Running an Open Space Technology (inspired) Session Online Using Zoom Breakouts for a Large-Scale Community Learning and Good Practice Exchange
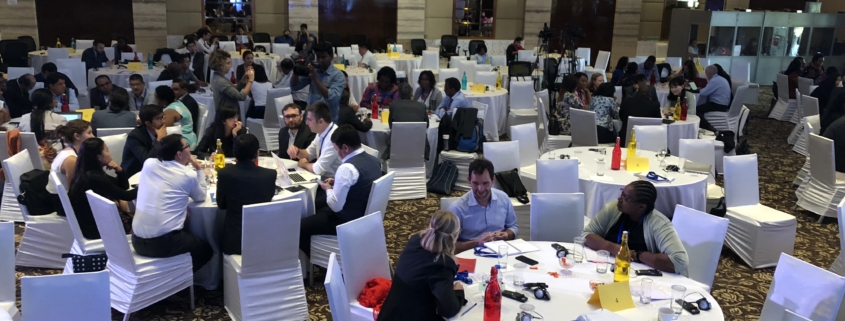
If you can’t run your Open Space session in real life (like this), how can you do it virtually?
This is a very detailed account of how to use Zoom and the Breakout room function to replicate Open Space Technology-like sessions online.
Executive Summary:
- You can run Open Space Technology (OST)-inspired Sessions in Zoom with large groups using the breakout rooms function.
- Pre-assigning people to our 10 groups didn’t work for us, so we assigned them manually once the session opened.
- To do this, participants need to log-in early and you need a specially formatted excel list of names to make manual allocation most efficient.
- Don’t change Zoom Host rights in the middle of preparing the groups, how to prepare and other learning.
If you might be tempted to run something similar in the future, read on…
Recently we ran an online peer learning and good practice exchange for a specialized global biodiversity community whose 350+ members normally meet bi-annually face-to-face. At these conferences, there has traditionally been an Open Space Technology session where community members share their work, learning and big questions on a set of salient topics. We wanted to replicate the dynamic of this virtually in an online event featuring a number of rounds of hosted small group discussions offered in parallel. For each round, participants chose the small group discussion to attend which was of most interest. This blog post shares ‘how to’ information and some learning from our experience doing this.
Using Zoom Breakouts for Parallel Small Group Discussions
We chose Zoom as the platform because of the breakout room function which allows you to designate up to 50 separate breakout sessions that can run in parallel at any one time. We had 10 topical discussions that we wanted to host, and we wanted to run two consecutive rounds (e.g. people picked one topic to attend for Round A, and then, after a break, they attended a different topical discussion for Round B). We ran the whole sequence of two rounds twice to accommodate participants in different time zones. People could attend one or the other, and a few people attended both.
The schedule looked like this:
Session 1 (09:45 – 12:00)
- Check-in (09:45 – 15 minutes in advance of the opening to set up breakouts for Round A)
- Plenary opening and how the exchange will work (15 minutes)
- Move people into breakout groups
- Round A: 10 topics in parallel (40 minutes)
- Break (15 minutes – people stay connected – create breakouts for Round B)
- Move people into breakout groups
- Round B: 10 topics in parallel (40 minutes)
- Plenary highlights and closing
Session 2 (15:45 – 18:00) (Repeat as above)
Preparation – 7 Steps
To prepare for the Community Exchange, there were a number of steps we needed to follow:
Step 1: Pick the topics. This was done based on feedback from the community, from which the organizer selected the 10 topics.
Step 2: Identify a discussion host for each topic. The organizer identified country representatives and global team members from within the network who had expertise in one of the topics and invited them to host that small group discussion.
Step 3: Schedule the Zoom session(s). The Host does this (in this case it was me, the facilitator). As these were large group sessions (from 60-100 people expected at each session), we enabled the Registration, Password, and the Waiting Room features of Zoom. For Registration we asked for name, country, and organization. In Zoom, the Registration feature enables a two-step process – once people fill in the online registration form, they automatically receive an email with a link and password to the Zoom meeting.
Step 4: Send out an announcement with event information to the network, with: 1) The Zoom link that takes them to the registration page; 2) A link to a google form asking people to select their top 5 topics from a drop-down list of the topics on offer; 3) Information about how it will work – for example, tell people that you will do your best to place them in one of their top 5 choices for each round, and that if they do not specify preferences, they will be put in a group at random on the day.
(Note: This was one of the lessons – while 100% of people registered to attend (you can’t join the Zoom meeting without doing that), only around 50% of people filled in the google form to indicate their preferences. The others just showed up, so they were randomly placed in rooms which takes extra time. We will do this differently next time as we want more people to identify their topics in advance so discussions can be more focused – how, is explained at the end of this post.)
Step 5: Prepare your topic discussion hosts. For this step we organized three 30-minute Zoom sessions where the hosts of the 10 topics, as well as the organizer’s team (who supported the discussion hosts) were invited to attend a preparatory session. During this short session, we talked through the schedule, their role and responsibilities, and then let them experience the breakout room function from both a participant perspective, as well as a Co-host perspective, as we made all these people Co-hosts once the meeting started. They learned how to share their screen, use some of the Zoon security functions, etc.
Step 6: Put together the participant lists by topic. We needed to make 2 Lists for things to work smoothly. This was a particularly important step! Once people filled in the google form with their preferences, we put together an excel worksheet for each session (Session 1 and 2) and round (A and B) within each session (so four worksheets in total.)
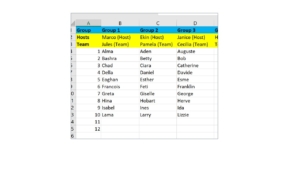
Each worksheet had 2 Lists. For List 1, we created a column for each of the 10 topics on offer during that specific round, the host for the topic and the team support person, followed by the list of people who signed up for that topic as their first choice. This helped us initially place people, as well as see how many people were signed up for each conversation. (click on images to enlarge)
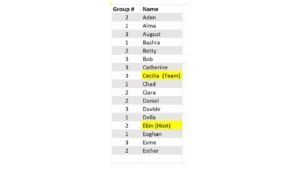
List 1 was useful to see how the groups were shaping up as we had a limit of 12 people per group. Once full, we would put people in their second choice group. List 2 was more important on the day for putting people into the breakout rooms. This list was a master list of all the people who had signed up for a topic, organized in a column alphabetized by FIRST name (as that is how the Host sees names in Zoom), preceded by another column with their topic number.
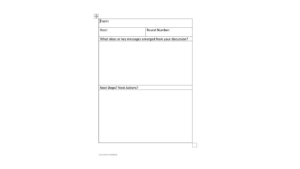
Step 7: Prepare the facilitation materials. We wanted to use a Zoom poll at the beginning of our session to map the group and see who was “in the room” (we asked about region, sector, etc.) and we scheduled a short poll at the end to understand people’s experiences – e.g. to see on a Likert scale how well people felt they could share their learning and experience in this format, and if they learned something new. We also created a simple word template for topic hosts to capture take away messages and next steps from their discussions. We sent this template in advance and asked them to fill it in after their sessions and send it back for reporting purposes.
What we learned about assigning breakout rooms – before or on the spot?
One thing that we did NOT do in preparation was set up the breakout rooms in advance in Zoom. It is very tempting to try to “pre-assign” the rooms in Zoom, especially when you have 60-100 people attending. Ostensibly to do this, when scheduling your meeting, you can choose under meeting options “Breakout Room pre-assign,” and Zoom offers you two ways to do this. That seems so easy, but in our tests this didn’t function reliably. I did two tests in advance, one using the option which invites you to “Create Rooms” and the other option with “Import from CSV” – CSV is a simple excel-like spread sheet. I had 5 people for each test meeting.
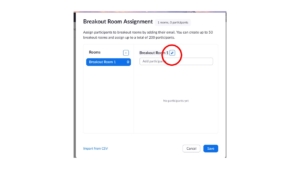
With the first “Create Rooms” option, you get a pop up that invites you to “Assign participants to breakout rooms by adding their email”. I did this for my 5 people. I changed the names of the meeting rooms in advance which you can do to match the topic names. Tip: Keep the group number in front of the topic name as that will make it easier later to find them. (“1. Green Bonds”) This will sound silly, but it took me AGES to find how to edit the room names – you need to go to the “Add participant” window and then hover over the room name for the little pencil to pop up.
So, the room was set up – now to see if it worked… Unfortunately, when I opened the breakout rooms for this first test meeting, only 1 of my 5 people had been pre-assigned into the designated room. The others were frustratingly unassigned – 20% success.
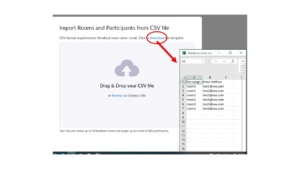
The second option to pre-assign people to breakouts is to use the CSV format. If you click on that option, it invites you to “Import rooms and participants from CSV File”. It also offers you a simple downloadable CSV file template to fill in.
I downloaded the file and put in the email addresses of my 5 people. In this second test, I got 3 out of the 5 people in the breakout rooms as pre-assigned. Better but still not 100%. And we could not figure out why this variation was happening even among 6 experienced Zoom users. As we had a large group, it felt too risky to wait and see if it would work on the day – who would be assigned and who wouldn’t be, and then try to fill in the gaps.
There are a couple of things to note about the Zoom breakout room function that figure in here:
- People need to be signed into their Zoom account for pre-assignments to be applied.
- You need to enable “join before host” for this feature to work (don’t ask me why)
- (from the Zoom website) If you have Registration enabled and have external participants (those without Zoom accounts), you need to assign them to breakouts during the meeting.
It seems like pre-assignment option might work better if you have a closed system – just a group of colleagues sharing a company zoom account, or a class of students who are taking the same class week after week. This was not our case.
As we could not do a test with a very large group, the pre-assignment feature seemed to have a lot of caveats. We were enabling Registration for security purposes, AND we had two rounds per session, so we would have to manually allocate participants for Round B anyways (you cannot pre-assign two consecutive breakout sessions if you want to change the people in the groups). As a result, we decided to manually allocate participants to their selected breakout rooms, using the two lists described above.
What to Do During the Zoom Community Exchange Meeting
We opened the meeting 30 minutes in advance for organizers, the discussion hosts and the team members who would support them. I had enabled the Waiting Room, creating two-step process to join the meeting – first you enter the Waiting Room and then the host lets you into the main room. I admitted the facilitation team into the main meeting room, and had the other participants stay in the Waiting Room until the official start of our event.
As the Host (and the Co-Hosts can do this too), you can admit people into the main room from the Waiting Room individually, or you can choose to let everyone in all at the same time. When people are in the Waiting Room, you can send them messages. I sent them a message every couple of minutes that said, “You are connected to our meeting. Please stay connected, we’ll start promptly.” (I wrote this text on the Notepad app on my computer and copied it, so I could just paste it in as a waiting room announcement periodically and not have to type it over and over.) Note: We needed all participants to connect early and stay connected so that we could create the breakout rooms, which you can start assigning when people are in the Waiting Room.
We let all the topic hosts and team members into the main room as soon as they showed up so that we could do some last-minute briefing and Q&A and make them all “Co-hosts”. We wanted them to be Co-hosts so they had some powers in the breakout rooms– that is, they could disable screen share for participants, move themselves to another room, etc. if needed.
As soon as participants started to show up in the Waiting Room, we began to use our lists to assign them to the various breakout rooms.
Tip: What it means to be “Host” when using breakout rooms
Only the Host of the meeting can work with the breakout rooms (e.g. name them, make assignments and move people around). And there can only be one Host for any meeting. The Host can give up her Host rights to another person but cannot take them back. The other person must give them back to you. This is important for creating the breakouts; you cannot start this work (renaming the breakout rooms and starting to assign people), and in the middle pass the Host responsibilities to another person without losing all the work you did.
The same Host needs to start and complete the breakout room assignment process. Then once the breakouts are launched, they can hand over hosting rights to another and nothing is disturbed. This means you cannot be smart and get in there early, name all the rooms, and assign the early people, then hand over hosting to another person to carry on while you brief people etc. Everything is lost and the new Host will start from scratch.
As a result, you really need two facilitators to work with Zoom in this way – so Lizzie and I teamed up to make it work smoothly. We asked participants to come in 15 minutes early, as you can only assign them to their breakouts once they are logged into the meeting (they can be in the Waiting Room). But not everyone was there 15 minutes early; many people came in at the last minute, and some people joined 10 minutes late! So, if you are the main facilitator (this was my role) opening the meeting, welcoming people, giving the first presentation and poll etc. then you need a second, technical facilitator who can take over as Host (this was Lizzie’s role) that can complete the breakout room assignments with the people trickling in after the meeting starts. The alternative is to not finish the breakout assignments and ask people to wait while you do that (time for a musical interlude?) OR keep all those unassigned people in the main room once the groups start and then assign the latecomers after that, which means they will start late. As we did not know how many people might be in this category, we decided to use two facilitators and have one solely dedicated to putting together the breakout groups.
Behind the scenes – assigning people to breakouts
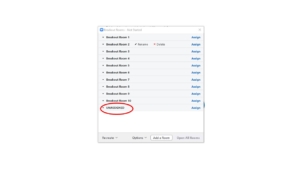
The Host assigning people to breakouts needs to have the two lists described above and needs to work quickly with the long list of names. In our case, part of which had signed up for a specific topical discussion, and part of which had not, thus would be randomly assigned to rooms. One thing that we discovered to dramatically increase efficiency at this stage was to create 1 more breakout room than needed (e.g. we needed 10 topical breakout rooms and we created 11 rooms), the final room was called “UNASSIGNED”.
As people logged into the meeting, the Host located their name on the long alphabetized list, along with their group number, and immediately placed them in the right room. However, if someone came in that had not signed up for a group, they were immediately placed in the UNASSIGNED room. This meant that at the very end, just before launching the breakout groups, you could see exactly how many people were in each group that had signed up in advance, see the total number of those in the unassigned room. You can then quickly move those from the unassigned room to fill in open spaces in the first 10 groups – we aimed to fill all rooms up equally with the same number of participants.
In the end, it worked just fine. We had enough time in the 15 minutes before (and well into the opening) to make Round A assignments manually, and had enough time in the 15-minute break between rounds to make the second set of assignments for Round B. We asked people NOT to disconnect during the break. Of course, a few did, but we manually added them into groups once they logged back in.
Last thoughts
Languages: We had some people for whom translation would have been useful. If you enable Interpretation on Zoom, it only works in the main room – thus in theory you could keep the group needing translation in the main “plenary”. For a large group this would not have been a great option, as there was a small but steady stream of people who lost connection and kept coming back into the main room, to be sent again to their breakouts. This would have been very disruptive for the group trying to work in the main room (with translation no less!) It might be easier to have a “whisper” interpreter (professional or informal) in the same breakout room with the person desiring translation support, and between the two or more of them, they set up a back channel for communication, such as a WhatsApp call or a phone call. Through Zoom they can see what is going on in their breakout room, but the audio is now coming from another source (mobile phone). The person could still unmute to ask questions, and the interpreter could sequentially translate these for the group, then they could both go back on mute and resume interpretation. This is a work-around, but we thought it might work.
Technical Support: For a large group you really need ongoing technical support throughout the session. In addition to our two Facilitators, we had one person from the organizer team designated for tech support and provided his email address. Occasionally someone without sound or another problem would contact him either through chat or by email and they would work with together to try to get the person properly connected. Also, while the breakout groups were in session, as the Facilitator, I stayed in the main room and responded to requests for help, or let people in from the Waiting Room who were late, or had gotten disconnected, placing them back in the breakout rooms. At times, I would have up to 4 people briefly in the main room before moving them back into a breakout room. Our participant group was logging in from all over the world, with almost all of them working from home offices and laptops, so occasionally there were connectivity or other problems.
Also, under this technical support heading, it has to be mentioned that we did find that people using Chrome OS, Chrome Book and Zoom Rooms could not be placed in breakouts, no matter how hard we tried. After some struggles, we found this mentioned on the Zoom website. These people needed to log out and log in again using a different pathway. And finally, for a couple of people, no matter what they did, and what we did, they were either perpetually stuck in the Waiting Room, or in the plenary room and there was simply nothing we could do. This mysterious situation befell only 1 or 2 people with whom I had nice chats as I waited with them for the breakouts to end – interestingly, for the second rounds, they both moved smoothly into the breakout rooms with no problem. You have to just keep trying.
Overall, the sessions were very dynamic and the feedback from participants has been enthusiastic! The breakout rooms worked very well overall, with only some coming and going which was only obvious to me as the Host. To reduce movement in and out of the breakout rooms and to encourage people to settle into their discussions, we did disable the setting allowing people to come back to the main room on their own (now they needed to wait until they were automatically moved back by me). We also reduced the friction for new Zoomers by moving people to the breakouts automatically (this is also a setting when you are creating breakouts), versus requiring them to click on a pop-up asking them if they want to Join Group X.
One thing to try next time – Custom Questions for Registration
One thing to consider next time, to encourage people to register their topic preferences and have less people in the unassigned category to allocate, we will use the Zoom Meeting Registration process to embed the questions about which group people would like to join, instead asking people to separately respond in a google form.
Here is how to do that:
- Enable Registration
- Under “Manage my Meeting”, scroll down to “Registration” at the bottom of the page
- Click “Edit” on the right, that opens a pop-up window
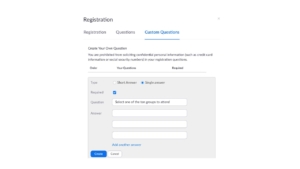
- Go to “Custom Questions” – this adds questions that you want people to answer during the registration process.
- Under “Create Your Own Question” click on “New Question”
- There you can add a question of your choice. For us, we would want to require a “Single Answer” (so people have to pick one, versus “short answer” where people write in responses. You simply type in the question – e.g. “Select your first choice from the following ten themes”. Then add additional questions asking people to select their second and third choices. You can write in the 10 themes as answers to choose from.
This would make sure that everyone who signed up could be placed quickly into a group. Of course, one of the answers could be “Surprise Me!” if people really don’t care, and then you could place that person anywhere.
This was a long post, as we learned a great deal from running our Community Exchange in an Open Space Technology-inspired format. As this group intends to replicate this model at the regional level in their network, and for others who may want to try, I wanted to write down the steps before I forgot them!



I just read a great hack to moving people, particularly if you want people to be able to pick a room on the spot, rather than have them sign up in advance. You number the rooms (1. Green Bonds; 2.Subsidies, …etc.) and then ask participants to rename themselves, putting the number of the room they want to go to in front of their name. This reorders them, and then the technical facilitator (Host) can quickly move them to the right room. If you do NOT disable people’s right to move back and forth from the main room to the breakout, then people who might want to try another discussion can simply leave their breakout and once in the plenary, you can put them in another room. That sounds interesting to me. Of course, if you have a very large group this will still take some time, so people will need to wait while the tech facilitator moves them (at that time the facilitator can be talking, giving instructions etc.) Great idea if you want to give people an on-the-spot choice – thanks to the Facilitators for Covid Response network for sharing the idea!
Hi Gillian. What a great and useful article! I used it the first time I needed to organise break-out rooms in Zoom, and I have found myself going back to it every time to remember how to do it. Thanks! Pete
Hi Pete, I am very happy that the article is useful – thanks so much for your comment!