The Climate Change Playbook

This post is generally translating “serious games” (games with learning messages) that we normally play in face-to-face settings into versions that can be played in a Zoom or other online evironment. Here I am writing specifically about games in the Systems Thinking Playbook and the Climate Change Playbook, the latter of which I wrote with two co-authors Dennis Meadows and Linda Booth Sweeney.

Recently I attended an online seminar, hosted by the Systems Dynamics Society and Linda, about how to use Playbook games online. These books are great resources for face-to-face workshops, but in Covid times these are virtually non-exoistent. As we all move online, Linda shared how she is using some of the games in virtual environments. We played Arms Crossed, Circles in the Air, and Paper Tear and they mapped over easily and effectively. It got me thinking about how to translate some of the longer and more complex games into Zoom workshops. I fully believe that every game can somehow have a virtual counterpart, with some creativity! Three of my favorite games are Triangles, Speed Catch, and Thumbwrestling. In this blog post I will write about Triangles. In subsequent posts I will tackle Speed Catch and Thumbwrestling.

A Few General Comments

1) Different Kinds of Games

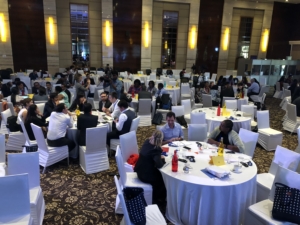
In the Climate Change Playbook, we divide the 22 games into three categories: Mass games, Demonstration games and Participation games. Mass games are those that can be played by very large groups of participants, for example in conferences or during presentations or lectures. People can be seated in theatre style or around tables and everyone plays.

These Mass games translate rather easily into virtual environments as there is a game leader who provides instructions and people follow these. Examples from the books are Circles in the Air, Arms Crossed and Frames. These games are played by individuals, although there can be some that benefit additionally from group play for deriving lessons, like 1,2,3 Go! or Paper Tear.

With Demonstration games, you can get a lot out of them by simply watching – if you have a small group then everyone can play, but if you have a large group then a subset of the group can play and others can watch and learning can come from either role (player or observer). For many of these kinds of games, you can use videos that are already online to show people parts of the game, stop the video, ask some questions, and then go on. Thumbwrestling is one of these. We call it a Mass game in the book because you can do it in an audience by playing with someone next to you, but because on Zoom you don’t have anyone next to you, I will move it to this category for now.

For Participation games, these can be played by larger groups (up to 30 we say) but learning really comes from participation, and “observation only” provides less value to participants. Triangles and Speed Catch are examples of Participation Games.

The games I want to makeover fall into the Demonstration and Participation game categories.

 2) Time for Debriefing

Virtual workshops and meetings tend to be shorter. People are regularly compressing 1.5 day workshops into a 2-3 hours session. As a result, it might be tempting to reduce the games and skip the debriefing. However, debriefing is the MOST important part of the game. The game mechanics show a dynamic that you then learn from through reflection and discussion. So it is really important to preserve the time after the game for the debriefing discussion. During our Systems Dynamics Society workshop we used Zoom breakouts to debrief the Paper Tear game in smaller groups of 3-4 so that everyone could talk (we were around 115 people). If your group is small to begin with, then this could be done in plenary. The key is that you use your powerful debriefing questions to do some mining of the game experience for the key messages and lessons you are trying to surface.

3) Consider the Environment

If you are doing a Mass game, for example, that depends on your demonstrating something (asking people to draw a circle on the ceiling, or cross their arms, etc.) you need to consider your own environment, camera angle, your distance from your video camera, etc. so that people can effectively see and hear what you are doing. As such, you need to test this, with your camera on, in advance so that you can see what other’s are seeing. You need to make sure you are not crossing your arms too low and out of the camera view (Arms Crossed), or that you are not too close to your camera for people to see your arm making a gesture towards the ceiling, that you want others to make (Circles in the Air).

Consider also that people may be connecting from different devices. Some people might be with you on their mobile phones, or on an ipad, with a smaller screen. As a result, it is important to speak the whole time you are showing people what to do – describe vividly what you are doing, so that even if they cannot see you well, they can still follow you.

Making Over Games to Virtual Environmets

Making “over” games is similar to making them in the first place. You have to think first about the message you want to get across, then think about a dynamic that can do that (with debriefing questions), and then you make the game. It is not always easy to do that, game design is a skill. In translating the following games into a virtual environment, I started by thinking about the games I wanted to redesign in this way.

What follows below is not a complete game description, for that you have the book (hopefully!) but will get you started thinking about how to do this, and maybe give you some ideas of how you can make over some of your own favorite workshop games.

Triangles: Makeover for Virtual Play

The Triangles game shows, among other things, how interconnected players are and how they form a system. It sets up a system in which you (the game administrator) intervene and can show how a change in one part of the system may or may not impact another part of the system (depending on the rules), and it can show delays in that things may change gradually and unexpectedly and not all at once. It helps explore leverage points – places where you can make large changes (if that is your goal), or no changes to a system (if that is your goal) – illustrating high or low leverage.

In the face-to-face (F2F) version of this game, people initially stand in a circle to set up the game. They select two reference points (people) around the circle and, once the game begins, are instructed to stand equidistant between those two people, making a triangle as needed to maintain equal distance. People move and the system starts to move. People laugh and try to maintain equidistance even when others continue to move and shift. Eventually the system settles and the game administrator can make changes to the system (moving selected individuals) to see how it reacts.   In the F2F version, you can add instructions at the start for people to select some characteristic (“pick someone with glasses as one of your reference points”), or NOT to select another characteristic (someone wearing red). So that you know when you move these people there will be a large change or no change.

How on earth could you do this virtually when people are sitting all over the world behind their computers???

Here’s one way:

Using a Google Jamboard or Miro or another white board tool on which people can interact. Set up a page in advance (or if people are used to the tool, they can create their own “avatar” post-it) with one post-it for each person. Start in the circle.

When you set up the Jamboard in advance, you need to change the settings so that everyone with a link can edit. Then you can share the link in the chat window during your workshop, have people click it, and then they are on your Jamboard and can participate, and are still connected with Zoom (for example).  At this point I would ask people to unmute themselves so that you can hear what is going on while people are playing (laughter or frustration) but you need to tell people that they should ideally not talk while playing the game.

Now you can provide the same instructions as in the F2F version, with some modifications. Once the game starts they will move the post-it with their name only when you say “Go”. They first need to pick two reference points (two names on post-its in the circle) and not tell anyone. Once you say “Go” they will need to move the post-it with their name (their “avatar”) so that it is equidistance between their two reference points. You can also add some qualifiers BEFORE people pick – e.g. make sure one of your reference points is orange, and don’t pick one that is yellow. I would say not to “personalise” it too much by using people’s names (same in the 3D version of the game).

When you say “Go” people will start to move their post-it avatars and things will get messy for a while. Then the system will settle probably spread out all over the Jamboard or Miro board. Once it has settled you can reinforce this by saying “STOP” and tell people that you, the game administrator, will intervene and make a change in their system and that they should just let this happen and not move anything. You now make a change (tell the person that you will be moving their post-it) – then move one of the post-its to another part of the Board. Then you ask them to again be equidistance between their two reference points. If you have selected one of the colours that no one has chosen (yellow), then nothing happens. If you choose an orange post-it, then chances are that everyone will have to move again. You can observe delays, where people initially don’t have to move, but eventually their two reference points are affected and they do. The general dynamics of the game should show up as you intervene a couple of times and in different ways. The debriefing can follow the book at this point. What real life behaviours does this exercise remind you of? Where have you seen high or low-influence individuals or policies in your own organization? etc…

Curious? Try it and leave some comments on your experiences.

I have also thought about a way to run Speed Catch and Thumbwrestling which I will write about later, this post is already pretty long!

This post isn’t about how to run training in Japan, it’s about how to get your body ready to do training in Japan, if you live 7 time zones away in Switzerland.

Normally, I would be enjoying a Bento box right now in Tokyo, preparing with my Japanese co-trainer, the interpretation team, and colleagues there for 3 full days of facilitation training for a large group of local facilitators and change agents.

I’m still doing that, at least most of it, except I’m eating muesli, it’s 3:30am and I’m still in Geneva.

For the last few years, I’ve had the great pleasure to join Change Agent Inc. to deliver a Foundations of Facilitation training programme in Japan.  This year, as with many other programmes affected by Covid-19, we are taking the training into virtual space. All the preparations are going well, the content is tight, and we are all now seasoned at online delivery from a technical standpoint. But biological? I will be delivering training for 8 hours a day, from 2:30am-10:30am, for 3 days. This is not a one-off 90-minute webinar in JST – this takes more thorough preparation to get body and mind ready for this.

“Have fun in Japan!”

That’s what my husband said to me last night at 7pm as I walked down the stairs to the basement bedroom, arms laden with clothes, pillows, and cables. Not quite the expertly packed samsonite that I would have been taking on a long-haul JAL flight to Narita. At least I can pop back for my forgotten toothbrush in 2 minutes. By 7:30pm I would be asleep.

Now at 3:30am I am up and at my desk. This is Day 4 of my preparation to be on Japan time by Wednesday.  I have 2 more days to get to the point where I am asleep by 5:30pm and up at 1:30am and ready for work by 2am for last minute tech and sound check, with a “go live” at 2:30am.

I have been following this schedule, which I planned weeks in advance, to gradually shift my normal 10pm sleep time up, and retain an 8-hour sleep window each night as much as possible:

  • Starting point: 10pm sleep – 6am awake
  • Day 1: 9pm sleep – 5am awake
  • Day 2: 8pm sleep – 4am awake
  • Day 3: 8pm sleep – 4am awake
  • Day 4: 7:30pm sleep – 3:30am awake
  • Day 5: 6pm sleep – 2am awake
  • Day 6: Ending point: 5:30pm sleep – 1:30am awake
  • Repeat for Training for 3 days

So far on Day 4 I am on track, and although I am still a big foggy in those early hours, it wasn’t that hard to get to sleep and get up early as the change has been gradual. The house is quiet and a little creepy at this time of night and I have to be careful not to make noise and wake up others. In a reflective moment, just me and the other noctural animals, here are a few observations:

After Day 3, your hours are anti-social. The alarm wakes others up and moving around to get dressed is bothersome. Others will also wake you up when they go to bed later, which can affect your sleep. So, at this point, you will need to move to another room in the house, if you can, if you are co-habitating.

“Jet lag” will present itself in other ways. You will eat breakfast in the middle of the night and have lunch when people are having breakfast, and dinner will be at the time of a mid-afternoon snack. That will be weird, and you won’t be very hungry at those odd times. But you need to eat or else you will be starving at midnight and that will wake you up. You also can’t rely on the sunshine to get your body on track as you would if you were onsite – try to go outdoors when you can as soon as it is light, and have a good dark room with blackout blinds for sleep if needed.

Your periods of overlap with others IRL will reduce dramatically. No evening television, no family meals for a few nights. You’re basically gone if others go off to work or school during the day. Just as though you got on that plane. You need to make arrangements for others to take over things that you might normally do in the evening. Tell friends who call and text you regularly in the evening that you won’t be available as normal.

Protect the rest of your day. It is tempting to take on additional meetings or work during the “regular” workday after your training ends at 10am. You could effectively be working every minute of your waking hours if you are not careful. A meeting from noon to 2pm after your training seems perfectly logical and you have that time free in your calendar, right? But you have to remember that you will have just worked a 10-hour day, and that will be like scheduling every waking moment. I guarantee that this is hard to explain to colleagues who wonder why you can’t join their meeting even though you are done with your training and not yet sleeping, and it’s only 4pm.

Take it seriously. It is pretty easy to let things slide and default to normal in the run up to your workshops, but the result could be a zombie on the training team sitting on the other side of the video camera that makes little sense in English and even less when translated into Japanese. This is part of the preparation stage of facilitation and training processes, so needs to be built into your schedule, recorded in your agenda, with all alarms set and followed.

I’m excited about the training course, it will be enormously fun and full of learning. I am a little more nervous about this biological part as this is the first time I have had to get my European body on to Japan time without physically moving it, and I want to do this in a mindful and structured way. Maybe tomorrow when I get up at 2am, I will start thinking about how to reverse my schedule to get me back on to Central European Time at the end of it all…


If you can’t run your Open Space session in real life (like this), how can you do it virtually?

This is a very detailed account of how to use Zoom and the Breakout room function to replicate Open Space Technology-like sessions online.

Executive Summary:

  • You can run Open Space Technology (OST)-inspired Sessions in Zoom with large groups using the breakout rooms function.
  • Pre-assigning people to our 10 groups didn’t work for us, so we assigned them manually once the session opened.
  • To do this, participants need to log-in early and you need a specially formatted excel list of names to make manual allocation most efficient.
  • Don’t change Zoom Host rights in the middle of preparing the groups, how to prepare and other learning.


If you might be tempted to run something similar in the future, read on…


Recently we ran an online peer learning and good practice exchange for a specialized global biodiversity community whose 350+ members normally meet bi-annually face-to-face. At these conferences, there has traditionally been an Open Space Technology session where community members share their work, learning and big questions on a set of salient topics. We wanted to replicate the dynamic of this virtually in an online event featuring a number of rounds of hosted small group discussions offered in parallel. For each round, participants chose the small group discussion to attend which was of most interest. This blog post shares ‘how to’ information and some learning from our experience doing this.

Using Zoom Breakouts for Parallel Small Group Discussions

We chose Zoom as the platform because of the breakout room function which allows you to designate up to 50 separate breakout sessions that can run in parallel at any one time. We had 10 topical discussions that we wanted to host, and we wanted to run two consecutive rounds (e.g. people picked one topic to attend for Round A, and then, after a break, they attended a different topical discussion for Round B). We ran the whole sequence of two rounds twice to accommodate participants in different time zones.  People could attend one or the other, and a few people attended both.

The schedule looked like this:

Session 1 (09:45 – 12:00)

  • Check-in (09:45 – 15 minutes in advance of the opening to set up breakouts for Round A)
  • Plenary opening and how the exchange will work (15 minutes)
  • Move people into breakout groups
  • Round A: 10 topics in parallel (40 minutes)
  • Break (15 minutes – people stay connected – create breakouts for Round B)
  • Move people into breakout groups
  • Round B: 10 topics in parallel (40 minutes)
  • Plenary highlights and closing

Session 2 (15:45 – 18:00) (Repeat as above)

Preparation – 7 Steps

To prepare for the Community Exchange, there were a number of steps we needed to follow:

Step 1: Pick the topics. This was done based on feedback from the community, from which the organizer selected the 10 topics.

Step 2: Identify a discussion host for each topic. The organizer identified country representatives and global team members from within the network who had expertise in one of the topics and invited them to host that small group discussion.

Step 3: Schedule the Zoom session(s). The Host does this (in this case it was me, the facilitator). As these were large group sessions (from 60-100 people expected at each session), we enabled the Registration, Password, and the Waiting Room features of Zoom. For Registration we asked for name, country, and organization. In Zoom, the Registration feature enables a two-step process – once people fill in the online registration form, they automatically receive an email with a link and password to the Zoom meeting.

Step 4: Send out an announcement with event information to the network, with: 1) The Zoom link that takes them to the registration page;  2) A link to a google form asking people to select their top 5 topics from a drop-down list of the topics on offer; 3) Information about how it will work – for example, tell people that you will do your best to place them in one of their top 5 choices for each round, and that if they do not specify preferences, they will be put in a group at random on the day.

(Note: This was one of the lessons – while 100% of people registered to attend (you can’t join the Zoom meeting without doing that), only around 50% of people filled in the google form to indicate their preferences. The others just showed up, so they were randomly placed in rooms which takes extra time. We will do this differently next time as we want more people to identify their topics in advance so discussions can be more focused – how, is explained at the end of this post.)

Step 5: Prepare your topic discussion hosts. For this step we organized three 30-minute Zoom sessions where the hosts of the 10 topics, as well as the organizer’s team (who supported the discussion hosts) were invited to attend a preparatory session. During this short session, we talked through the schedule, their role and responsibilities, and then let them experience the breakout room function from both a participant perspective, as well as a Co-host perspective, as we made all these people Co-hosts once the meeting started. They learned how to share their screen, use some of the Zoon security functions, etc.

Step 6: Put together the participant lists by topic. We needed to make 2 Lists for things to work smoothly. This was a particularly important step! Once people filled in the google form with their preferences, we put together an excel worksheet for each session (Session 1 and 2) and round (A and B) within each session (so four worksheets in total.)

Each worksheet had 2 Lists. For List 1, we created a column for each of the 10 topics on offer during that specific round, the host for the topic and the team support person, followed by the list of people who signed up for that topic as their first choice.  This helped us initially place people, as well as see how many people were signed up for each conversation. (click on images to enlarge)
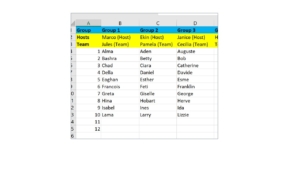
List 1 was useful to see how the groups were shaping up as we had a limit of 12 people per group. Once full, we would put people in their second choice group.  List 2 was more important on the day for putting people into the breakout rooms. This list was a master list of all the people who had signed up for a topic, organized in a column alphabetized by FIRST name (as that is how the Host sees names in Zoom), preceded by another column with their topic number.
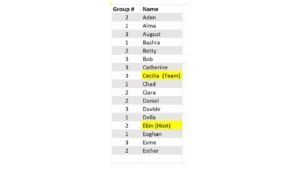
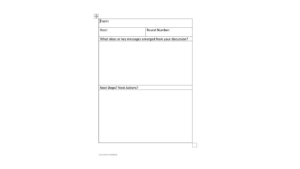
Step 7: Prepare the facilitation materials. We wanted to use a Zoom poll at the beginning of our session to map the group and see who was “in the room” (we asked about region, sector, etc.) and we scheduled a short poll at the end to understand people’s experiences – e.g. to see on a Likert scale how well people felt they could share their learning and experience in this format, and if they learned something new. We also created a simple word template for topic hosts to capture take away messages and next steps from their discussions. We sent this template in advance and asked them to fill it in after their sessions and send it back for reporting purposes.


What we learned about assigning breakout rooms – before or on the spot?

One thing that we did NOT do in preparation was set up the breakout rooms in advance in Zoom. It is very tempting to try to “pre-assign” the rooms in Zoom, especially when you have 60-100 people attending. Ostensibly to do this, when scheduling your meeting, you can choose under meeting options “Breakout Room pre-assign,” and Zoom offers you two ways to do this. That seems so easy, but in our tests this didn’t function reliably. I did two tests in advance, one using the option which invites you to “Create Rooms” and the other option with “Import from CSV” – CSV is a simple excel-like spread sheet. I had 5 people for each test meeting.

With the first “Create Rooms” option, you get a pop up that invites you to “Assign participants to breakout rooms by adding their email”. I did this for my 5 people. I changed the names of the meeting rooms in advance which you can do to match the topic names. Tip: Keep the group number in front of the topic name as that will make it easier later to find them. (“1. Green Bonds”) This will sound silly, but it took me AGES to find how to edit the room names – you need to go to the “Add participant” window and then hover over the room name for the little pencil to pop up.
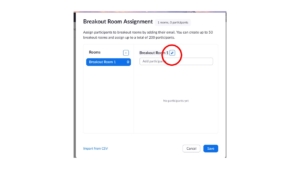
So, the room was set up – now to see if it worked… Unfortunately, when I opened the breakout rooms for this first test meeting, only 1 of my 5 people had been pre-assigned into the designated room. The others were frustratingly unassigned – 20% success.

The second option to pre-assign people to breakouts is to use the CSV format. If you click on that option, it invites you to “Import rooms and participants from CSV File”. It also offers you a simple downloadable CSV file template to fill in.
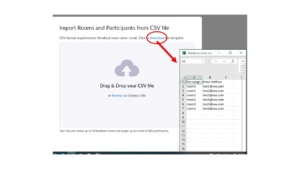
I downloaded the file and put in the email addresses of my 5 people. In this second test, I got 3 out of the 5 people in the breakout rooms as pre-assigned. Better but still not 100%. And we could not figure out why this variation was happening even among 6 experienced Zoom users. As we had a large group, it felt too risky to wait and see if it would work on the day – who would be assigned and who wouldn’t be, and then try to fill in the gaps.

There are a couple of things to note about the Zoom breakout room function that figure in here:

  • People need to be signed into their Zoom account for pre-assignments to be applied.
  • You need to enable “join before host” for this feature to work (don’t ask me why)
  • (from the Zoom website) If you have Registration enabled and have external participants (those without Zoom accounts), you need to assign them to breakouts during the meeting.

It seems like pre-assignment option might work better if you have a closed system – just a group of colleagues sharing a company zoom account, or a class of students who are taking the same class week after week. This was not our case.

As we could not do a test with a very large group, the pre-assignment feature seemed to have a lot of caveats. We were enabling Registration for security purposes, AND we had two rounds per session, so we would have to manually allocate participants for Round B anyways (you cannot pre-assign two consecutive breakout sessions if you want to change the people in the groups). As a result, we decided to manually allocate participants to their selected breakout rooms, using the two lists described above.

What to Do During the Zoom Community Exchange Meeting

We opened the meeting 30 minutes in advance for organizers, the discussion hosts and the team members who would support them. I had enabled the Waiting Room, creating two-step process to join the meeting – first you enter the Waiting Room and then the host lets you into the main room. I admitted the facilitation team into the main meeting room, and had the other participants stay in the Waiting Room until the official start of our event.

As the Host (and the Co-Hosts can do this too), you can admit people into the main room from the Waiting Room individually, or you can choose to let everyone in all at the same time. When people are in the Waiting Room, you can send them messages. I sent them a message every couple of minutes that said, “You are connected to our meeting. Please stay connected, we’ll start promptly.” (I wrote this text on the Notepad app on my computer and copied it, so I could just paste it in as a waiting room announcement periodically and not have to type it over and over.) Note: We needed all participants to connect early and stay connected so that we could create the breakout rooms, which you can start assigning when people are in the Waiting Room.

We let all the topic hosts and team members into the main room as soon as they showed up so that we could do some last-minute briefing and Q&A and make them all “Co-hosts”. We wanted them to be Co-hosts so they had some powers in the breakout rooms– that is, they could disable screen share for participants, move themselves to another room, etc. if needed.

As soon as participants started to show up in the Waiting Room, we began to use our lists to assign them to the various breakout rooms.

Tip: What it means to be “Host” when using breakout rooms

Only the Host of the meeting can work with the breakout rooms (e.g. name them, make assignments and move people around). And there can only be one Host for any meeting. The Host can give up her Host rights to another person but cannot take them back. The other person must give them back to you. This is important for creating the breakouts; you cannot start this work (renaming the breakout rooms and starting to assign people), and in the middle pass the Host responsibilities to another person without losing all the work you did.

The same Host needs to start and complete the breakout room assignment process. Then once the breakouts are launched, they can hand over hosting rights to another and nothing is disturbed. This means you cannot be smart and get in there early, name all the rooms, and assign the early people, then hand over hosting to another person to carry on while you brief people etc. Everything is lost and the new Host will start from scratch.

As a result, you really need two facilitators to work with Zoom in this way – so Lizzie and I teamed up to make it work smoothly. We asked participants to come in 15 minutes early, as you can only assign them to their breakouts once they are logged into the meeting (they can be in the Waiting Room). But not everyone was there 15 minutes early; many people came in at the last minute, and some people joined 10 minutes late!  So, if you are the main facilitator (this was my role) opening the meeting, welcoming people, giving the first presentation and poll etc. then you need a second, technical facilitator who can take over as Host (this was Lizzie’s role) that can complete the breakout room assignments with the people trickling in after the meeting starts. The alternative is to not finish the breakout assignments and ask people to wait while you do that (time for a musical interlude?) OR keep all those unassigned people in the main room once the groups start and then assign the latecomers after that, which means they will start late. As we did not know how many people might be in this category, we decided to use two facilitators and have one solely dedicated to putting together the breakout groups.

Behind the scenes – assigning people to breakouts

The Host assigning people to breakouts needs to have the two lists described above and needs to work quickly with the long list of names. In our case, part of which had signed up for a specific topical discussion, and part of which had not, thus would be randomly assigned to rooms. One thing that we discovered to dramatically increase efficiency at this stage was to create 1 more breakout room than needed (e.g. we needed 10 topical breakout rooms and we created 11 rooms), the final room was called “UNASSIGNED”.
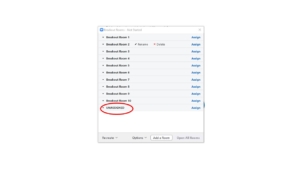
As people logged into the meeting, the Host located their name on the long alphabetized list, along with their group number, and immediately placed them in the right room. However, if someone came in that had not signed up for a group, they were immediately placed in the UNASSIGNED room. This meant that at the very end, just before launching the breakout groups, you could see exactly how many people were in each group that had signed up in advance, see the total number of those in the unassigned room. You can then quickly move those from the unassigned room to fill in open spaces in the first 10 groups – we aimed to fill all rooms up equally with the same number of participants.

In the end, it worked just fine. We had enough time in the 15 minutes before (and well into the opening) to make Round A assignments manually, and had enough time in the 15-minute break between rounds to make the second set of assignments for Round B. We asked people NOT to disconnect during the break. Of course, a few did, but we manually added them into groups once they logged back in.

Last thoughts

Languages: We had some people for whom translation would have been useful. If you enable Interpretation on Zoom, it only works in the main room – thus in theory you could keep the group needing translation in the main “plenary”. For a large group this would not have been a great option, as there was a small but steady stream of people who lost connection and kept coming back into the main room, to be sent again to their breakouts. This would have been very disruptive for the group trying to work in the main room (with translation no less!) It might be easier to have a “whisper” interpreter (professional or informal) in the same breakout room with the person desiring translation support, and between the two or more of them, they set up a back channel for communication, such as a WhatsApp call or a phone call. Through Zoom they can see what is going on in their breakout room, but the audio is now coming from another source (mobile phone).  The person could still unmute to ask questions, and the interpreter could sequentially translate these for the group, then they could both go back on mute and resume interpretation. This is a work-around, but we thought it might work.

Technical Support: For a large group you really need ongoing technical support throughout the session. In addition to our two Facilitators, we had one person from the organizer team designated for tech support and provided his email address. Occasionally someone without sound or another problem would contact him either through chat or by email and they would work with together to try to get the person properly connected.  Also, while the breakout groups were in session, as the Facilitator, I stayed in the main room and responded to requests for help, or let people in from the Waiting Room who were late, or had gotten disconnected, placing them back in the breakout rooms. At times, I would have up to 4 people briefly in the main room before moving them back into a breakout room.  Our participant group was logging in from all over the world, with almost all of them working from home offices and laptops, so occasionally there were connectivity or other problems.

Also, under this technical support heading, it has to be mentioned that we did find that people using Chrome OS, Chrome Book and Zoom Rooms could not be placed in breakouts, no matter how hard we tried. After some struggles, we found this mentioned on the Zoom website. These people needed to log out and log in again using a different pathway. And finally, for a couple of people, no matter what they did, and what we did, they were either perpetually stuck in the Waiting Room, or in the plenary room and there was simply nothing we could do. This mysterious situation befell only 1 or 2 people with whom I had nice chats as I waited with them for the breakouts to end – interestingly, for the second rounds, they both moved smoothly into the breakout rooms with no problem. You have to just keep trying.

Overall, the sessions were very dynamic and the feedback from participants has been enthusiastic! The breakout rooms worked very well overall, with only some coming and going which was only obvious to me as the Host. To reduce movement in and out of the breakout rooms and to encourage people to settle into their discussions, we did disable the setting allowing people to come back to the main room on their own (now they needed to wait until they were automatically moved back by me). We also reduced the friction for new Zoomers by moving people to the breakouts automatically (this is also a setting when you are creating breakouts), versus requiring them to click on a pop-up asking them if they want to Join Group X.

One thing to try next time – Custom Questions for Registration

One thing to consider next time, to encourage people to register their topic preferences and have less people in the unassigned category to allocate, we will use the Zoom Meeting Registration process to embed the questions about which group people would like to join, instead asking people to separately respond in a google form.

Here is how to do that:

  • Enable Registration
  • Under “Manage my Meeting”, scroll down to “Registration” at the bottom of the page
  • Click “Edit” on the right, that opens a pop-up window
  • Go to “Custom Questions” – this adds questions that you want people to answer during the registration process.
  • Under “Create Your Own Question” click on “New Question”
  • There you can add a question of your choice. For us, we would want to require a “Single Answer” (so people have to pick one, versus “short answer” where people write in responses. You simply type in the question – e.g. “Select your first choice from the following ten themes”. Then add additional questions asking people to select their second and third choices. You can write in the 10 themes as answers to choose from.
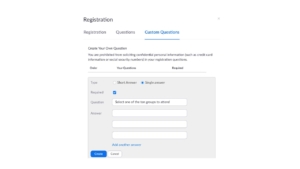
This would make sure that everyone who signed up could be placed quickly into a group. Of course, one of the answers could be “Surprise Me!” if people really don’t care, and then you could place that person anywhere.

This was a long post, as we learned a great deal from running our Community Exchange in an Open Space Technology-inspired format. As this group intends to replicate this model at the regional level in their network, and for others who may want to try, I wanted to write down the steps before I forgot them!

(Note: This blog post is long and detailed, and really only for facilitators or hosts who want to run bi-lingual meetings in Zoom. I’m capturing this learning mostly for myself so I can use it easily next time, and I’m happy to share with others exploring this useful functionality of Zoom. Feel free to ask questions in the comments, and I’ll do my best to answer.  Also, click on images to make them larger.)


My three, inter-connected virtual workshops this week were unique for a couple of reasons. First, I found it amusing that each workshop was held on two different dates – that was because the online participants were so spaced out in terms of time zones, that for one half we started on Tuesday but for the other half it was already Wednesday. Every workshop was held on two dates! (with the organizing team in the middle in Central European Time working from 21:30 – 00:00 or so every night.)

The other thing that made our three 2.5 hour workshops different was that we used interpretation online, and had two English-Russian interpreters join our meeting. This was new for everyone, including the interpreters and me, so I wanted to share this overwhelmingly positive experience (of course with a few challenges to overcome) and some thoughts about effectiveness from the perspective of the interpreters which I found insightful.

Our programme, spread over three days as it was, was a multi-sectoral discussion that needed to take place in 2 languages – English and Russian. This is a group of conservation scientists from different sectors located from the far east of Russia to the Bay area of the US, who have worked together face-to face in the past, always with translation. Now we needed to take their work into a virtual environment and chose Zoom as our platform particularly because of this new interpretation option. Our two interpreters joined us from their home offices in two different locations, and they translated in and out of both languages.

There were really only 5 steps to get interpretation working:

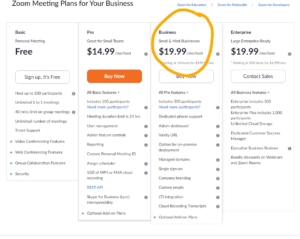
Step 1: Get the Zoom Business Plan

Zoom had recently offered an interpretation feature that we wanted to test. This option is only available to Zoom Business users. This is the plan above the Pro version that I already had. For this plan you need to pay for 10 hosts at the minimum, and it costs 199.99 USD per month. You can buy it by the month, which is what I did. Upgrading was incredibly easy to do on their website. You click the button and pay. You maintain your own account and all your details and just get the added features from the Zoom Business plan. Usefully, Zoom doesn’t force you to register the additional 8 hosts, just pay for them.  I only have two hosts registered (me and my colleague Lizzie), I will go back to Zoom Pro next month, and when I work with translators again, I will simply upgrade for the time needed.

Step 2: Setting  up your meeting for interpretation

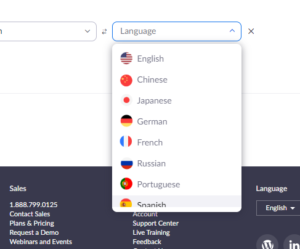
With Zoom Business, now what I see as a host when I create a new Zoom meeting is a box to tick at the bottom of the meeting set-up screen that says “Enable interpretation”. Once you tick that box, you need to put in the email addresses of the interpreter(s) and the languages you will use. Currently Zoom offers options for 9 languages: English, Chinese, Japanese, German, French, Russian, Portuguese, Spanish and Korean. We needed Russian and English, so that was fine. I selected the languages that each interpreter would work in from a drop-down box. You can add many interpreters it seems using the “Add Interpreter” button – after clicking that 10 times I stopped.

Once you set up the meeting, the interpreters get an email message inviting them to join the Zoom meeting as interpreters. That’s really all that’s needed prior to your meeting – very simple!


Step 3: Once in your meeting: Start Interpretation

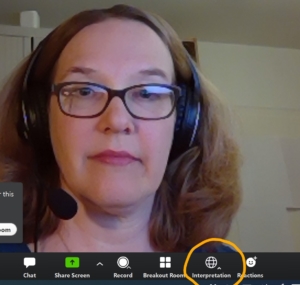
When you open the Zoom meeting as the host, you need to click on the Interpretation icon which shows up on your dashboard (bottom of the screen). Once that is open you need to “Start Interpretation”.  This makes an Interpretation icon show up on the screen of every participant. This is relatively easy to forget the first few times you use this function, because as the host you already see the Interpretation button on your screen and assume that everyone else does too. You then might confidently declare that there is interpretation enabled, and then all participants will respond loudly and in unison that they don’t have the interpretation button, they can’t find it and that this doesn’t work. Then you say “sorry” and start interpretation and magically the icons appear and everyone is happy.

This extra step to turn on interpretation probably makes sense so as not to start it before your interpreters are there. My two interpreters were always in the room early, so I could start that even before the meeting officially opened.


Step 4: Participants choose their language

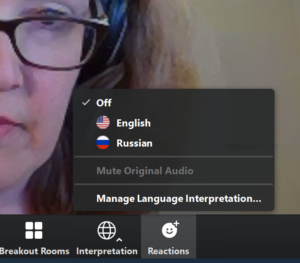
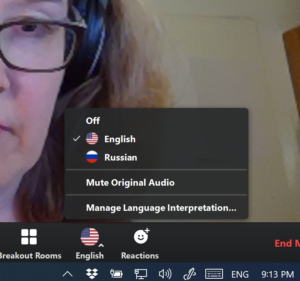
Once participants see the Interpretation icon on their screen at the panel at the bottom, they click on the icon to see the language choices for your meeting. Note that by default, interpretation is “off” and they just hear whatever is going on in the main room. They need to choose their language to start hearing the interpreter when he/she is speaking their chosen language.


Step 5: Mute original audio

This last step is very important and was an initial source of consternation, taking us a few tests to understand what was going on and what to do about it. So, only after selecting the language of choice, the option to “Mute original audio” becomes active (before you select the language you can see it but you cannot click on it). Unless you wish to hear both languages simultaneously (the speaker and the interpreter) you will want to select this.

When Zoom describes this feature, they make it sound appealing to listen to the interpreters while also having the original language going on softly in the background, simulating a real physical workshop room where you would hear the interpreter in your headset, and still have the original speaker going on in the front of the room at a distance. However, this wasn’t our experience. Both languages seem to be almost the same volume, and with headsets, it was maddening to listen to both languages in both ears at the same time. So other than just dropping in to see that the translation was working, everyone used “Mute original audio” and were happier for it.

Here’s another thing we learned in our testing, the “mute original audio button” is currently only available in the most recent Zoom updates. People with older versions, or company versions that were updated (or not updated) centrally found that they did not have this button and were relegated to either “Interpretation off” (hearing only the language of whoever is speaking – for perfectly bilingual people this is no big deal) or hearing the frustratingly loud mash-up of the speaker and interpreter. This lack of “mute original audio” button was the case in about 25% of our participant tests prior to the workshops. As soon as people updated Zoom they all had the option to “mute original audio”, and their blood pressure went down again.

Eventually, the system worked 100% for everyone, even those who were working in very remote areas. As we had substantive technical presentations in both English and Russian, and only a small subset of bilingual participants, the meeting would not have been possible without interpretation. Zoom made it easy through keeping it all on one platform, rather than having a work around with interpreters needing to set up a separate call, using Skype or other. Another option is always consecutive translation, but that essentially doubles the time needed for meetings and would have slowed us down considerably.

How it felt to participate

I am trying not to be effusive, but we were truly amazed at how well the whole thing worked and how easy it was once you got used to it and set up. One of organizers said that it should be explored even for face-to-face meetings as everyone always has a laptop in front of them and headphones anyways these days. Even sitting in the room, they could log into a Zoom meeting, turn off their video, mute their microphone and pick their preferred language on the Zoom screen. The speakers at the front of the room would just need to have Zoom too and a headset (no video needed as they are live). If participants had a question, they would unmute themselves, speak and the speaker would hear it. There would be no additional interpretation devices to check out and collect, no booths needed, and your interpreters could be anywhere in the world and not in the room. Ah, I get carried away. It is an interesting idea to ponder. Just to note – the interpreters had a completely different opinion on this! (See “How it felt for interpreters” below)

Testing, testing, 1,2,3

As this was new to all participants, hosts, and even the interpreters, we ran 5 interpretation zoom tests in advance of our meetings, where we invited people to join us, walk through the few steps to turn it on and check they had the latest version of Zoom. This also helped us check audio, video, and connectivity issues, which was helpful overall.

I set up the Interpretation tests as separate Zoom meetings, enabled interpretation, invited the two interpreters, and then we hosted a subset of participants each time so that they group was small enough to help and trouble shoot (note that our first two tests were just internal with our friendly and patient organizers). These tests lasted from 15-30 minutes and upon declaring success, greatly helped us move technical issues out of the actual workshop meetings, making starts smoother and punctual.

Final reminder in the meeting

Even with the tests, I opened the first of our three workshops with a few PPT slides to remind people what to do for interpretation, using screen shots. I also included the meeting norms (keep on mute unless speaking, raise hands, etc.), followed by some simple testing of these important functions (“give me a thumbs up if you have this”). I always opened the Zoom environment 15-20 min before the official start of the meeting to trouble shoot with all those who signed in early. And on the last day, where we had a few new external people joining to give presentations, I presented the Day 1 “How to” slides again in the 5 minutes preceding our start time for these newcomers. We had informed them to join us early during the interpretation test meeting.

This all might seem like overkill, but it helped significantly, and made for an effective workshop. The first few times you use interpretation (or even Zoom itself), you can still easily forget where to find things and what to do, and then not know why things aren’t working, descending quickly into general gloom and the potential of existential crisis about whether or not you are going to get this virtual stuff, ever. On a more practical note, even before you get a whiff that people are stuck, you as the facilitator can also invite people who need help to write you in the chat using the “private” option and you can help them individually. After a few times, it is very straightforward.

Ultimately, for participants, once they got there, it was smooth and easy and a little magical to see the videos of their colleagues speaking, mouths moving, and the smooth voice of the interpreter seemingly coming out of it in your very own language. This facilitates discussion and communication among people significantly – brilliant!

How it felt for the interpreters

Talking to our interpreters about these meetings was eye opening for me. I have always been in awe of people who can listen to one language and simultaneously speak another one. I continue to be impressed – our interpreters were excellent, and were themselves learning how to do their work in Zoom.

A number of focused debriefing meetings with them after the tests, and after the workshops themselves, helped us tweak things – but interestingly, not so much from the technology aspect. That worked fine. But more from the procedural perspective. It was interesting to hear them compare their work in a booth at the back of a workshop room, to being plugged in, in front of their computer screens during a virtual meeting.

For them, interpreting for Zoom meetings is now a reality, so they are eager to get up to speed on this. However, their observation is that it is more intense and stressful than providing this service for in-person meetings. Meetings in the Zoom environment, they observed, caused additional cognitive stress. First, because when they are interpreting, they cannot communicate with the host, participants or the other interpreter (who is not in their booth but 1000 km away in their own office).  They cannot bang on the booth to get our attention, or visually signal to the other interpreter when they need something or are having a problem (e.g. if their system goes down, there is an issue with sound quality, or they lose connection – which can happen to anyone, necessitating the need to quickly log out and log back in). They cannot read the chat function when they are interpreting – the chat button lights up but they cannot easily see if it is a private message (e.g. about the sound, etc.) or just people chatting back and forth amongst one another.

Also, when someone is sharing their screen to present this obscures part of their dashboard so they cannot easily other things on their screen, like the time – so need to look at their watch or phone, etc. to know when it is time for the next interpreter to take over. That second interpreter is also not there with them physically to use visual communication to switch interpreters (they work in 30 min shifts).  All these might seem like small things, but when you are using all your full attention to listen to one language and speak in another simultaneously, it is cognitively more demanding to keep track of all these other things going on at the same time.

The second reason that this is stressful is because the Zoom technology does not impose procedural discipline upon participants, which means that the facilitators and chairs need to do that more. In face-to-face environments, when using interpretation systems, some systems do not allow two people to speak at once, and also people raise their real hands, and then push on a button when called, and then they speak. In Zoom however, everyone can unmute themselves and speak at the same time  (I’m sure we have all been on those family zoom calls when everyone is shouting at the same time). People can even speak over one another in two languages! In that case, what does an interpreter do?

To help, there needs to be an emphasis on procedural discipline, which might make the meeting feel more formal, but is really necessary when using interpretation. The Chair or facilitator needs to give voice to participants, and needs to insist on procedural compliance in terms of taking turns, and even trying to leave a bit of space between speakers and language changes, so that the interpreters can click on the other language button when they change languages. It is better for them, they said, if there is no direct contact between participants without the chair giving the floor to people. People also cannot mix the two languages which is very tempting for bilingual people – this is also a rule in F2F interpretation.

Notes for the Facilitator and Host

For the Facilitator of a Zoom meeting, you need to keep your eye on the interpreters’ names in the Participant Panel, and you can even check from time to time that all is going well by switching languages to hear the interpretation (or taking off for a minute “Mute original audio”). One tip for the Host is to rename each interpreter with a “__” (double underscore) before their first name, so that these names are always near the top of your participant screen, which is alphabetized by Zoom (after Host, Co-Hosts, those sharing screen and speaking). That way, you can easily see if for some reason they are not there/drop off the line, so you can stop and wait for them to come back in. If you don’t rename them in this way, their names are mixed in with all other participants and you might not notice if they aren’t there, with a speaker talking away but no interpretation.

This happened to us for a few seconds during one of our workshops, but we just asked the speaker to pause until the interpreter was back, and then to repeat a short segment. We went merrily on and it didn’t happen again.  It has to be noted, that bandwidth and internet fluctuations can happen to anyone these days, when everyone in the world is at home and trying to get online simultaneously – whether they are working or watching Netflix, or both at the same time. We know that these little things always happen in virtual meetings, and of course it is a little more dramatic momentarily when it is the interpreter who drops off, but you just pause for a moment and work through it.

This is surmountable, and our interpreters navigated all this novelty elegantly. We, the organizers, only really knew how much work it was for them afterwards.  I am sure that no one participating felt anything other than a great meeting, supported by equally great interpretation.  For interpreters everywhere who want or need to make this transition to virtual meetings, the Zoom system will become easier to use as they have more and more practice, but the procedural discipline aspect needs to be firmly on the “To Do” list for facilitators.

Some final thoughts

It was exhilarating to try something new and have it work so well! This international group would have had to wait months to meet again in person, and this virtual option allowed them to continue their collaboration in the meantime, from the comfort of their own homes from the far east to the far west.  It goes without saying that your interpreters are critical for the success of your bilingual Zoom meeting. As such, it is important to work closely with them, listen to their perspective and get their feedback through testing of the system in the preliminary stages of workshop development. And of course, remember to thank your interpreters at the end!

(BTW if you need recommendations for experienced Russian-English Zoom interpreters, I have some names to share!)

There has been a raft of flipped workshops recently where F2F events have been redesigned to be held virtually, and it is fascinating what a rich diversity of designs there are. Some of them have been reworked as big blocks of synchronous together time that aim to closely mimic the programme of the original F2F workshop with some minor modifications, such as adjusting the time to make it more comfortable for participants on different continents, and reducing the number of days for example. Others are dramatically reducing the “contact” time and pushing workshop tasks into the days before and after the online meeting, undertaken by participants individually. Yet another model is spreading the engagement out over weeks, with scheduled touch points that pick up different themes of the original event – and many, many more!

As we are all learning right now, I thought I’d share some details of a few of these models that I am working on right now, in case they might be useful for other designers and organizers who are in the process of flipping their workshops.

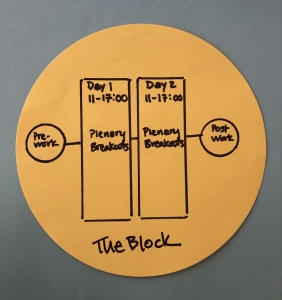
Model 1: The Block

I have one of these coming up which was originally a 3-day F2F workshop, scheduled to be held daily from 09:00 – 18:00, with one evening session. Now in its virtual incarnation, it is two days long, and will be held from 11:30-17:30 (Central European Time) to accommodate both European and North American participants (and no “night” session). To pare down the work, we needed to go back to the original objectives and select those that needed to be accomplished now, and those that could wait for a subsequent F2F, or be taken into a set of topical conference calls later on. We also added some pre-work, but most of the work would still be done together in the virtual sessions.

Even with these modifications, this virtual workshop block will be a heavy lift for participants. We have the traditional 90-minute session lengths, with lunch and afternoon coffee breaks scheduled to relieve people from their screens. During this free time, we will invite people to stay connected if they wish, to chat together informally while they eat and have coffee. To keep things interactive and lively, we have a diverse mix of activities, including a number of break outs, supported with google docs to capture outputs from breakouts and other small activities (polls, stretching, etc.) to keep things moving.

This format of this workshop is relatively close to our original F2F agenda, and I think in some cases the makeover of a F2F workshop to a virtual using this model can work well with a few caveats. This would include a rather small group (we are 20) of very dedicated people (this will be tiring so need to manage their attention) with a well- defined task (we are finishing a co-creation project to develop a set of guidelines). I think the fact that the majority of this mixed stakeholder group has worked together before will make the social dynamics side work. We invested significantly in building social capital in our first F2F workshop that we can draw on now for trust, commitment and creativity. For this workshop we are using zoom and will have two facilitators supporting the team in their work, one of which will operate the technical aspects (splitting people into breakouts, launching polls, etc.)

Model 2: The Blend

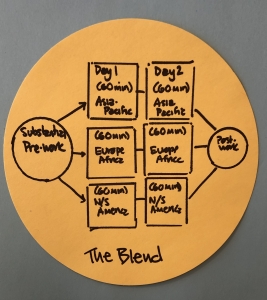
Not many of my flipped workshops are taking this compact block shape. For others we are opting for shorter synchronous meetings (where people are all together) and taking a lot of the planned work out of that full contact time. We are blending substantive pre- and post-meeting work that is asynchronously completed (e.g. undertaken by individual participants whenever they want), with the meeting times for synchronous engagement and discussion.

Here’s an example: For one previously scheduled two-day F2F workshop where we were gathering feedback to guide a consultation process, we asked the 40+ participants to review and comment on a google doc in advance of the meeting, and to answer 3 higher-level strategic questions about the document on a separate google sheet before we met online. As participants were located all over the world, we conducted our workshop through three 90-minute meetings held each day for two consecutive days – one call for participants in the Asia Pacific region, one for Europe/Africa/MENA, and one for North America, Latin America and the Caribbean. To support these virtual meetings, we made three identical copies of the document to comment upon and labeled each by region. The google sheet with the strategic questions had the instructions on the first sheet and then three tabs, labeled by region, each with an identical set of strategic questions. Note that we sent out the links to the google docs, but also sent the files as attachments in word and excel. Some people are not able to use google docs due to their location or institution, or not familiar with them, so they had the option.

The calls themselves were used to present an overview of the document as a reminder, and then an analysis of the comments and feedback received. We asked for more feedback and could ask specific probing questions on each region’s responses where we had them. With the documents split by region, we could easily see what the people from the region on the call said, so we could seek further clarification and detail on their comments efficiently as need be.

For the Day 2 meetings, we synthesized what we had heard on the Day 1 across the regions, and identified five topics that emerged across the calls to bring back to the groups. For example, we had a couple of points that needed further clarification, others where the different groups offered conflicting advice, etc. The second call allowed us to share what we had heard and to go further, bringing in some of the good ideas across the different calls.

It is true that not everyone attending this larger workshop did the pre-work, especially at this time when people are working from home and juggling many things. Many did, but said they would value more time to reflect on the comments others had made, or in order to do some internal consultation in their organizations. As such, we are leaving the documents open for another week to capture as much of their input as possible, let them build on other’s ideas, and reflect further. Also, if someone could not join the calls for some reason, or did not want to speak out on the call, they are able to contribute their ideas in this way. This was our plan, and was also requested by participants.

Our workshop goal was to get this senior group’s comments and ideas, so we needed to make this as easy as possible for participants. This workshop was the first step in a longer consultation process so it had to generate good quality input, in addition to being satisfying for the participants. This model blends asynchronous work before and after the call, with shorter synchronous virtual meetings. It was run by one facilitator on the Go-to-Meeting platform.

Model 3: The Journey

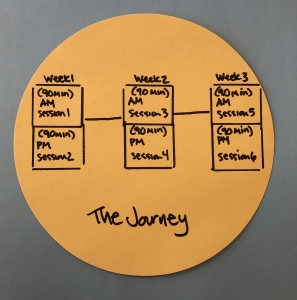
The third model that we’re working on flips a very large-scale 300+ community workshop into virtual space by spreading the content out over three weeks. Six interactive webinars will be held in total. Once a week on the same day, two webinars will be held on the same day, one in the late morning and one in early afternoon to accommodate as comfortably as possible the largest number of the global participant group.

As this was more of a conference-style gathering for a larger group, even with many interactive elements in the F2F format, there was a lot of content to work with. This gathering will be postponed until early 2021, so we are pulling out the good practice exchange, community updating and storytelling aspects into this webinar format and featuring the work of different community members. We will still have interactivity through the introduction of a back chat polling tool (polleverywhere for example), as well as a crowdsourcing exercise to draw ideas from the group. This latter task will be introduced in the first webinar and the results analyzed and presented in the last webinar two weeks later. For this we are exploring Zoom, and will have a facilitator and a host of moderators and technical resource persons.

So there you have it, what started out as three F2F workshops planned to be held over 2 and 3 days, have ended up as three dramatically different models of virtual workshops. The diversity of options makes it exciting to re-design in virtual space.

Design Questions

Your choice also depends on the design parameters you are working with. Once you know your objectives and desired outputs, you ask:

  1. How many people?
  2. Where are they located (time zones)?
  3. What kind of connectivity do they have? (Can they support video, calls, other?)
  4. How committed are they to your process and the goals?
  5. Do they know each other? Do they need to?
  6. What experience do they have with virtual work? Do you use some platform already?
  7. Will people do asynchronous work? E.g. Will they devote the time if we give them tasks to do before and after the contact time?

Then as a facilitator, you use your design skills and creativity to put together your virtual workshops, which, just like their F2F counterparts, come in a delightfully wide variety of shapes and sizes.


There is an excited flurry of activity right now among meeting, workshop and conference organizers -and their facilitators -as travel restrictions due to the coronavirus cause cancellations of face-to-face (F2F) meeting formats. Planning meeting agendas are being taken over with the exploration of different technologies, tools and platforms to help hold these events virtually.

But in many ways, virtual gatherings are not so different to their F2F counterparts.

It’s worth remembering, and I am talking to myself here too, that these meetings, workshops and conferences themselves are tools – a means to an end. We don’t organize workshops or conference just to have them – they are not boxes to tick in our annual workplans. We use these gatherings for other goals that are important to us. The most useful thing to bear in mind when looking at all these different models, tools and platforms to convert our F2F meetings into virtual formats is, “What was the end we had in mind?”

What did we want to change or be different as a result of our workshop? What did we want people to know, think or do differently after attending our conference? What did we want to have in our hands as outputs at the end of our meeting?

No doubt there was a task you wanted to complete – whether it was to collect useful input to a strategy development process, collectively write an article, review a set of draft guidelines, or exchange good practice to build community capacities, and so on. There were also probably some softer outcomes in mind, like helping build relationships in a community, reinforcing trust in a process, or inspiring buy-in and support in promoting the final co-created product.

Putting your desired outcomes first will help make choosing the right technology to support it much easier – form follows function (if you will pardon my invocation of an over-used design cliché.) If we take a step back and remember our desired outcomes and outputs, that will help make this conversion-to-virtual process easier, and potentially tap into some creativity in terms of how we get things done virtually.

A couple of other thoughts on virtual workshop design – length and complexity

We observe in our F2F conferences and workshops that even the most well-intentioned participants have finite attention spans. It may be less obvious when people are sitting in an auditorium as they can easily dream away while still looking fixedly forward at the person standing at the podium. They can of course also choose to keep talking to the person they just met at coffee break and leave their seat empty in the plenary room. (It is of course harder to disappear when there are only 15 or 35 people – although they may invoke the “sorry, I couldn’t reschedule this important call.”)

Online, there are a multitude of ways people’s attention can drift away or be drawn away – pulled by their computers, email, various devices. And there is no way to tell if they are even there at all, or just popped out to make a coffee, if they are on mute and no camera is being used.

So the same rules apply to virtual as F2F, keep things short and to the point. In F2F we rarely have sessions that are more than 90 minutes to two hours maximum before taking a break. Within those blocks we use a lot of techniques to keep messages focused, interventions short, pithy and discussions interactive. Virtual sessions should use the same rhythm, sticking to these familiar timeframes, and include well-prepared interventions.

Technology adds a layer of complexity for both participants and organizers. Even in F2F, preparing a presentation and standing up to speak is something that most people are happy to do. But add a PPT projector, slide changer, microphone and sound system, and things can fall apart if not practiced and tested. This is the same for virtual environments where seasoned speakers can be perplexed by talking, keeping an eye on the chat stream, and changing their slides at the same time – especially the first few times they do it. Speaker preparation is something that needs built into both formats.

Although we all have our phones in our hands at every moment of the day, even using polling apps in F2F workshops (like polleverywhere or mentimeter) with an increasingly tech-savvy audience, still creates complications for some. This is why we take time for set up and do some low risk test questions before we use these tools for real data gathering. With online interaction it’s the same, and we do need to add in that additional time for people to get used to the tool – take it slow, make it easy with clear instructions, and practice. It also helps to be humble and invite the audience to join in the experiment of trying new things and invite them to give feedback afterwards on what worked and what could be different next time.

The good part is that people are getting more comfortable with these technologies, at least as users. With this current situation, many more will also get more comfortable with the back end of these platforms and tools as administrators. Whether it is using a polling app on our phone F2F or using zoom in our offices or at home, we are now more quickly domesticating these technologies.

It’s actually a great opportunity right now, and a great responsibility. By doing a good job with your virtual meeting or conference, you are building the capacity and confidence of the whole community to work together in this way. Once people feel comfortable with the technical aspects,  and have a productive and enjoyable experience working together virtually, they will show up differently next time.

This is a valuable mass learning opportunity for our community to learn how to work effectively together virtually. It’s possible that, even without travel restrictions, we may never go back to the same meeting culture we had before. We will still gather, but may be even more ambitious with precious F2F meetings, with their substantial investments in carbon, budget and time. If we get our methods right, we may get the same valuable outputs in virtual formats as F2F, demonstrating that they are not so different after all.

(Note from Gillian: This is a very long, detailed, and rather geeky post. I write this as I have been asked a few times recently for “how to” information on how to set up these kinds of group work templates for virtual workshops.)

As we get more comfortable with getting work done collectively through No-Fly Workshops, innovations begin to emerge as we challenge ourselves with facilitation questions like, “How can we run this interactive activity virtually?” Rather than lowering our ambitions about what we can accomplish with an entirely or partially virtual group, we can take these as facilitation design parameters (similar to having to work with theatre format, or not knowing how many people will show up to your parallel side event) and come up with a design that is fit for purpose.

Everyone is now familiar with Google Docs, although perhaps less so Google Sheets (the Excel equivalent). These are both incredibly useful in virtual workshop contexts. Below are two ways to use them to support group work. I expand at the end into one application of Google Sheets that is perhaps less well-known, but very valuable in helping to solve a couple of familiar workshop issues around identifying key messages from group work and (too) long report backs. I provide detailed instructions at the end of this post for how to set up an Aggregator Google Sheet that collects highlights from different small groups’ work recorded on individual sheets, and automatically pulls them together into one summary sheet.

I start with two scenarios for how to capture and guide a group’s work with Google Docs/Sheets – 1) Co-writing a product document of some kind; and 2) Capturing ideas/answers to questions through small group work.

Preparation for both these scenarios:

  1. Decide on “permissions” in advance – can everyone or only some people edit the document (with others in read only)? If the group is small, you might give everyone the right to edit. If your group is larger and you will have smaller sub-groups working on sections, then pre-assign the small sub-groups and decide who will be the recorder/rapporteur for that group and give them editing permission. If you pre-assign groups and recorder, make a table that indicates which group people are in, and who is the recorder, and share that table in advance.
  2. Set up a “Back Chat Channel”: This could be a WhatsApp group for all participants, and if the Facilitator sets this up, you will also have all members connected to you in case you need to contact them individually during the workshop.
  3. Always write the exercise instructions on the Google Doc or Sheet. When people finally get into their part of the document or groups, they might very well have forgotten what they were supposed to do!


Scenario 1: One virtual group needs to collectively write a document or write parts of a document (e.g. a proposal, a strategic plan, a book chapter, etc.)

OutputA collectively written document.
Online documentGoogle Doc
PreparationIf you have the headings for the different sections of the document (e.g. table of contents), paste that into a new Google Doc. If you do not, then your first exercise might be to have a brainstorming about the section headings (you can also do this BEFORE the workshop). Number the sections.
Activity (small group – 8-10 people)
  • Provide people with the link to the google doc.
  • Slower approach: If you want to discuss collectively and write the sections all together in real time, then have one person type and the others contributing ideas. This becomes a plenary activity. This is slow and can get messy. Plus even with a small group, people will struggle to jump in if you have any louder people, so this can be boring for some people. This can still work with a small group that  knows one another well and has good group dynamics.
  • Faster approach: Assign people to the numbered sections (this can be based on competencies or randomly assigned – e.g. putting your writers in alphabetical order to assign them.) People will write on the same document at the same time, but only initially on their assigned section.
  • Step 1: Give people a set amount of time to write. It is better to write in chunks and check in with people periodically for questions or comments. You can send an announcement in the chat to provide a 10 minute “warning” and the end.
  • Step 2: Once people are done with their sections. You can start a new activity asking people to read and comment on the other sections. Assign a time, and give them a 10 minute warning just before it is up.
  • Step 3: After the commenting period is over. Ask people to go back to their original section and review the comments, taking them into consideration and making a next draft of their section. Have them highlight any comments or questions for which they might need more information.
  • Step 4: After the writing, open a plenary discussion that allows section writers to clarify any comments or questions that they didn’t understand or would value more input. If it is useful, after this clarification round, you can give the writers some more time to finalise their sections.
  • Step 5: Open a final plenary discussion about the experience, what is missing, or what is to be done. You can create a new google doc that has Next Actions, Responsible person(s) and a Timeline or Deadline section. You might need to iterate your document further, or involve more people. This can potentially be done asynchronously after the workshop.
  • Note: While people are working, they can stay connected to the main workshop platform (Zoom, GoToMeeting, Skype, etc.) but mute themselves and take off their camera while they are writing their sections or comments on others, coming back in for the plenary check-ins and discussions.
Activity (large group – over 10 people)
  • Follow the above activity sequencing, but create small sub-groups (assigned in advance) and have them work together on another platform (Skype, MS Teams, or use the breakout room function in Zoom, etc.)  so they can talk while they write. They are still using the same shared Google Doc and link. The sub-groups can decide if one person writes and the others talk. Note you need to allocate more time for this kind of group work. It takes more time when a group is working, versus one person writing alone.
  • People can still stay on the same platform and mute themselves while they are doing their sub-group writing.


Scenario 2: Small groups need to brainstorm and provide responses to a question or set of questions.

OutputIdeas and answers to a question or questions (this might also provide input into a strategy etc.)
Online documentGoogle Doc for each group OR a Google Sheet with one tab per sub-group.

How to choose? If you have a report back, it is a little fiddly to click through to different Google Doc links, especially if you have some people who are only connected through audio (e.g. dialed in through their phones) who are clicking through themselves following along. It is easier to have one Google Sheet with multiple tabs, and then people can just click tabs to see the results of the different groups’ work. This latter also has the advantage of keeping all the information in one place for ease of sharing and use later.

PreparationYour choice of a Google Doc or a Google Sheet also depends on what you are doing. If you have, for example, four groups working on a complex set of questions in parallel and you don’t necessarily need to share their detailed results with the others, then you could make 4 separate Google Docs. This could be more appropriate for longer and more involved group discussions.

If you have four small groups that are brainstorming or answering one or two questions, then you might want to set up a Google Sheet that has 4 tabs (each labelled with a different group name), and ask people to work on the same Sheet but on their designated tab.

Designate the groups in advance. If you want to let people choose their group, then ask them to choose in advance through email or a polling tool like survey monkey, etc. Make a table to share to ensure that people know which group they are going into, what document they will work on (link), and how they will convene in their smaller groups. This can be through the breakout group function of your platform, or you can set up skype, MS Teams or other channel.

Activity
  • In “Plenary”, announce the activity and remind people of their groups by sharing the table that lists the group members. Explain what they will be doing once they get into their groups, ask for any questions then.
  • Give people a way to contact you if they have any problems (e.g. through WhatsApp).
  • Tell people when they need to come back to the Plenary.
  • As a facilitator you can watch the Google Docs or Google Sheets fill up, and if one of the groups is not making progress, you can check in with people in their small groups through WhatsApp or other backchannel. Note you may need to refresh your browser as there might be a delay in updating the shared doc.
  • Report backs? After the designated time period, when people come back to the “plenary”, you can ask for a representative from each group to share some highlights and share their screen, or you can share your screen, or you can ask people to click through the document themselves.
  • This part can be very long! You need to time it (e.g. give each group 5 minutes) or come up with another way to limit what people say, particularly if it is not essential for everyone to know every little detail about another groups’ work! For a neat way to help groups synthesize their discussions, you can create an aggregator Google Sheet (see below).

Helping groups identify key messages and be concise in their report back – Creating an Aggregator Google Sheet

When people have their group’s entire results in front of them, reporting back can be very long and overly detailed. It is hard in real time for many people to synthesize on the spot, and they want to honour the whole discussion. This is the same for both a F2F workshop and a virtual one. In addition, sometimes people don’t care very much about the nitty gritty of another groups’ work; they just want to hear the key points. However, report backs are expected, they can be useful for making bigger picture observations, and can acknowledge and appreciate a group’s work. So it is hard to avoid them. But you can make them better!

In a F2F workshop, I might give a group a template to work on with the key questions, and at the end of their discussion another smaller template asking them to distill out 3 key messages or highlights from their group’s work. Then I ask them to report back using the highlights template, rather than their longer, group work artefact.

You can do this in virtual meetings as well. A ninja tip (as my Luc Hoffmann Institute colleague who created one recently called it) is to develop a Google Sheet that has an aggregator function. By this, I mean, on each group’s tab there is one space where the group can discuss their question and record their answer in length, and a separate place where they write in their 3 highlights or key messages. Anything written in this second spot is automatically aggregated on a separate tab on the Google Sheet labelled “Summary” or “Highlights”.

When the group then gets to the report back part, you display the Summary tab’s sheet and that is all they and the other groups see. This Summary sheet gives you an overview of responses from all the groups, supporting a more focused and concise report back, as well as any subsequent observations for pattern spotting.

With this type of Sheet, as the organizer, you now get a write up of the longer discussion as recorded by the group on their designated tab, as well as their highlights on a separate one. Now you don’t have to wade through a lot of information to find key messages from the whole exercise.

Making this kind Google Sheet is very easy but takes some knowledge of Excel. For those who are whizz’s at Excel you might already know how to do this and be happy that it is similar in Google Sheets. If not, here is a description to follow below:


Setting up your Aggregator Google Sheet

First set up your Google Sheet with your “Group” tabs and a separate tab for the “Summary” (see below). Note that you need to have a one-word name for each sheet with no spaces. E.g. instead of “Group 1” you need to call it “Group1”.

Note: You can make the Sheets on the separate tabs as pretty or as plain as you like – this is a template, you can be creative! Below I changed font colour and font size for the title, put borders around my question and answer area, and highlighted the aggregated cell/line so it was easy to see. For each separate sheet, write in the group name again at the top, the question, as well as instructions for group work. (click on the image below to enlarge)


Next you will set up your aggregator page. Go to your Summary tab, here you need to enter a few simple formulas so that this sheet pulls the answers from the other sheets automatically (same as in Excel) (click on the image below to enlarge):


For this, you need to:

  1. Click on the cell in the SUMMARY sheet where you want the highlights to show up (e.g. the cell under Group 1).
  2. Type “=”
  3. Now go back to the sheet from where you want to draw the information and click on the cell where that information will be written (e.g. the “Highlights” cell)
  4. Press RETURN (it will automatically take you back to the SUMMARY sheet). Now your formula is there that links the key cells from the two sheets (SUMMARY and GROUP1)

Now when you go back to the SUMMARY sheet, you see the following formula in the cell under Group 1 as follows: =Group1!A2  (A2 is the cell you connected to on the Group 1 sheet)

  1. Repeat for the other group tabs until you have all the highlights connected with the SUMMARY sheet. Now in subsequent cells you have =Group2!A2   =Group3A2, etc.

You will see how easy this is once you try it. What you get in the end will be a helpful support to your virtual group work, making reporting back more efficient, pattern spotting easier, and giving you concrete outputs to work with in the next steps of your No-Fly Workshop. (And please feel free to add additional ideas on how to use them in virtual workshops in the comments section below.)