Lessons I’m Learning About How to Be an MC (Master of Ceremonies)
As learning practitioners we play many roles – we are process designers and facilitators, panel moderators, skills trainers, advisors, team coaches, and sometimes we are MCs (Master of Ceremonies), helping weave together the different learning threads of a larger event.
I recently took on this role at the Women’s Forum, having done this on a number of occasions with other groups. This event had high production values, with beautiful lighting, a 360 degree stage, video cameras and screens in all directions recording and simulcasting, professional makeup and a “Madonna” mike (as they called it), and, I might mention, 1500 people watching every move you make (or at least the intention to).
I personally find this role – Master of Ceremonies (we couldn’t come up with a satisfying gender neutral alternative -any ideas?) – more than a little nerve wracking. To get to a place of comfort in this role I tend towards over preparation. However, I won’t apologize for this; that’s what it takes for me to do a good job in this high visibility role. I want to help make participation meaningful for everyone in the room, add value and interest – spark curiosity and maybe some surprise to grab attention, and help connect the dots of the event for people. Now that I have done this for a number of events, I thought I would record and share my tips for preparing and delivering as an MC. I divided my reflections into four parts: what I do in the weeks before, the day of the event, moments before, and onstage. 
Weeks Before
1. Get the Programme: Be proactive and request early versions of the Programme and keep in touch with the Programme manager about changes. Make sure you always have the latest agenda (this can change daily nearer the event when speakers and moderators cancel at the last minute, or even miss their flight). You don’t want to introduce the wrong person in front of 1000 people. It might be tempting to wait until things settle to do this, but don’t; it will be a big job to get on top of it and identify the main threads all at the last minute. Plus your antennae will be up for interesting facts and initiatives in all the other meetings you attend and newspapers you read, and new ideas will come to you as the programme and its key messages percolate in your brain.
2. Build Your Background: Read about the speakers and the conference themes. This research can be considerable if you are the MC for the whole event as I was, with 13 different sessions, themes, panels and speakers. I estimated that it was like giving 13 Toastmasters icebreaker speeches in 3 days, each one taking some 5 or more hours to prepare (research, collect ideas, write, edit, make notes, brief speakers/moderators, practice, practice, practice).YouTube is a great place to listen to other speeches given by your speakers, to hear their perspective and main messages, and to see how other MCs and moderators have worked with them.
3. Get Inspiration: Once I had my session themes I looked into a number of directions for inspiration. TED is a great source, in fact I spent the week before this event at TED Global in Rio and found some good leads for interesting facts and angles. The news and current events is an obvious source and I read newspapers and periodicals cover to cover (even sports!) for a change in the weeks before the event, as you never know what facts or questions might come up on stage. 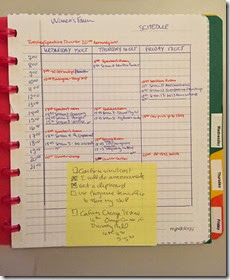
4. Make a Notebook: This is actually a step the “maker” and tinkerer in me enjoys. This year I used an A5 sized notebook, with the pages that you can take in and out along those plastic discs (because things will change!) Use any notebook that you can change the order of the pages and put new ones in easily. Use dividers by day, and then within the days each session has a page. At the top I have the title, timing (when to meet speakers, time of session), list of speakers with their titles, the objectives of the session, notes on the choreography (if there is a sequence to introductions, if there are chairs or if the speakers stand, etc.) and then my script (see below). This makes it easier to practice session by session and quickly check details if there is a question (how will you introduce me) or a change in the programme. Carry your notebook around all the time and use post-its to note any ideas that pop up on the appropriate session page, to integrate later.
5. Write Your Script: I always write out my scripts completely first, then edit them and tweak them repeatedly, as I am more of a writer than an off-the-cuff speaker. I write out the narrative word-by-word first, including interaction with the audience (and put this in my notebook). Then I start to boil it down to bullet points with sub-text, and then the final step is to define headlines/key words to trigger my memory of the associated text.
Note that I always build in interactivity (mapping the audience, introduction to your neighbour, etc.) early in my scripts to liven up the participant experience and engage the audience but also to give me a moment to look at my cards if need be. It shortens the length of what you have to commit to memory before you can pause and regroup/breath/centre yourself once onstage. So I write these breaks into the text. I also include short stories/vignettes that I can tell as they are easier, once you launch into them, to remember and tell than a list of facts. You want your introductions to be thought provoking, meaningful, and relevant to the audience. It should make then want to hear and think about the next session and not choose instead to go and get a coffee or stand in line for the photo booth. It’s not as easy as you think.
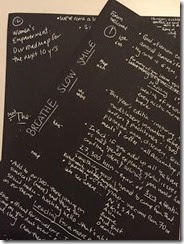
6. Prepare Prompt Cards: In all the photos and videos of me as the MC at the Women’s Forum, you will see that I have notes in my hand. They are my bullet points and key words written on black card stock and cut to hand size. I write on them with a white pen. This draws much less attention than white, dog-eared, A4 papers flapping around as you wave your hands. At TED Global I noticed Chris Anderson and Bruno Guisani had small cards in some sessions, held with a single metal ring on the upper right hand corner, so you can flip cards easily and quickly as you are talking. They also from time to time had a bright red Clip board. All of these things work, and look good, choose your favorite, prepare them in advance, and if there is any doubt that you might forget the three line title of the fifth speaker on the panel you’re introducing, use them!
Put what you need on the cards, after practicing you will know the places where you trip up or forget or get the two parts of someone’s last name turned around (people care about this!). The cards I hold on stage have some of this bullet point text (especially the transitions – opening words and closing words for each idea/story), and the key words written larger that I can glance at if needed.
7. Practice!- Once I make my cards, I carry them around and practice everywhere in the days before and during the event. I take them with me to cafés, I pace in my hotel room, I go through tricky text transitions, or complicated names, or super long titles ( and there will be many) before I go to sleep and before I get up. You can do this with your eyes closed.
Doing this will also help you revise and change word order or transitions so the words and narrative seems more natural. Once you are familiar with the written script, you will be able to slow down and get comfortable as you know where you’re going with the text. And this will make that last minute additions or name changes less of a problem (e.g. when a speaker asks you to call him or her by their nickname rather than their formal name just before going onstage, etc.) You want it to be super smooth and easy onstage and this takes a lot of work! I had several speakers ask me if I was using a teleprompter, which made me smile. Maybe it’s my line of work, but I haven’t seen one of these yet! ( I have heard of an iPad app, and have seen moderators use ipads once in a while, but I will probably continue to do this the old fashioned way for now).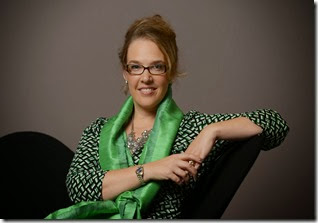
The Day of the Event
1. Confidence and Looking Good– I will venture that this applies to anyone getting on a 360 degrees stage ( or any stage where you are being watched by a thousand plus in the room, any number on simulcast, and then for perpetuity on the internet.) We all have our strategies. I got my hair done professionally, it’s the only time a year I do! There was a professional makeup station in the Speakers Room, where we convened for our Speakers briefing 30 min before going onstage, because the lights and filming can do funny things to your features and complexion.
You need to think about what to what to wear (stage and mike friendly clothes). I was always on my feet and walking up and down the steps before and after speakers, interviews and panels. For women, low heels are definitely best and your feet will thank you at the end of the day – I stand up about 10 min or more before the scheduled end of any session just in case it stops abruptly and you need to hustle up (elegantly of course) on to the stage. You don’t want any tripping. For the microphone, if you have a hand mike no problem, but I try to avoid that as I want to be able to clap and I will also have my cards in my hands. So a Madonna mike works best, and for that you need a belt or some hidden way to fix the Madonna mike to the back of your clothing (jacket, belt, or camisole). The sound team also discouraged earrings (actually taking them off me) as the can can clank or get caught in the mike.
I try to wear something interesting and colorful, even a little sparkle if you can get away with it ( I’m thinking more of necklace or pin than full length evening gown and tiara). This goes for all speakers but especially the MC as people see you over and over again on stage all day. Remember that they will be looking at you at 8:30 in the morning and 8pm at night, and tired or hungry or in need of caffeine, you can at least try delight both minds with your words and eyes with your turquoise and magenta scarf.
2. Speakers Briefing: As noted above, having a scheduled meeting of speakers directly before the event is incredibly useful and serves a number of functions. First, it lets you check that all speakers are present- there’s nothing like introducing someone who is stuck in traffic 3 km away. Second, it lets you go through the mechanics of the session with all the speakers together. You might have done this before with the panel moderator or even all the speakers, but it will only be when they see the stage and the huge audience sitting around it that they will really want to know who walks on first, what chair they should sit in and how long they can talk. Finally, it lets you check name pronunciation, title accuracy and give them confidence in how you will introduce them to the audience and frame their session. And of course it lets you establish some rapport and remind them of your name so they can talk to you on stage and thank you by name. These little touches make the session seem more friendly and less formal or staged – that makes the audience feel more comfortable and the discussion going on in front of them more accessible.
3. Bring Food: You may not have time to, or want to, stop for the scheduled meals. It is hard to “grab and go” when you are the MC as everyone knows you and you will get stopped for an interesting chat everywhere you go. If you need to prepare, you might rather eat your Power bar in your room.
Moments Before
1. Where are Your Cards? At this stage you are still keeping the prompt cards for the next session in your hand and now only thinking about one session at a time, literally relegating anything from the next few sessions to the back of your brain and the past and upcoming cards to your bag.
2. Your stuff– When you’re onstage you don’t have any place to keep your stuff, bag, other papers, lipstick etc. Find that place first, so you are not looking under every chair for it at the end of the session, because as soon as you stand up, someone else will sit in your empty chair (even with a reserved sign there is something oh so tempting about a front row seat) and by the end of the session you will have sat all over the place. Bring the minimum, and put it under the chair of your neighbour or someone you know who will not be jumping up all the time to take the stage. This might seem like a small point, but it will take up residence in a small paranoid spot in your mind that you need to be totally zen and not worried about your handbag.
3. Take a deep breath: Ok, you are about to walk up those steps. Breath deeply and smile. You might want to do some Amy Cuddy “Power Posing” to get you ready and confident to go onstage. I also write at this stage on my first card at the top in big letters “SLOW”, “BREATH”, “PAUSE”, for obvious reasons. If that’s the only thing I register in the bright lights and 2000+ eyes! then the rest will go much easier. Then you step up, confidently…

Onstage
1. Voice/Body: As there are books written about this, I will only repeat two pieces of advice given to me by Lizzie the first time I did this big stage work: 1) Pause before starting and look at the audience (I am an MBTI ENFP and tend to open my mouth first and think later, this helps enormously); and 2) Emphasize at least one word in each sentence. It can literally be any word, but do that and it immediately adds interest, voice inflection, and give you a natural pause (breath, think, collect visual feedback). Even if you only do this at the onset of your introductory remarks, it will help with flow. Try it!
2. Try to Enjoy Yourself! I have to tell myself this over and over, and to be honest it starts to be true only about 1 hour into the day, when feedback starts sinking in. I know intellectually that it is a great privilege to have this role, as well as a great responsibility, and that the role should be fun and I should try to enjoy it. But it takes me a while to get here. Once I start seeing positive reactions with my own eyes and hearing it from others, then the mantra starts to have the desired effect. And this calmness and sense of enjoyment is critical for me to calm the voices in my own head so that I can deeply listen and connect into the richness of what is going on onstage.
And there you go!
I can not emphasize enough how important good event structure and design is. When you are done, thank that terrific Programme manager for their months of effort in Programme development, identifying timely topics, the right speakers and developing the briefing notes that were sent out in advance. (Thank you Jennifer!)
Being the MC isn’t just memorizing titles and names and the sequence of sessions. In its best and most helpful form, it is a guiding, weaving and connecting role. It helps people understand why the topic is interesting and important for them, why they should listen and why they should care. It connects the different sub-themes into a powerful whole. In creating meaningful frames, it helps the audience connect to the broader narrative of the overall conference, and invites them to draw their own learning. This is the work of the MC from my perspective.
A gentle warning, this kind of work is both mentally exhausting (you are probably the only person in the room that is present and deeply listening 100% of the time) and physically exhausting (reread shoes part). And it is at the same time incredibly gratifying to support collective learning, one thousand people at a time, in this way. If you get the offer, take it, and bear in mind that it is more than just walking on stage on a very exciting day.


Leave a Reply
Want to join the discussion?Feel free to contribute!