(Note from Gillian: This is a very long, detailed, and rather geeky post. I write this as I have been asked a few times recently for “how to” information on how to set up these kinds of group work templates for virtual workshops.)

As we get more comfortable with getting work done collectively through No-Fly Workshops, innovations begin to emerge as we challenge ourselves with facilitation questions like, “How can we run this interactive activity virtually?” Rather than lowering our ambitions about what we can accomplish with an entirely or partially virtual group, we can take these as facilitation design parameters (similar to having to work with theatre format, or not knowing how many people will show up to your parallel side event) and come up with a design that is fit for purpose.

Everyone is now familiar with Google Docs, although perhaps less so Google Sheets (the Excel equivalent). These are both incredibly useful in virtual workshop contexts. Below are two ways to use them to support group work. I expand at the end into one application of Google Sheets that is perhaps less well-known, but very valuable in helping to solve a couple of familiar workshop issues around identifying key messages from group work and (too) long report backs. I provide detailed instructions at the end of this post for how to set up an Aggregator Google Sheet that collects highlights from different small groups’ work recorded on individual sheets, and automatically pulls them together into one summary sheet.

I start with two scenarios for how to capture and guide a group’s work with Google Docs/Sheets – 1) Co-writing a product document of some kind; and 2) Capturing ideas/answers to questions through small group work.

Preparation for both these scenarios:

  1. Decide on “permissions” in advance – can everyone or only some people edit the document (with others in read only)? If the group is small, you might give everyone the right to edit. If your group is larger and you will have smaller sub-groups working on sections, then pre-assign the small sub-groups and decide who will be the recorder/rapporteur for that group and give them editing permission. If you pre-assign groups and recorder, make a table that indicates which group people are in, and who is the recorder, and share that table in advance.
  2. Set up a “Back Chat Channel”: This could be a WhatsApp group for all participants, and if the Facilitator sets this up, you will also have all members connected to you in case you need to contact them individually during the workshop.
  3. Always write the exercise instructions on the Google Doc or Sheet. When people finally get into their part of the document or groups, they might very well have forgotten what they were supposed to do!


Scenario 1: One virtual group needs to collectively write a document or write parts of a document (e.g. a proposal, a strategic plan, a book chapter, etc.)

OutputA collectively written document.
Online documentGoogle Doc
PreparationIf you have the headings for the different sections of the document (e.g. table of contents), paste that into a new Google Doc. If you do not, then your first exercise might be to have a brainstorming about the section headings (you can also do this BEFORE the workshop). Number the sections.
Activity (small group – 8-10 people)
  • Provide people with the link to the google doc.
  • Slower approach: If you want to discuss collectively and write the sections all together in real time, then have one person type and the others contributing ideas. This becomes a plenary activity. This is slow and can get messy. Plus even with a small group, people will struggle to jump in if you have any louder people, so this can be boring for some people. This can still work with a small group that  knows one another well and has good group dynamics.
  • Faster approach: Assign people to the numbered sections (this can be based on competencies or randomly assigned – e.g. putting your writers in alphabetical order to assign them.) People will write on the same document at the same time, but only initially on their assigned section.
  • Step 1: Give people a set amount of time to write. It is better to write in chunks and check in with people periodically for questions or comments. You can send an announcement in the chat to provide a 10 minute “warning” and the end.
  • Step 2: Once people are done with their sections. You can start a new activity asking people to read and comment on the other sections. Assign a time, and give them a 10 minute warning just before it is up.
  • Step 3: After the commenting period is over. Ask people to go back to their original section and review the comments, taking them into consideration and making a next draft of their section. Have them highlight any comments or questions for which they might need more information.
  • Step 4: After the writing, open a plenary discussion that allows section writers to clarify any comments or questions that they didn’t understand or would value more input. If it is useful, after this clarification round, you can give the writers some more time to finalise their sections.
  • Step 5: Open a final plenary discussion about the experience, what is missing, or what is to be done. You can create a new google doc that has Next Actions, Responsible person(s) and a Timeline or Deadline section. You might need to iterate your document further, or involve more people. This can potentially be done asynchronously after the workshop.
  • Note: While people are working, they can stay connected to the main workshop platform (Zoom, GoToMeeting, Skype, etc.) but mute themselves and take off their camera while they are writing their sections or comments on others, coming back in for the plenary check-ins and discussions.
Activity (large group – over 10 people)
  • Follow the above activity sequencing, but create small sub-groups (assigned in advance) and have them work together on another platform (Skype, MS Teams, or use the breakout room function in Zoom, etc.)  so they can talk while they write. They are still using the same shared Google Doc and link. The sub-groups can decide if one person writes and the others talk. Note you need to allocate more time for this kind of group work. It takes more time when a group is working, versus one person writing alone.
  • People can still stay on the same platform and mute themselves while they are doing their sub-group writing.


Scenario 2: Small groups need to brainstorm and provide responses to a question or set of questions.

OutputIdeas and answers to a question or questions (this might also provide input into a strategy etc.)
Online documentGoogle Doc for each group OR a Google Sheet with one tab per sub-group.

How to choose? If you have a report back, it is a little fiddly to click through to different Google Doc links, especially if you have some people who are only connected through audio (e.g. dialed in through their phones) who are clicking through themselves following along. It is easier to have one Google Sheet with multiple tabs, and then people can just click tabs to see the results of the different groups’ work. This latter also has the advantage of keeping all the information in one place for ease of sharing and use later.

PreparationYour choice of a Google Doc or a Google Sheet also depends on what you are doing. If you have, for example, four groups working on a complex set of questions in parallel and you don’t necessarily need to share their detailed results with the others, then you could make 4 separate Google Docs. This could be more appropriate for longer and more involved group discussions.

If you have four small groups that are brainstorming or answering one or two questions, then you might want to set up a Google Sheet that has 4 tabs (each labelled with a different group name), and ask people to work on the same Sheet but on their designated tab.

Designate the groups in advance. If you want to let people choose their group, then ask them to choose in advance through email or a polling tool like survey monkey, etc. Make a table to share to ensure that people know which group they are going into, what document they will work on (link), and how they will convene in their smaller groups. This can be through the breakout group function of your platform, or you can set up skype, MS Teams or other channel.

Activity
  • In “Plenary”, announce the activity and remind people of their groups by sharing the table that lists the group members. Explain what they will be doing once they get into their groups, ask for any questions then.
  • Give people a way to contact you if they have any problems (e.g. through WhatsApp).
  • Tell people when they need to come back to the Plenary.
  • As a facilitator you can watch the Google Docs or Google Sheets fill up, and if one of the groups is not making progress, you can check in with people in their small groups through WhatsApp or other backchannel. Note you may need to refresh your browser as there might be a delay in updating the shared doc.
  • Report backs? After the designated time period, when people come back to the “plenary”, you can ask for a representative from each group to share some highlights and share their screen, or you can share your screen, or you can ask people to click through the document themselves.
  • This part can be very long! You need to time it (e.g. give each group 5 minutes) or come up with another way to limit what people say, particularly if it is not essential for everyone to know every little detail about another groups’ work! For a neat way to help groups synthesize their discussions, you can create an aggregator Google Sheet (see below).

Helping groups identify key messages and be concise in their report back – Creating an Aggregator Google Sheet

When people have their group’s entire results in front of them, reporting back can be very long and overly detailed. It is hard in real time for many people to synthesize on the spot, and they want to honour the whole discussion. This is the same for both a F2F workshop and a virtual one. In addition, sometimes people don’t care very much about the nitty gritty of another groups’ work; they just want to hear the key points. However, report backs are expected, they can be useful for making bigger picture observations, and can acknowledge and appreciate a group’s work. So it is hard to avoid them. But you can make them better!

In a F2F workshop, I might give a group a template to work on with the key questions, and at the end of their discussion another smaller template asking them to distill out 3 key messages or highlights from their group’s work. Then I ask them to report back using the highlights template, rather than their longer, group work artefact.

You can do this in virtual meetings as well. A ninja tip (as my Luc Hoffmann Institute colleague who created one recently called it) is to develop a Google Sheet that has an aggregator function. By this, I mean, on each group’s tab there is one space where the group can discuss their question and record their answer in length, and a separate place where they write in their 3 highlights or key messages. Anything written in this second spot is automatically aggregated on a separate tab on the Google Sheet labelled “Summary” or “Highlights”.

When the group then gets to the report back part, you display the Summary tab’s sheet and that is all they and the other groups see. This Summary sheet gives you an overview of responses from all the groups, supporting a more focused and concise report back, as well as any subsequent observations for pattern spotting.

With this type of Sheet, as the organizer, you now get a write up of the longer discussion as recorded by the group on their designated tab, as well as their highlights on a separate one. Now you don’t have to wade through a lot of information to find key messages from the whole exercise.

Making this kind Google Sheet is very easy but takes some knowledge of Excel. For those who are whizz’s at Excel you might already know how to do this and be happy that it is similar in Google Sheets. If not, here is a description to follow below:


Setting up your Aggregator Google Sheet

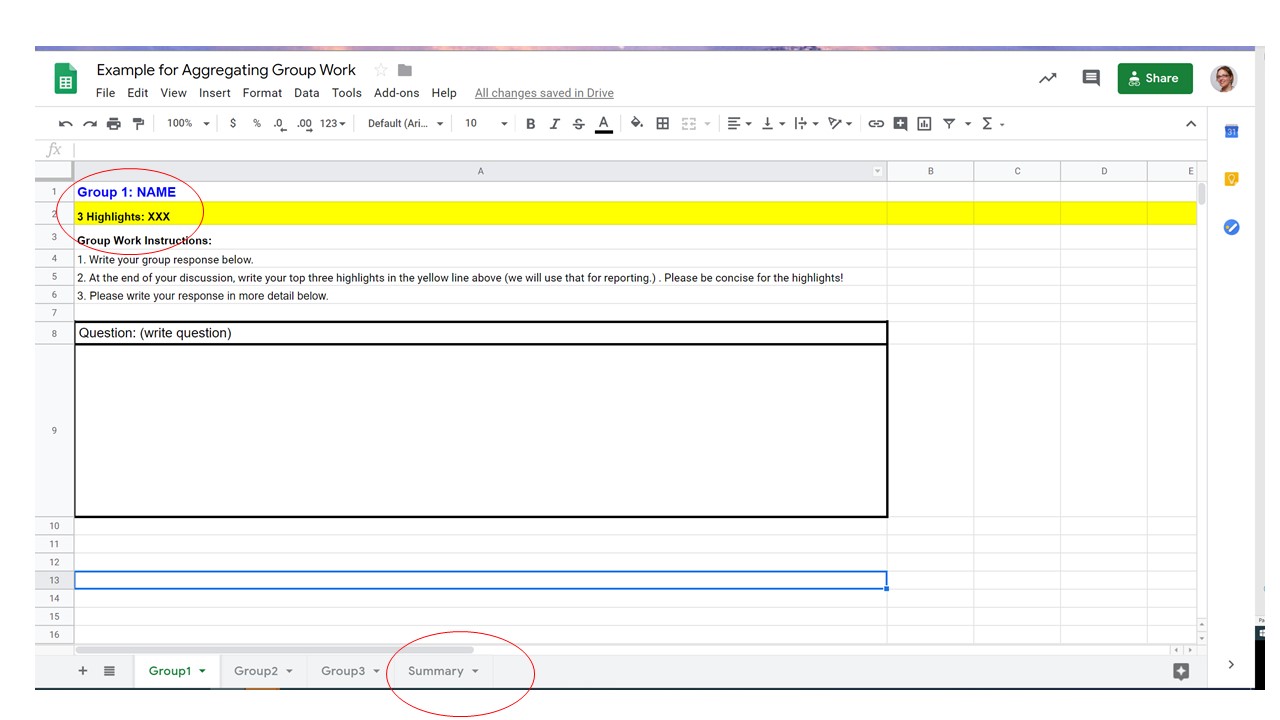
First set up your Google Sheet with your “Group” tabs and a separate tab for the “Summary” (see below). Note that you need to have a one-word name for each sheet with no spaces. E.g. instead of “Group 1” you need to call it “Group1”.

Note: You can make the Sheets on the separate tabs as pretty or as plain as you like – this is a template, you can be creative! Below I changed font colour and font size for the title, put borders around my question and answer area, and highlighted the aggregated cell/line so it was easy to see. For each separate sheet, write in the group name again at the top, the question, as well as instructions for group work. (click on the image below to enlarge)


Next you will set up your aggregator page. Go to your Summary tab, here you need to enter a few simple formulas so that this sheet pulls the answers from the other sheets automatically (same as in Excel) (click on the image below to enlarge):


For this, you need to:

  1. Click on the cell in the SUMMARY sheet where you want the highlights to show up (e.g. the cell under Group 1).
  2. Type “=”
  3. Now go back to the sheet from where you want to draw the information and click on the cell where that information will be written (e.g. the “Highlights” cell)
  4. Press RETURN (it will automatically take you back to the SUMMARY sheet). Now your formula is there that links the key cells from the two sheets (SUMMARY and GROUP1)

Now when you go back to the SUMMARY sheet, you see the following formula in the cell under Group 1 as follows: =Group1!A2  (A2 is the cell you connected to on the Group 1 sheet)

  1. Repeat for the other group tabs until you have all the highlights connected with the SUMMARY sheet. Now in subsequent cells you have =Group2!A2   =Group3A2, etc.

You will see how easy this is once you try it. What you get in the end will be a helpful support to your virtual group work, making reporting back more efficient, pattern spotting easier, and giving you concrete outputs to work with in the next steps of your No-Fly Workshop. (And please feel free to add additional ideas on how to use them in virtual workshops in the comments section below.)


No-Fly Workshops are becoming increasingly popular as people become more sensitive to carbon emissions from air travel, respond to budget freezes or higher scrutiny of trips and travel, and try to profit from the time savings afforded by avoiding long flights or trips to meetings.

We know that face-to-face (F2F) meetings are good for social capital and relationship building, and can be important for achieving soft outcomes from group identity creation to shared ownership of a great collective result. But after relationships have been built, what are the options for teams or partnerships that have work to do, but also want to benefit from all these environmental, economic and personal productivity savings?

I recently had the great pleasure to work with a tri-continental team on a strategic consultation exercise during which: a) The whole team needed to share an understanding of future organizational objectives; b) Team members in different constellations needed to work together to generate key inputs; and c) These inputs needed to be shared with the whole group for further validation and value-adding discussion so that the process could go forward to the next step with everyone’s support.

This workshop would have taken a day or more to accomplish the stated goals. To execute in F2F format, it would also have produced over 20.5 tonnes of carbon from the air travel it would have needed to convene the team in one place, not to mention cost many thousands of USD in travel costs, and implied days of travel time for team members in other parts of the world – in this case, Europe and Latin America. We had bigger groups in two of the organization’s offices, and a few individuals joining from other locations.

In the end, the following virtual format was used:

  1. Four, 2-hour online workshops were held starting from 09:00 EST/14:00 GMT/15:00 CET and ending at 11:00 EST/16:00 GMT/17:00 CET. These were scheduled over an 8-day period, with gaps of a few days in between the first three calls (which helped with collecting feedback from those participating and tweaking the meeting process).
  2. Go-to-Meeting was the platform that we used for plenary discussions. MSTeams was used for small group work. The largest group always stayed in the Go-to-Meeting space, keeping that open for the duration of the workshop.
  3. A Google doc was designed to help small groups capture the outputs of the breakout discussions for each of the days (each day had a different theme), with one tab for each breakout group (labelled with the group name) created for each day. The questions to be answered through the group work on the different sheets were the same for each group in this case, although the groups could modify the questions and the framework for responding.
  4. A Word doc was sent to all participants in advance of each of the online workshops with the link to the Google doc for that session, a reminder of the Group topics, and the list of members for each group. Instructions as to whether the group would move to another room, or stay in the main room were included.

The first of the 2-hour sessions was somewhat of a pilot. We spent that session entirely in plenary using a Mindmeister mind map to capture the outputs of the plenary discussion. However, we quickly understood that we needed some further discussion on the overall framework and rationale for the exercise, so some time was devoted to a presentation during the next scheduled staff meeting. This happened to fall between Workshop 1 and 2, and had a more traditional online presentation format with a Q&A afterwards.  After that, as we were 14 people and wanted to have as much time as possible for individual contributions, we decided that small group work would be more effecient at least for part of each workshop. Therefore, for calls 2, 3 and 4, we used the following design:

  • Plenary opening (in the Go-to-Meeting space):  Welcome and reminder of the purpose of the 2-hour session, overview of the group composition and topic areas for this day, instructions for the group work, and the time to reconvene in the Go-to-Meeting space. (10 min)
  • Small group work: The largest group stayed in the main virtual meeting space. Some other people physically moved rooms if they were with one of the two larger groups in one of the offices.    Those people not in the larger group muted their microphones and turned off their cameras in Go-to-Meeting, and went onto the other platform for their small group calls (MSTeams in this case, but this could also be Skype or another). All the groups connected to the one google doc, and used their appropriate group tab to discuss and answer questions and capture notes. Each group designated a facilitator, as well as a rapporteur who would capture the discussion on the Google doc. In the bigger group, the external facilitator (in this case, me) stayed with that group and supported facilitation as needed and helped keep track of time. Some groups found that people had already included some ideas on their Google doc – this was because the Word document with the links had been sent in advance, and those who could have contributed to more than one thematic discussion encouraged to add some of their ideas in advance, with their initials.   (45-50 min)
  • Plenary exchange: After the parallel work, the groups reconvened in the Go-to-Meeting space to share the results of their discussions. For this plenary discussion, we used the “record” option for Go-to-Meeting, so that the discussion could be referred back to later. For the plenary exchange, we each clicked on the appropriate tab of the google doc to follow along as one team member shared their discussion. After each report, we took questions and comments, and added any additional thoughts to the template. As the plenary group was large, people also had the option to add comments and ideas to the google doc individually and noted their initials, so that we could get back to them if there were questions about what they added. This way it was not necessary for everyone to share in plenary – some could, and others could add their ideas in writing directly onto the Google doc.  (55 min)
  • Closing and Next steps: We had a little time at the end to take some closing comments from the host, and to talk about the objectives of the next call/the next steps in the process. We noted that the Google docs for each of the workshops were live and that people could also add ideas afterwards, again including their initials. (5 min)

This process got smoother and smoother, as people got used to the technology. We also tried a few different ways of recording the results of the small group discussions. Initially we let groups that went “off piste”  record the notes of the discussion outside the templates. But we eventually decided that it was better for people to use the templates, and answer the questions (bearing in mind that they could tweak the questions) for more task precision. We definitely saw the benefit of using this format a number of times over a few days – practice helped!

From the Facilitator’s perspective, I took some notes for myself that I wanted to share – I will want to use these the next time I facilitate a No-Fly workshop:

Before: Design
  • Design needs to be taken seriously by both the Facilitator and the hosting organization. It is tempting to think that this is like the conference calls of yore, when you just ask a question and (some) people talk. You will go miles further with a more complex design, a good discussion capture tool, and the technology and groupings decisions made in advance, written down and shared with all participating. Make an agenda just like you would with a F2F workshop, with timing to keep you on track.
  • Two hours is really the longest you can keep people’s attention online, and moving into groups keeps people engaged for that period. If you stayed in plenary the whole time you would need a break in the middle, and even with the break, two-hours in plenary would still be taxing, and guarantee a bit of attention drift for even the most committed participants.
  • All the discussion supports need to be made in advance, the Google doc, the instructions sheet (with links and groupings). This can be sent to people in advance so they can review them and have them handy.
  • Don’t make the templates too complex, and include the group work instructions at the top so that once people are separated from you in their small groups they won’t spend a lot of time trying to remember what it was they were supposed to be doing.
  • Build in extra time for some initial technical difficulties. As you will normally be using the platform that the team uses, someone from the team will likely be the adminstrator/convener of the session.  Know who your technical support person is – that is the person in the team who always knows how the technology works (in my experience, there is one in every team and probably one of the younger team members!)
During the Workshop
  • Remember that as the facilitator, your video camera will be on the whole time. People will be looking at you the whole time (in the breakouts you will stay with the big group, camera on, with your smiling face!) So think about that. Movements that you will make will be distracting, every turn of your head will be noticed, your facial expressions, your yawn, and everything else. If you are a fidgiter, you might want a stress ball nearby, as well as your water glass, your notes, your phone (on silent), your watch (also on silent), etc. all in your immediate reach so that your head is not bobbing in and out of the camera frame as discussions ensue.
  • As the facilitator in a virtual workshop, it becomes pretty obvious when you are doing something else. You can’t stand at the back of the room and take a break while people are watching the speaker. And to make matters worse (or more obvious), if you have glasses, the reflection in your glasses will show what is on your computer screen (this is the same for individual participants in front of their computers too). You are there to pay attention, support the group and deeply listen (if you are not trouble shooting or taking notes, or trying to find a participant, etc.)  – two hours is a long time!
  • Look behind you. I wrote a whole blog post about this: Look Behind You – it’s funny that I wrote this post 10 years ago, so the technology we were using is long gone, but the tips on how to manage your environment for an online workshop still apply.
  • Check your own  technology. I used a wired headset, as over a couple of hours (and as the facilitator I connected 30 minutes before the 2-hour call, so my online time was longer), my earpods can run out of battery if I’m not careful.  Also, if I have an option, I don’t rely on wifi for my connection, and have a wired cable, just to avoid any ups and downs in the wifi. You need to judge the reliability of your work environment.
  • Create your “cockpit”: I facilitated all of these workshops standing, using my standing desk. On this I have a large additional screen on which I displayed the Google doc and instructions. Beside this was my laptop with my webcam, as well as showing the webcams of all the other participants. I needed to be looking most of the time at my webcam, and still following the other documents, so they had to be in my line of sight. The workshop agenda I had in hardcopy and it was there that I took my facilitation notes by hand during the call. I had my phone on a stand-up charger just by my laptop so I could also see the skype chat (and WhatsApp). My “cockpit” had three screens of differing sizes and all my documents open or at hand.
  • Set up a communication means with the organizer. I used Skype to call and chat with my counterpart, but on reflection, during the workshop it would have been handy to have two WhatsApp groups available – one with the whole group to remind them about timing (e.g. when to come back from breakouts) and to see where people were (if someone didn’t come back, you could message them), and one WhatsApp with the main organizer so that you could ask bilateral questions, or check things as people were talking.
  • Remind people while they are speaking to speak slowly, and to pause from time to time. Similar to your role as facilitator in F2F environments, you will be helping other people jump in, so it is important that people not talk for too long. There seems to be even more of a barrier to entry for people to jump into a conversation virtually and it is harder for them to make eye contact or use the body language that they might employ in an in-person workshop to signal to the speaker that they want to get into the discussion. You will spend more time helping people contribute in this virtual environment.
  • All of the issues that would emerge in a F2F workshop will also emerge here and potentially affect people’s willingness to contribute. Whether it is trust, transparency, confidence, hierarchy – everything you as the facilitator may be keeping an eye on in an in-person workshop, you will need to keep an eye on in a virtual environment as well. Having methodologies that allow people to contribute without always speaking in plenary  – for example, using the google doc, allowing people to contribute asynchonously before and after, or even during the workshop,  in writing, etc. all these can help to manage some of these very human dimensions of collaborative work.
After: Feedback
  • It is incredibly useful after each of the workshops to have a debriefing call with the organizer to talk through what worked and what could be different next time. That helps continually modify the agenda.
  • It is also important to let all the participants know that they can send through observations on the process and suggestions, to you bilaterally, or to the organizers. Again this helps with adjusting the process.
  • I also used 10 minutes at the end of one of the early calls for people to write in their thoughts about “What worked” and “What could be different next time” on the side of the Google doc. In real time I wrote those two headings and asked people to take a moment to provide some quick feedback in real time. It just took a couple of minutes and everyone who had a reflection could contribute it without noting their name.

No-Fly Workshops have been around for a while, and they are certainly not going away. More and more people are considering this option for getting work done within distributed teams and networks, to cut carbon, costs and time. As technology advances, and our organizations invest in better platforms, so too do our motivations to learn how to use them more effeciently to get our collaborative work done.  Similar to sharing facilitation and design tips, as Facilitators, let’s try to share more and more of our “how to’s ” for these No-Fly workshops, as without all that flying around, we should have more time to do so!