No Flipcharts at No-Fly Workshops – Using Google Docs and Google Sheets to Capture Virtual Group Work Effectively
(Note from Gillian: This is a very long, detailed, and rather geeky post. I write this as I have been asked a few times recently for “how to” information on how to set up these kinds of group work templates for virtual workshops.)
As we get more comfortable with getting work done collectively through No-Fly Workshops, innovations begin to emerge as we challenge ourselves with facilitation questions like, “How can we run this interactive activity virtually?” Rather than lowering our ambitions about what we can accomplish with an entirely or partially virtual group, we can take these as facilitation design parameters (similar to having to work with theatre format, or not knowing how many people will show up to your parallel side event) and come up with a design that is fit for purpose.
Everyone is now familiar with Google Docs, although perhaps less so Google Sheets (the Excel equivalent). These are both incredibly useful in virtual workshop contexts. Below are two ways to use them to support group work. I expand at the end into one application of Google Sheets that is perhaps less well-known, but very valuable in helping to solve a couple of familiar workshop issues around identifying key messages from group work and (too) long report backs. I provide detailed instructions at the end of this post for how to set up an Aggregator Google Sheet that collects highlights from different small groups’ work recorded on individual sheets, and automatically pulls them together into one summary sheet.
I start with two scenarios for how to capture and guide a group’s work with Google Docs/Sheets – 1) Co-writing a product document of some kind; and 2) Capturing ideas/answers to questions through small group work.
Preparation for both these scenarios:
- Decide on “permissions” in advance – can everyone or only some people edit the document (with others in read only)? If the group is small, you might give everyone the right to edit. If your group is larger and you will have smaller sub-groups working on sections, then pre-assign the small sub-groups and decide who will be the recorder/rapporteur for that group and give them editing permission. If you pre-assign groups and recorder, make a table that indicates which group people are in, and who is the recorder, and share that table in advance.
- Set up a “Back Chat Channel”: This could be a WhatsApp group for all participants, and if the Facilitator sets this up, you will also have all members connected to you in case you need to contact them individually during the workshop.
- Always write the exercise instructions on the Google Doc or Sheet. When people finally get into their part of the document or groups, they might very well have forgotten what they were supposed to do!
Scenario 1: One virtual group needs to collectively write a document or write parts of a document (e.g. a proposal, a strategic plan, a book chapter, etc.)
| Output | A collectively written document. |
| Online document | Google Doc |
| Preparation | If you have the headings for the different sections of the document (e.g. table of contents), paste that into a new Google Doc. If you do not, then your first exercise might be to have a brainstorming about the section headings (you can also do this BEFORE the workshop). Number the sections. |
| Activity (small group – 8-10 people) |
|
| Activity (large group – over 10 people) |
|
Scenario 2: Small groups need to brainstorm and provide responses to a question or set of questions.
| Output | Ideas and answers to a question or questions (this might also provide input into a strategy etc.) |
| Online document | Google Doc for each group OR a Google Sheet with one tab per sub-group. How to choose? If you have a report back, it is a little fiddly to click through to different Google Doc links, especially if you have some people who are only connected through audio (e.g. dialed in through their phones) who are clicking through themselves following along. It is easier to have one Google Sheet with multiple tabs, and then people can just click tabs to see the results of the different groups’ work. This latter also has the advantage of keeping all the information in one place for ease of sharing and use later. |
| Preparation | Your choice of a Google Doc or a Google Sheet also depends on what you are doing. If you have, for example, four groups working on a complex set of questions in parallel and you don’t necessarily need to share their detailed results with the others, then you could make 4 separate Google Docs. This could be more appropriate for longer and more involved group discussions. If you have four small groups that are brainstorming or answering one or two questions, then you might want to set up a Google Sheet that has 4 tabs (each labelled with a different group name), and ask people to work on the same Sheet but on their designated tab. Designate the groups in advance. If you want to let people choose their group, then ask them to choose in advance through email or a polling tool like survey monkey, etc. Make a table to share to ensure that people know which group they are going into, what document they will work on (link), and how they will convene in their smaller groups. This can be through the breakout group function of your platform, or you can set up skype, MS Teams or other channel. |
| Activity |
|
Helping groups identify key messages and be concise in their report back – Creating an Aggregator Google Sheet
When people have their group’s entire results in front of them, reporting back can be very long and overly detailed. It is hard in real time for many people to synthesize on the spot, and they want to honour the whole discussion. This is the same for both a F2F workshop and a virtual one. In addition, sometimes people don’t care very much about the nitty gritty of another groups’ work; they just want to hear the key points. However, report backs are expected, they can be useful for making bigger picture observations, and can acknowledge and appreciate a group’s work. So it is hard to avoid them. But you can make them better!
In a F2F workshop, I might give a group a template to work on with the key questions, and at the end of their discussion another smaller template asking them to distill out 3 key messages or highlights from their group’s work. Then I ask them to report back using the highlights template, rather than their longer, group work artefact.
You can do this in virtual meetings as well. A ninja tip (as my Luc Hoffmann Institute colleague who created one recently called it) is to develop a Google Sheet that has an aggregator function. By this, I mean, on each group’s tab there is one space where the group can discuss their question and record their answer in length, and a separate place where they write in their 3 highlights or key messages. Anything written in this second spot is automatically aggregated on a separate tab on the Google Sheet labelled “Summary” or “Highlights”.
When the group then gets to the report back part, you display the Summary tab’s sheet and that is all they and the other groups see. This Summary sheet gives you an overview of responses from all the groups, supporting a more focused and concise report back, as well as any subsequent observations for pattern spotting.
With this type of Sheet, as the organizer, you now get a write up of the longer discussion as recorded by the group on their designated tab, as well as their highlights on a separate one. Now you don’t have to wade through a lot of information to find key messages from the whole exercise.
Making this kind Google Sheet is very easy but takes some knowledge of Excel. For those who are whizz’s at Excel you might already know how to do this and be happy that it is similar in Google Sheets. If not, here is a description to follow below:
Setting up your Aggregator Google Sheet
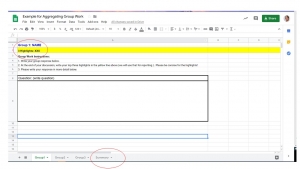
First set up your Google Sheet with your “Group” tabs and a separate tab for the “Summary” (see below). Note that you need to have a one-word name for each sheet with no spaces. E.g. instead of “Group 1” you need to call it “Group1”.
Note: You can make the Sheets on the separate tabs as pretty or as plain as you like – this is a template, you can be creative! Below I changed font colour and font size for the title, put borders around my question and answer area, and highlighted the aggregated cell/line so it was easy to see. For each separate sheet, write in the group name again at the top, the question, as well as instructions for group work. (click on the image below to enlarge)
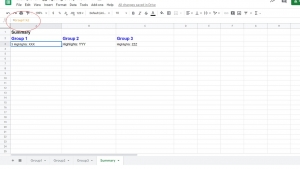
Next you will set up your aggregator page. Go to your Summary tab, here you need to enter a few simple formulas so that this sheet pulls the answers from the other sheets automatically (same as in Excel) (click on the image below to enlarge):
For this, you need to:
- Click on the cell in the SUMMARY sheet where you want the highlights to show up (e.g. the cell under Group 1).
- Type “=”
- Now go back to the sheet from where you want to draw the information and click on the cell where that information will be written (e.g. the “Highlights” cell)
- Press RETURN (it will automatically take you back to the SUMMARY sheet). Now your formula is there that links the key cells from the two sheets (SUMMARY and GROUP1)
Now when you go back to the SUMMARY sheet, you see the following formula in the cell under Group 1 as follows: =Group1!A2 (A2 is the cell you connected to on the Group 1 sheet)
- Repeat for the other group tabs until you have all the highlights connected with the SUMMARY sheet. Now in subsequent cells you have =Group2!A2 =Group3A2, etc.
You will see how easy this is once you try it. What you get in the end will be a helpful support to your virtual group work, making reporting back more efficient, pattern spotting easier, and giving you concrete outputs to work with in the next steps of your No-Fly Workshop. (And please feel free to add additional ideas on how to use them in virtual workshops in the comments section below.)


Thanks Gillian for sharing! All the best, Christiane
Thank you for sharing your experience and providing detailed information. Olympia
As always, love to check in on your posts with learning and wisdom to share! Hope are well and staying safe at this crazy time!
Thanks, Michelle! All is well here so far and enjoying learning about learning in this new virtual space.
Excellent, I love the detail of your blog. Thank you so much for being so generous 🙂