Tag Archive for: virtual


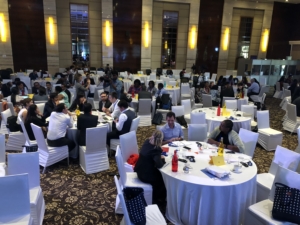
If you can’t run your Open Space session in real life (like this), how can you do it virtually?

This is a very detailed account of how to use Zoom and the Breakout room function to replicate Open Space Technology-like sessions online.

Executive Summary:

  • You can run Open Space Technology (OST)-inspired Sessions in Zoom with large groups using the breakout rooms function.
  • Pre-assigning people to our 10 groups didn’t work for us, so we assigned them manually once the session opened.
  • To do this, participants need to log-in early and you need a specially formatted excel list of names to make manual allocation most efficient.
  • Don’t change Zoom Host rights in the middle of preparing the groups, how to prepare and other learning.


If you might be tempted to run something similar in the future, read on…


Recently we ran an online peer learning and good practice exchange for a specialized global biodiversity community whose 350+ members normally meet bi-annually face-to-face. At these conferences, there has traditionally been an Open Space Technology session where community members share their work, learning and big questions on a set of salient topics. We wanted to replicate the dynamic of this virtually in an online event featuring a number of rounds of hosted small group discussions offered in parallel. For each round, participants chose the small group discussion to attend which was of most interest. This blog post shares ‘how to’ information and some learning from our experience doing this.

Using Zoom Breakouts for Parallel Small Group Discussions

We chose Zoom as the platform because of the breakout room function which allows you to designate up to 50 separate breakout sessions that can run in parallel at any one time. We had 10 topical discussions that we wanted to host, and we wanted to run two consecutive rounds (e.g. people picked one topic to attend for Round A, and then, after a break, they attended a different topical discussion for Round B). We ran the whole sequence of two rounds twice to accommodate participants in different time zones.  People could attend one or the other, and a few people attended both.

The schedule looked like this:

Session 1 (09:45 – 12:00)

  • Check-in (09:45 – 15 minutes in advance of the opening to set up breakouts for Round A)
  • Plenary opening and how the exchange will work (15 minutes)
  • Move people into breakout groups
  • Round A: 10 topics in parallel (40 minutes)
  • Break (15 minutes – people stay connected – create breakouts for Round B)
  • Move people into breakout groups
  • Round B: 10 topics in parallel (40 minutes)
  • Plenary highlights and closing

Session 2 (15:45 – 18:00) (Repeat as above)

Preparation – 7 Steps

To prepare for the Community Exchange, there were a number of steps we needed to follow:

Step 1: Pick the topics. This was done based on feedback from the community, from which the organizer selected the 10 topics.

Step 2: Identify a discussion host for each topic. The organizer identified country representatives and global team members from within the network who had expertise in one of the topics and invited them to host that small group discussion.

Step 3: Schedule the Zoom session(s). The Host does this (in this case it was me, the facilitator). As these were large group sessions (from 60-100 people expected at each session), we enabled the Registration, Password, and the Waiting Room features of Zoom. For Registration we asked for name, country, and organization. In Zoom, the Registration feature enables a two-step process – once people fill in the online registration form, they automatically receive an email with a link and password to the Zoom meeting.

Step 4: Send out an announcement with event information to the network, with: 1) The Zoom link that takes them to the registration page;  2) A link to a google form asking people to select their top 5 topics from a drop-down list of the topics on offer; 3) Information about how it will work – for example, tell people that you will do your best to place them in one of their top 5 choices for each round, and that if they do not specify preferences, they will be put in a group at random on the day.

(Note: This was one of the lessons – while 100% of people registered to attend (you can’t join the Zoom meeting without doing that), only around 50% of people filled in the google form to indicate their preferences. The others just showed up, so they were randomly placed in rooms which takes extra time. We will do this differently next time as we want more people to identify their topics in advance so discussions can be more focused – how, is explained at the end of this post.)

Step 5: Prepare your topic discussion hosts. For this step we organized three 30-minute Zoom sessions where the hosts of the 10 topics, as well as the organizer’s team (who supported the discussion hosts) were invited to attend a preparatory session. During this short session, we talked through the schedule, their role and responsibilities, and then let them experience the breakout room function from both a participant perspective, as well as a Co-host perspective, as we made all these people Co-hosts once the meeting started. They learned how to share their screen, use some of the Zoon security functions, etc.

Step 6: Put together the participant lists by topic. We needed to make 2 Lists for things to work smoothly. This was a particularly important step! Once people filled in the google form with their preferences, we put together an excel worksheet for each session (Session 1 and 2) and round (A and B) within each session (so four worksheets in total.)

Each worksheet had 2 Lists. For List 1, we created a column for each of the 10 topics on offer during that specific round, the host for the topic and the team support person, followed by the list of people who signed up for that topic as their first choice.  This helped us initially place people, as well as see how many people were signed up for each conversation. (click on images to enlarge)

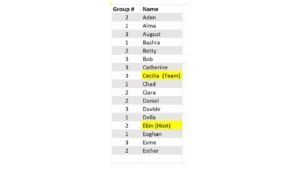
List 1 was useful to see how the groups were shaping up as we had a limit of 12 people per group. Once full, we would put people in their second choice group.  List 2 was more important on the day for putting people into the breakout rooms. This list was a master list of all the people who had signed up for a topic, organized in a column alphabetized by FIRST name (as that is how the Host sees names in Zoom), preceded by another column with their topic number.

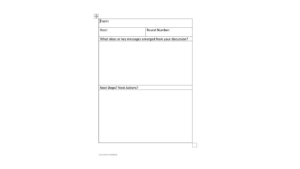
Step 7: Prepare the facilitation materials. We wanted to use a Zoom poll at the beginning of our session to map the group and see who was “in the room” (we asked about region, sector, etc.) and we scheduled a short poll at the end to understand people’s experiences – e.g. to see on a Likert scale how well people felt they could share their learning and experience in this format, and if they learned something new. We also created a simple word template for topic hosts to capture take away messages and next steps from their discussions. We sent this template in advance and asked them to fill it in after their sessions and send it back for reporting purposes.


What we learned about assigning breakout rooms – before or on the spot?

One thing that we did NOT do in preparation was set up the breakout rooms in advance in Zoom. It is very tempting to try to “pre-assign” the rooms in Zoom, especially when you have 60-100 people attending. Ostensibly to do this, when scheduling your meeting, you can choose under meeting options “Breakout Room pre-assign,” and Zoom offers you two ways to do this. That seems so easy, but in our tests this didn’t function reliably. I did two tests in advance, one using the option which invites you to “Create Rooms” and the other option with “Import from CSV” – CSV is a simple excel-like spread sheet. I had 5 people for each test meeting.

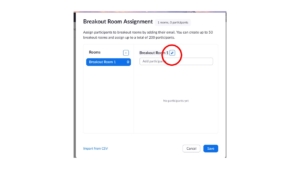
With the first “Create Rooms” option, you get a pop up that invites you to “Assign participants to breakout rooms by adding their email”. I did this for my 5 people. I changed the names of the meeting rooms in advance which you can do to match the topic names. Tip: Keep the group number in front of the topic name as that will make it easier later to find them. (“1. Green Bonds”) This will sound silly, but it took me AGES to find how to edit the room names – you need to go to the “Add participant” window and then hover over the room name for the little pencil to pop up.

So, the room was set up – now to see if it worked… Unfortunately, when I opened the breakout rooms for this first test meeting, only 1 of my 5 people had been pre-assigned into the designated room. The others were frustratingly unassigned – 20% success.

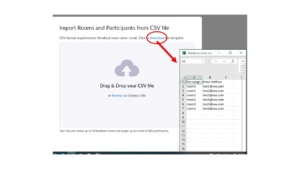
The second option to pre-assign people to breakouts is to use the CSV format. If you click on that option, it invites you to “Import rooms and participants from CSV File”. It also offers you a simple downloadable CSV file template to fill in.

I downloaded the file and put in the email addresses of my 5 people. In this second test, I got 3 out of the 5 people in the breakout rooms as pre-assigned. Better but still not 100%. And we could not figure out why this variation was happening even among 6 experienced Zoom users. As we had a large group, it felt too risky to wait and see if it would work on the day – who would be assigned and who wouldn’t be, and then try to fill in the gaps.

There are a couple of things to note about the Zoom breakout room function that figure in here:

  • People need to be signed into their Zoom account for pre-assignments to be applied.
  • You need to enable “join before host” for this feature to work (don’t ask me why)
  • (from the Zoom website) If you have Registration enabled and have external participants (those without Zoom accounts), you need to assign them to breakouts during the meeting.

It seems like pre-assignment option might work better if you have a closed system – just a group of colleagues sharing a company zoom account, or a class of students who are taking the same class week after week. This was not our case.

As we could not do a test with a very large group, the pre-assignment feature seemed to have a lot of caveats. We were enabling Registration for security purposes, AND we had two rounds per session, so we would have to manually allocate participants for Round B anyways (you cannot pre-assign two consecutive breakout sessions if you want to change the people in the groups). As a result, we decided to manually allocate participants to their selected breakout rooms, using the two lists described above.

What to Do During the Zoom Community Exchange Meeting

We opened the meeting 30 minutes in advance for organizers, the discussion hosts and the team members who would support them. I had enabled the Waiting Room, creating two-step process to join the meeting – first you enter the Waiting Room and then the host lets you into the main room. I admitted the facilitation team into the main meeting room, and had the other participants stay in the Waiting Room until the official start of our event.

As the Host (and the Co-Hosts can do this too), you can admit people into the main room from the Waiting Room individually, or you can choose to let everyone in all at the same time. When people are in the Waiting Room, you can send them messages. I sent them a message every couple of minutes that said, “You are connected to our meeting. Please stay connected, we’ll start promptly.” (I wrote this text on the Notepad app on my computer and copied it, so I could just paste it in as a waiting room announcement periodically and not have to type it over and over.) Note: We needed all participants to connect early and stay connected so that we could create the breakout rooms, which you can start assigning when people are in the Waiting Room.

We let all the topic hosts and team members into the main room as soon as they showed up so that we could do some last-minute briefing and Q&A and make them all “Co-hosts”. We wanted them to be Co-hosts so they had some powers in the breakout rooms– that is, they could disable screen share for participants, move themselves to another room, etc. if needed.

As soon as participants started to show up in the Waiting Room, we began to use our lists to assign them to the various breakout rooms.

Tip: What it means to be “Host” when using breakout rooms

Only the Host of the meeting can work with the breakout rooms (e.g. name them, make assignments and move people around). And there can only be one Host for any meeting. The Host can give up her Host rights to another person but cannot take them back. The other person must give them back to you. This is important for creating the breakouts; you cannot start this work (renaming the breakout rooms and starting to assign people), and in the middle pass the Host responsibilities to another person without losing all the work you did.

The same Host needs to start and complete the breakout room assignment process. Then once the breakouts are launched, they can hand over hosting rights to another and nothing is disturbed. This means you cannot be smart and get in there early, name all the rooms, and assign the early people, then hand over hosting to another person to carry on while you brief people etc. Everything is lost and the new Host will start from scratch.

As a result, you really need two facilitators to work with Zoom in this way – so Lizzie and I teamed up to make it work smoothly. We asked participants to come in 15 minutes early, as you can only assign them to their breakouts once they are logged into the meeting (they can be in the Waiting Room). But not everyone was there 15 minutes early; many people came in at the last minute, and some people joined 10 minutes late!  So, if you are the main facilitator (this was my role) opening the meeting, welcoming people, giving the first presentation and poll etc. then you need a second, technical facilitator who can take over as Host (this was Lizzie’s role) that can complete the breakout room assignments with the people trickling in after the meeting starts. The alternative is to not finish the breakout assignments and ask people to wait while you do that (time for a musical interlude?) OR keep all those unassigned people in the main room once the groups start and then assign the latecomers after that, which means they will start late. As we did not know how many people might be in this category, we decided to use two facilitators and have one solely dedicated to putting together the breakout groups.

Behind the scenes – assigning people to breakouts

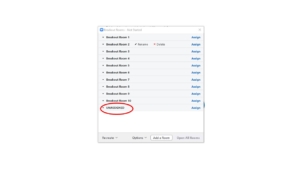
The Host assigning people to breakouts needs to have the two lists described above and needs to work quickly with the long list of names. In our case, part of which had signed up for a specific topical discussion, and part of which had not, thus would be randomly assigned to rooms. One thing that we discovered to dramatically increase efficiency at this stage was to create 1 more breakout room than needed (e.g. we needed 10 topical breakout rooms and we created 11 rooms), the final room was called “UNASSIGNED”.

As people logged into the meeting, the Host located their name on the long alphabetized list, along with their group number, and immediately placed them in the right room. However, if someone came in that had not signed up for a group, they were immediately placed in the UNASSIGNED room. This meant that at the very end, just before launching the breakout groups, you could see exactly how many people were in each group that had signed up in advance, see the total number of those in the unassigned room. You can then quickly move those from the unassigned room to fill in open spaces in the first 10 groups – we aimed to fill all rooms up equally with the same number of participants.

In the end, it worked just fine. We had enough time in the 15 minutes before (and well into the opening) to make Round A assignments manually, and had enough time in the 15-minute break between rounds to make the second set of assignments for Round B. We asked people NOT to disconnect during the break. Of course, a few did, but we manually added them into groups once they logged back in.

Last thoughts

Languages: We had some people for whom translation would have been useful. If you enable Interpretation on Zoom, it only works in the main room – thus in theory you could keep the group needing translation in the main “plenary”. For a large group this would not have been a great option, as there was a small but steady stream of people who lost connection and kept coming back into the main room, to be sent again to their breakouts. This would have been very disruptive for the group trying to work in the main room (with translation no less!) It might be easier to have a “whisper” interpreter (professional or informal) in the same breakout room with the person desiring translation support, and between the two or more of them, they set up a back channel for communication, such as a WhatsApp call or a phone call. Through Zoom they can see what is going on in their breakout room, but the audio is now coming from another source (mobile phone).  The person could still unmute to ask questions, and the interpreter could sequentially translate these for the group, then they could both go back on mute and resume interpretation. This is a work-around, but we thought it might work.

Technical Support: For a large group you really need ongoing technical support throughout the session. In addition to our two Facilitators, we had one person from the organizer team designated for tech support and provided his email address. Occasionally someone without sound or another problem would contact him either through chat or by email and they would work with together to try to get the person properly connected.  Also, while the breakout groups were in session, as the Facilitator, I stayed in the main room and responded to requests for help, or let people in from the Waiting Room who were late, or had gotten disconnected, placing them back in the breakout rooms. At times, I would have up to 4 people briefly in the main room before moving them back into a breakout room.  Our participant group was logging in from all over the world, with almost all of them working from home offices and laptops, so occasionally there were connectivity or other problems.

Also, under this technical support heading, it has to be mentioned that we did find that people using Chrome OS, Chrome Book and Zoom Rooms could not be placed in breakouts, no matter how hard we tried. After some struggles, we found this mentioned on the Zoom website. These people needed to log out and log in again using a different pathway. And finally, for a couple of people, no matter what they did, and what we did, they were either perpetually stuck in the Waiting Room, or in the plenary room and there was simply nothing we could do. This mysterious situation befell only 1 or 2 people with whom I had nice chats as I waited with them for the breakouts to end – interestingly, for the second rounds, they both moved smoothly into the breakout rooms with no problem. You have to just keep trying.

Overall, the sessions were very dynamic and the feedback from participants has been enthusiastic! The breakout rooms worked very well overall, with only some coming and going which was only obvious to me as the Host. To reduce movement in and out of the breakout rooms and to encourage people to settle into their discussions, we did disable the setting allowing people to come back to the main room on their own (now they needed to wait until they were automatically moved back by me). We also reduced the friction for new Zoomers by moving people to the breakouts automatically (this is also a setting when you are creating breakouts), versus requiring them to click on a pop-up asking them if they want to Join Group X.

One thing to try next time – Custom Questions for Registration

One thing to consider next time, to encourage people to register their topic preferences and have less people in the unassigned category to allocate, we will use the Zoom Meeting Registration process to embed the questions about which group people would like to join, instead asking people to separately respond in a google form.

Here is how to do that:

  • Enable Registration
  • Under “Manage my Meeting”, scroll down to “Registration” at the bottom of the page
  • Click “Edit” on the right, that opens a pop-up window
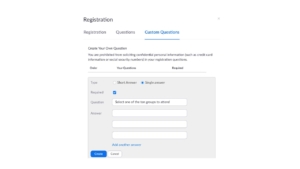
  • Go to “Custom Questions” – this adds questions that you want people to answer during the registration process.
  • Under “Create Your Own Question” click on “New Question”
  • There you can add a question of your choice. For us, we would want to require a “Single Answer” (so people have to pick one, versus “short answer” where people write in responses. You simply type in the question – e.g. “Select your first choice from the following ten themes”. Then add additional questions asking people to select their second and third choices. You can write in the 10 themes as answers to choose from.

This would make sure that everyone who signed up could be placed quickly into a group. Of course, one of the answers could be “Surprise Me!” if people really don’t care, and then you could place that person anywhere.

This was a long post, as we learned a great deal from running our Community Exchange in an Open Space Technology-inspired format. As this group intends to replicate this model at the regional level in their network, and for others who may want to try, I wanted to write down the steps before I forgot them!

Article by Lizzie Crudgington, Bright Green Learning

When helping clients design online meetings and workshops, we often face all sorts of assumptions about what you can and cannot do online.  Usually we find that you can do MUCH more than you first assume.  What you need is some creativity and thoughtful planning!

Here I share a few examples of some of the more unusual ways in which I’ve used Zoom in the last months for more informal online convenings and gatherings, such as various birthdays and other fun events. These are being shared in the hope that these times push us to challenge our assumptions about what we can and can’t do online, have fun testing new ideas (for example with kids, friends and family- push yourself to try new things in a ‘safe space’), and then find ways to adapt and integrate more lively and creative interactive elements in our professional as well as personal virtual lives going forward.

I’ve included some ‘how to’ steps below with these 20 examples, revealing some of the things to think about when preparing for these online activities.  If you feel so inspired – have a go!  And reach out with questions if you’d like more details. Included below:

  1. The Maker Challenge
  2. Read Together Online
  3. Sewing Workshops with Grandma
  4. Playing App-based Games
  5. Online Face-painting Game
  6. Hum that Tune
  7. Charades
  8. Mind-meld
  9. Pictionary Online
  10. Online Quiz with Riddles and Emoji Questions
  11. How Well Do You Know…? Game
  12. Guess the Song
  13. Musical Statues
  14. Blow Out The Candles on the Cake
  15. Choose a Themed Virtual Background
  16. Get Physical with a Speed Hunt
  17. Collective Cocktail Making
  18. Online Spinning Wheel
  19. Celebrity/Who’s in the Bag?
  20. Taking Cranium (the Board Game) Online


OK, let’s start!


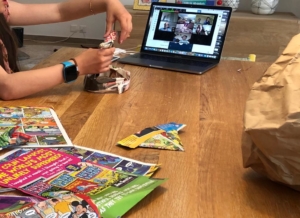
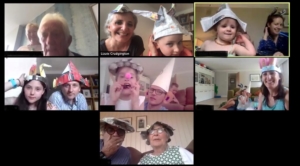
  • The Maker Challenge. The week before Easter, we planned an online family party and asked everyone to get scrap paper ready. We ran the party on Zoom with families in five locations. Each family had 5 minutes to make their Easter Bonnets from scrap paper – ensuring the camera was lined up so we could see one another’s creative process – and of course we wore the bonnets for the remainder of the party.
    (Other versions: Instead of an Easter bonnet, make a space helmet, pair of glasses, diving mask, a dress, a bouquet of flowers, a trophy, a car, the strongest bridge, the tallest tower…. The fun is in the making! And why stick to scrap paper?  Could be modeling clay, twigs found outdoors, LEGO…)

  • Read Together Online. Take photos of the pages of illustrated children’s books and upload these to Google Drive. In Zoom, screen-share the book and simply click through the pages.  We’ve had reading sessions with grandparents, as well as 6 and 7-year-old cousins reading their favourite books together.

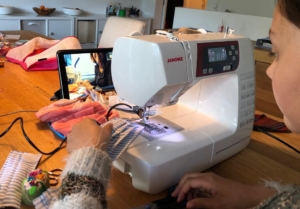
  • Sewing Workshops with Grandma. This was really simple.  We just set up Facetime (could use Zoom or other platforms too) with the cameras carefully positioned, and away we went. Home-sewn face masks – tick.

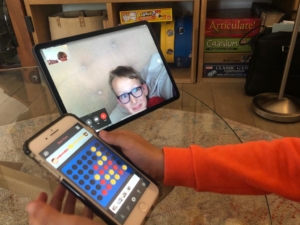
  • Play App-based Games such as Connect 4 and Rummikub – whilst using Zoom or Facetime to interact. We use two devices (a smartphone and tablet or computer) so that we can chat and see and hear one another’s reactions during the game playing – maintaining the social dimension.

  • Online face-painting game. How about it? Also during the Easter party, we played a face-painting game using only an eye-liner pencil. We gave a willing volunteer the challenge of giving face-painting ‘instructions’ to everyone else (based on an image provided), without using certain words (i.e. they couldn’t use the words rabbit, bunny, nose or whiskers). We did the drawing part with backs to the cameras and then, once complete, we had ‘the big reveal’. Ours was a Easter-themed bunny, but you could choose any face-painting theme.  An interesting exercise in the power of communication too – usually with entertaining results.


  • Hum that tune. To play this one, we combine Zoom with WhatsApp.  The name of the tune is picked from a hat, by the “game master”, photographed and WhatsApp’d to the player who’s turn it is to hum.  Then those ‘guessing’ the name of the tune race to submit the correct answer – either to a WhatsApp group or the Zoom Chat.  (We find that using the Chat for answers works better than shouting out the answer as it can be hard to hear the person humming, especially if the group playing is large.)


  • Charades. As we did for for ‘Hum that tune’, we combined Zoom with WhatsApp. The charade is picked from a hat by the game master, photographed and WhatsApp’d to the player who’s turn it is to act out the charade.  Those in the same team call out over Zoom.


  • Mind-meld. The idea of this team game is that a word (suggested by the one team) is given to all players on the other team who then have 30 seconds to each write down three words associated with that word.  If there is one word in common in what all players in the team write down, they win a point. To play this, the word is called out, and players simply use simply pen and paper to write down their three associated words.  After the 30 seconds they then hold their papers up to the webcam so everyone can see what they wrote and whether or not they win the point.

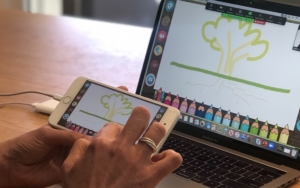
  • Pictionary online. For this, we’ve done it in various ways. One option is to use the whiteboard in Zoom and have players ‘annotate’ it using the ‘scribble’ tool.  Others can then guess either shouting aloud or submitting their guesses via the Zoom Chat or a WhatsApp group. Another option – which allows for a better touchpad drawing experience – is to invite players to use a drawing app on their smartphone or tablet.  If they connect it to their computer via USB, they can then screenshare what they are drawing.  The downside of this option is that it requires a bit more tech set up (getting people to install drawing apps on their devices), and you need to change who is screen-sharing every time there is a change in who’s turn it is to draw.
    (Another option: use paper and pen in view of the webcam.)

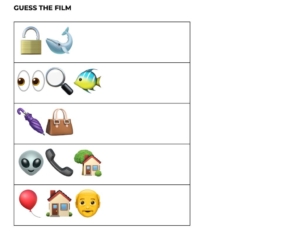
  • Online Quiz. There are so many ways to do this.  A few things we’ve done to ensure the quizzes are fun and interesting to all – ask everyone to contribute questions in advance. Include riddles and try some questions with emojis (e.g. Which film is this?).

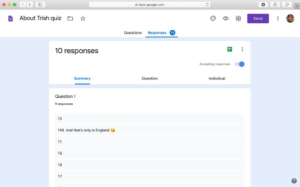
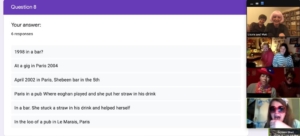
  • How Well Do You Know…? Game. A great variant on the quiz – especially if you are throwing a party for a birthday girl orboy – here Person X. We asked everyone to submit questions about person X in advance (e.g. Where were they born?), and we created a Google Form with questions numbered 1 to however many questions you have.  Note: Don’t actually include the questions themselves in the form – just the question numbers.  During the party, announce the game and send everyone the link to respond to the Google Form.  Read question 1 aloud and invite each player to write their response in the form.  Repeat for question 2, and so forth.  (The fact that the questions aren’t written into the form keeps an element of surprise!). Make sure that person X also responds in the Form!  Once you’ve gone through all the questions, go the summary of responses (in the Google Form) and screen share these, looking at them question by question. Person X reveals the correct answer (and all are amused by the variety of responses).   If you like, you can give points for correct answers but this is totally optional.

  • Guess the song. Different to ‘hum that tune’, in this game we play songs from a playlist in Spotify and it’s a race for players to guess the song – using the Zoom Chat or a WhatsApp group.  To ensure a good sound quality, mute everyone and play the music through your computer, clicking on ‘Share Screen’ / ‘Advanced’ / ‘Music or Computer Sound only’. Not only does this help with sound quality – it also means people can’t see the songs you are selecting to play, which would defeat the object of the game.
    (Another version of this game: What’s the next lyric?)


  • Musical statues. A classic party game, super for expending some energy and loosening up bodies. As in ‘Guess the Song’, play music for musical statues using ‘Screen Share’ / ‘Advanced’ / ‘Music or Computer Sound only’. Before starting, check everyone has their web cam set up such that you can see them in their ‘dancing space’.  And then play musical statues as normal – when the music starts every begins to dance. When the music is stopped, everyone freezes (stops dancing), and the person who is still moving is out of the game. This continues until there is one person left.  A great and easy party game for small and big kids.


  • Blow out the Candles on the Cake. Just for a bit of fun – when it’s a birthday, have a real (or ‘model’) cake with a real candle held up close to the web cam and have the birthday boy or girl blow the candle out from their computer (close up to the web cam).  Tip:  Make it tough for them, and get them really huffing and puffing (with little effect on the flame) before you blow it out once and for all 🙂

  • Choose a Themed Virtual background – such as bunting or a photo of your favourite bar! In Zoom, go to ‘Choose virtual background’ (next to the video options in the bottom control bar) and you can upload an image of your choice and select it as your virtual background. (Note: This works best when your own background is neutral)


  • Get Physical with a Speed Hunt. This is another great way of bringing some movement and energy to online events. Prepare a list of commonplace items and mini challenges and have different household / office teams race to complete them.  g. ‘Find something stripey’, ‘Find something that makes music’, or ‘Take a selfie of all your team in a wardrobe’.  Either have everyone return to the web cam as they tick of each thing on the treasure hunt list, OR have them take a photograph at each step and WhatsApp it to you.
    (Another version of the game: Create mixed teams (across multiple households / offices) and use the Breakout rooms function – putting one mixed team per breakout room to complete the speed hunt.  Note – for this option you can’t ask everyone to take a selfie of themselves together in a wardrobe!)


  • Collective Cocktail Making in Various Kitchens. Need a drink? Rather than just take a break, make the drink preparation an online activity. It requires a little prep, deciding on your cocktail and sending out an ingredients list in advance with enough time for everyone to source things (e.g. mint, red berries, soda water, lime, cucumber…) To run it’s really easy.  Just invite everyone to move their devices to somewhere safe in the kitchen and line up webcams so everyone can see one another well, and then walk through the cocktail making steps, and once made – enjoy!  A refreshing and energizing break.

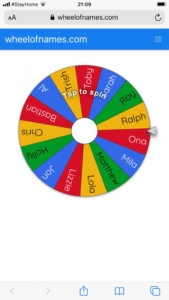
  • Screen-share an Online Spinning Wheel – such as the ‘wheel of names’. I love this and use it for all sorts of activities. For example, if playing a team-game online, use it to randomize the teams.  Put all names in the wheel, screen-share it and and spin it to see who goes with who (e.g. the 1st 4 are together, 2nd 4 are together, etc.) Use it to choose which games you’re going to play next (e.g. will it be Pictionary, charades or treasure hunt?) Use it to see who gets to go next (from all the names).  So many applications.  Get creative!  And keep people on their toes with the element of surprise.  (Note: the default setting in ‘wheel of names’ is that, once selected by the spinner, the name disappears, but you can change the settings if you want to keep all items in the list. You can also change the colours, sounds, spin time, etc.  It’s very versatile.)


  • Celebrity / Who’s in the Bag?  For this one, you need to know how to play the game IRL (in real life), then this online version description will make sense. You also need a dedicated games master.  It’s a lot of fun, but the games master doesn’t get to play.  The game works as normal, only the games master has the list of celebrity names and, as people can’t pick the cards or papers from a bag. The games master uses lightning speed fingers to type the names into WhatsApp and send them to the player who’s turn it is to make his/her team mates guess the names.  Every time their team guesses an answer, you send the next name.  As it can go really fast, I try and queue up the names so that I just have to press send.  You can also cut and paste them from a list (make sure you have three copies of the list at the start: one for each round – with the names in a different, random order in each list).  For scoring – count up how many names each player gets in 45 seconds (ask someone else to manage a timer!!) by looking at the number of names sent to them in the WhatsApp thread.  At the end of each turn, write ‘END TURN’ into the WhatsApp thread so you can keep track of how many names they got in each round. 

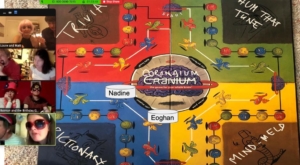
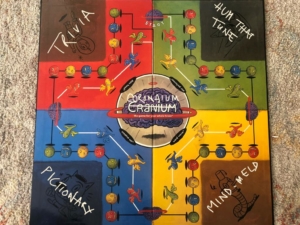
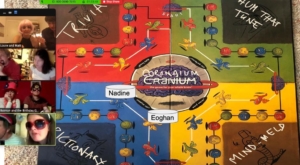
  • Take Cranium (the board game) Online – renamed ‘Corona-ium’ 🙂 For those who are becoming masters managing Zoom calls, you can put a number of the ideas above together and take the board game Cranium online.  Cranium combines games like Pictionary, charades, hum-that-tune and quiz questions, so see notes above on running those.  Take a photo of the Cranium Board and put this into a Google slide (or make one up of your own design). Make and name a coloured shape per team as the pieces to move around the board (using ‘Insert’ / ‘Shape’). Then designate someone to be the scorer (ideally not you).  Doing it in google slides in this way you can share the link with everyone (view only) so that at all times people can see the state of play.  From time to time you can screenshare it too. If you have the board game, you can take photos of loads of the cards and have these in your photo library ready to send out to people via WhatsApp or pop them into a google slide deck that you screenshare.  If you don’t have the board game (and I prefer this option with an international group), rather than picking cards, before playing ask everyone to send you (privately) 5 quiz questions, 5 famous people, 5 things, 5 songs, etc. Compile these and use them for the game, drawing on them randomly. Caveat: A player can’t give an answer they submitted so you need teams of at least three.Top Tip: As this game has lots of moving parts, I like to give different people the ‘lead’ on different topic types.  e.g. One person reads out the quiz questions.  Another does the Pictionary.  Another the Charades, etc.  This means you can participate and enjoy the game too, rather than just being the games master permanently.

We hope that these 20 examples give you some ideas for how you might adapt the above for your next online gathering, whether it is in a team meeting, a learning activity, or another fun gathering with others online!

(Note: This blog post is long and detailed, and really only for facilitators or hosts who want to run bi-lingual meetings in Zoom. I’m capturing this learning mostly for myself so I can use it easily next time, and I’m happy to share with others exploring this useful functionality of Zoom. Feel free to ask questions in the comments, and I’ll do my best to answer.  Also, click on images to make them larger.)


My three, inter-connected virtual workshops this week were unique for a couple of reasons. First, I found it amusing that each workshop was held on two different dates – that was because the online participants were so spaced out in terms of time zones, that for one half we started on Tuesday but for the other half it was already Wednesday. Every workshop was held on two dates! (with the organizing team in the middle in Central European Time working from 21:30 – 00:00 or so every night.)

The other thing that made our three 2.5 hour workshops different was that we used interpretation online, and had two English-Russian interpreters join our meeting. This was new for everyone, including the interpreters and me, so I wanted to share this overwhelmingly positive experience (of course with a few challenges to overcome) and some thoughts about effectiveness from the perspective of the interpreters which I found insightful.

Our programme, spread over three days as it was, was a multi-sectoral discussion that needed to take place in 2 languages – English and Russian. This is a group of conservation scientists from different sectors located from the far east of Russia to the Bay area of the US, who have worked together face-to face in the past, always with translation. Now we needed to take their work into a virtual environment and chose Zoom as our platform particularly because of this new interpretation option. Our two interpreters joined us from their home offices in two different locations, and they translated in and out of both languages.

There were really only 5 steps to get interpretation working:

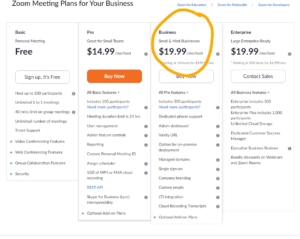
Step 1: Get the Zoom Business Plan

Zoom had recently offered an interpretation feature that we wanted to test. This option is only available to Zoom Business users. This is the plan above the Pro version that I already had. For this plan you need to pay for 10 hosts at the minimum, and it costs 199.99 USD per month. You can buy it by the month, which is what I did. Upgrading was incredibly easy to do on their website. You click the button and pay. You maintain your own account and all your details and just get the added features from the Zoom Business plan. Usefully, Zoom doesn’t force you to register the additional 8 hosts, just pay for them.  I only have two hosts registered (me and my colleague Lizzie), I will go back to Zoom Pro next month, and when I work with translators again, I will simply upgrade for the time needed.

Step 2: Setting  up your meeting for interpretation

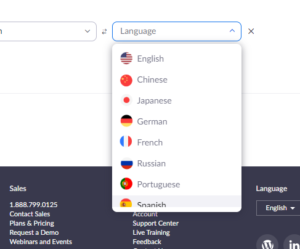
With Zoom Business, now what I see as a host when I create a new Zoom meeting is a box to tick at the bottom of the meeting set-up screen that says “Enable interpretation”. Once you tick that box, you need to put in the email addresses of the interpreter(s) and the languages you will use. Currently Zoom offers options for 9 languages: English, Chinese, Japanese, German, French, Russian, Portuguese, Spanish and Korean. We needed Russian and English, so that was fine. I selected the languages that each interpreter would work in from a drop-down box. You can add many interpreters it seems using the “Add Interpreter” button – after clicking that 10 times I stopped.

Once you set up the meeting, the interpreters get an email message inviting them to join the Zoom meeting as interpreters. That’s really all that’s needed prior to your meeting – very simple!


Step 3: Once in your meeting: Start Interpretation

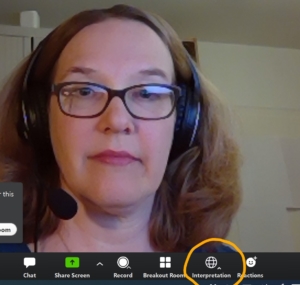
When you open the Zoom meeting as the host, you need to click on the Interpretation icon which shows up on your dashboard (bottom of the screen). Once that is open you need to “Start Interpretation”.  This makes an Interpretation icon show up on the screen of every participant. This is relatively easy to forget the first few times you use this function, because as the host you already see the Interpretation button on your screen and assume that everyone else does too. You then might confidently declare that there is interpretation enabled, and then all participants will respond loudly and in unison that they don’t have the interpretation button, they can’t find it and that this doesn’t work. Then you say “sorry” and start interpretation and magically the icons appear and everyone is happy.

This extra step to turn on interpretation probably makes sense so as not to start it before your interpreters are there. My two interpreters were always in the room early, so I could start that even before the meeting officially opened.


Step 4: Participants choose their language

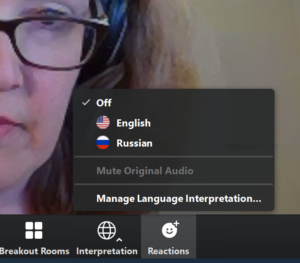
Once participants see the Interpretation icon on their screen at the panel at the bottom, they click on the icon to see the language choices for your meeting. Note that by default, interpretation is “off” and they just hear whatever is going on in the main room. They need to choose their language to start hearing the interpreter when he/she is speaking their chosen language.


Step 5: Mute original audio

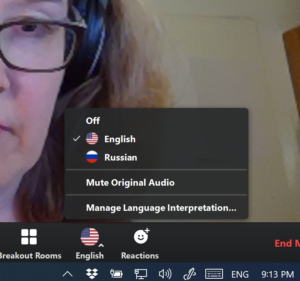
This last step is very important and was an initial source of consternation, taking us a few tests to understand what was going on and what to do about it. So, only after selecting the language of choice, the option to “Mute original audio” becomes active (before you select the language you can see it but you cannot click on it). Unless you wish to hear both languages simultaneously (the speaker and the interpreter) you will want to select this.

When Zoom describes this feature, they make it sound appealing to listen to the interpreters while also having the original language going on softly in the background, simulating a real physical workshop room where you would hear the interpreter in your headset, and still have the original speaker going on in the front of the room at a distance. However, this wasn’t our experience. Both languages seem to be almost the same volume, and with headsets, it was maddening to listen to both languages in both ears at the same time. So other than just dropping in to see that the translation was working, everyone used “Mute original audio” and were happier for it.

Here’s another thing we learned in our testing, the “mute original audio button” is currently only available in the most recent Zoom updates. People with older versions, or company versions that were updated (or not updated) centrally found that they did not have this button and were relegated to either “Interpretation off” (hearing only the language of whoever is speaking – for perfectly bilingual people this is no big deal) or hearing the frustratingly loud mash-up of the speaker and interpreter. This lack of “mute original audio” button was the case in about 25% of our participant tests prior to the workshops. As soon as people updated Zoom they all had the option to “mute original audio”, and their blood pressure went down again.

Eventually, the system worked 100% for everyone, even those who were working in very remote areas. As we had substantive technical presentations in both English and Russian, and only a small subset of bilingual participants, the meeting would not have been possible without interpretation. Zoom made it easy through keeping it all on one platform, rather than having a work around with interpreters needing to set up a separate call, using Skype or other. Another option is always consecutive translation, but that essentially doubles the time needed for meetings and would have slowed us down considerably.

How it felt to participate

I am trying not to be effusive, but we were truly amazed at how well the whole thing worked and how easy it was once you got used to it and set up. One of organizers said that it should be explored even for face-to-face meetings as everyone always has a laptop in front of them and headphones anyways these days. Even sitting in the room, they could log into a Zoom meeting, turn off their video, mute their microphone and pick their preferred language on the Zoom screen. The speakers at the front of the room would just need to have Zoom too and a headset (no video needed as they are live). If participants had a question, they would unmute themselves, speak and the speaker would hear it. There would be no additional interpretation devices to check out and collect, no booths needed, and your interpreters could be anywhere in the world and not in the room. Ah, I get carried away. It is an interesting idea to ponder. Just to note – the interpreters had a completely different opinion on this! (See “How it felt for interpreters” below)

Testing, testing, 1,2,3

As this was new to all participants, hosts, and even the interpreters, we ran 5 interpretation zoom tests in advance of our meetings, where we invited people to join us, walk through the few steps to turn it on and check they had the latest version of Zoom. This also helped us check audio, video, and connectivity issues, which was helpful overall.

I set up the Interpretation tests as separate Zoom meetings, enabled interpretation, invited the two interpreters, and then we hosted a subset of participants each time so that they group was small enough to help and trouble shoot (note that our first two tests were just internal with our friendly and patient organizers). These tests lasted from 15-30 minutes and upon declaring success, greatly helped us move technical issues out of the actual workshop meetings, making starts smoother and punctual.

Final reminder in the meeting

Even with the tests, I opened the first of our three workshops with a few PPT slides to remind people what to do for interpretation, using screen shots. I also included the meeting norms (keep on mute unless speaking, raise hands, etc.), followed by some simple testing of these important functions (“give me a thumbs up if you have this”). I always opened the Zoom environment 15-20 min before the official start of the meeting to trouble shoot with all those who signed in early. And on the last day, where we had a few new external people joining to give presentations, I presented the Day 1 “How to” slides again in the 5 minutes preceding our start time for these newcomers. We had informed them to join us early during the interpretation test meeting.

This all might seem like overkill, but it helped significantly, and made for an effective workshop. The first few times you use interpretation (or even Zoom itself), you can still easily forget where to find things and what to do, and then not know why things aren’t working, descending quickly into general gloom and the potential of existential crisis about whether or not you are going to get this virtual stuff, ever. On a more practical note, even before you get a whiff that people are stuck, you as the facilitator can also invite people who need help to write you in the chat using the “private” option and you can help them individually. After a few times, it is very straightforward.

Ultimately, for participants, once they got there, it was smooth and easy and a little magical to see the videos of their colleagues speaking, mouths moving, and the smooth voice of the interpreter seemingly coming out of it in your very own language. This facilitates discussion and communication among people significantly – brilliant!

How it felt for the interpreters

Talking to our interpreters about these meetings was eye opening for me. I have always been in awe of people who can listen to one language and simultaneously speak another one. I continue to be impressed – our interpreters were excellent, and were themselves learning how to do their work in Zoom.

A number of focused debriefing meetings with them after the tests, and after the workshops themselves, helped us tweak things – but interestingly, not so much from the technology aspect. That worked fine. But more from the procedural perspective. It was interesting to hear them compare their work in a booth at the back of a workshop room, to being plugged in, in front of their computer screens during a virtual meeting.

For them, interpreting for Zoom meetings is now a reality, so they are eager to get up to speed on this. However, their observation is that it is more intense and stressful than providing this service for in-person meetings. Meetings in the Zoom environment, they observed, caused additional cognitive stress. First, because when they are interpreting, they cannot communicate with the host, participants or the other interpreter (who is not in their booth but 1000 km away in their own office).  They cannot bang on the booth to get our attention, or visually signal to the other interpreter when they need something or are having a problem (e.g. if their system goes down, there is an issue with sound quality, or they lose connection – which can happen to anyone, necessitating the need to quickly log out and log back in). They cannot read the chat function when they are interpreting – the chat button lights up but they cannot easily see if it is a private message (e.g. about the sound, etc.) or just people chatting back and forth amongst one another.

Also, when someone is sharing their screen to present this obscures part of their dashboard so they cannot easily other things on their screen, like the time – so need to look at their watch or phone, etc. to know when it is time for the next interpreter to take over. That second interpreter is also not there with them physically to use visual communication to switch interpreters (they work in 30 min shifts).  All these might seem like small things, but when you are using all your full attention to listen to one language and speak in another simultaneously, it is cognitively more demanding to keep track of all these other things going on at the same time.

The second reason that this is stressful is because the Zoom technology does not impose procedural discipline upon participants, which means that the facilitators and chairs need to do that more. In face-to-face environments, when using interpretation systems, some systems do not allow two people to speak at once, and also people raise their real hands, and then push on a button when called, and then they speak. In Zoom however, everyone can unmute themselves and speak at the same time  (I’m sure we have all been on those family zoom calls when everyone is shouting at the same time). People can even speak over one another in two languages! In that case, what does an interpreter do?

To help, there needs to be an emphasis on procedural discipline, which might make the meeting feel more formal, but is really necessary when using interpretation. The Chair or facilitator needs to give voice to participants, and needs to insist on procedural compliance in terms of taking turns, and even trying to leave a bit of space between speakers and language changes, so that the interpreters can click on the other language button when they change languages. It is better for them, they said, if there is no direct contact between participants without the chair giving the floor to people. People also cannot mix the two languages which is very tempting for bilingual people – this is also a rule in F2F interpretation.

Notes for the Facilitator and Host

For the Facilitator of a Zoom meeting, you need to keep your eye on the interpreters’ names in the Participant Panel, and you can even check from time to time that all is going well by switching languages to hear the interpretation (or taking off for a minute “Mute original audio”). One tip for the Host is to rename each interpreter with a “__” (double underscore) before their first name, so that these names are always near the top of your participant screen, which is alphabetized by Zoom (after Host, Co-Hosts, those sharing screen and speaking). That way, you can easily see if for some reason they are not there/drop off the line, so you can stop and wait for them to come back in. If you don’t rename them in this way, their names are mixed in with all other participants and you might not notice if they aren’t there, with a speaker talking away but no interpretation.

This happened to us for a few seconds during one of our workshops, but we just asked the speaker to pause until the interpreter was back, and then to repeat a short segment. We went merrily on and it didn’t happen again.  It has to be noted, that bandwidth and internet fluctuations can happen to anyone these days, when everyone in the world is at home and trying to get online simultaneously – whether they are working or watching Netflix, or both at the same time. We know that these little things always happen in virtual meetings, and of course it is a little more dramatic momentarily when it is the interpreter who drops off, but you just pause for a moment and work through it.

This is surmountable, and our interpreters navigated all this novelty elegantly. We, the organizers, only really knew how much work it was for them afterwards.  I am sure that no one participating felt anything other than a great meeting, supported by equally great interpretation.  For interpreters everywhere who want or need to make this transition to virtual meetings, the Zoom system will become easier to use as they have more and more practice, but the procedural discipline aspect needs to be firmly on the “To Do” list for facilitators.

Some final thoughts

It was exhilarating to try something new and have it work so well! This international group would have had to wait months to meet again in person, and this virtual option allowed them to continue their collaboration in the meantime, from the comfort of their own homes from the far east to the far west.  It goes without saying that your interpreters are critical for the success of your bilingual Zoom meeting. As such, it is important to work closely with them, listen to their perspective and get their feedback through testing of the system in the preliminary stages of workshop development. And of course, remember to thank your interpreters at the end!

(BTW if you need recommendations for experienced Russian-English Zoom interpreters, I have some names to share!)

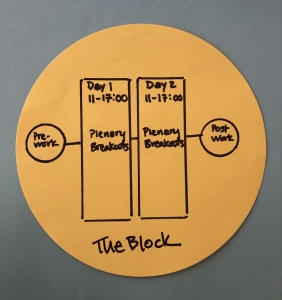
There has been a raft of flipped workshops recently where F2F events have been redesigned to be held virtually, and it is fascinating what a rich diversity of designs there are. Some of them have been reworked as big blocks of synchronous together time that aim to closely mimic the programme of the original F2F workshop with some minor modifications, such as adjusting the time to make it more comfortable for participants on different continents, and reducing the number of days for example. Others are dramatically reducing the “contact” time and pushing workshop tasks into the days before and after the online meeting, undertaken by participants individually. Yet another model is spreading the engagement out over weeks, with scheduled touch points that pick up different themes of the original event – and many, many more!

As we are all learning right now, I thought I’d share some details of a few of these models that I am working on right now, in case they might be useful for other designers and organizers who are in the process of flipping their workshops.

Model 1: The Block

I have one of these coming up which was originally a 3-day F2F workshop, scheduled to be held daily from 09:00 – 18:00, with one evening session. Now in its virtual incarnation, it is two days long, and will be held from 11:30-17:30 (Central European Time) to accommodate both European and North American participants (and no “night” session). To pare down the work, we needed to go back to the original objectives and select those that needed to be accomplished now, and those that could wait for a subsequent F2F, or be taken into a set of topical conference calls later on. We also added some pre-work, but most of the work would still be done together in the virtual sessions.

Even with these modifications, this virtual workshop block will be a heavy lift for participants. We have the traditional 90-minute session lengths, with lunch and afternoon coffee breaks scheduled to relieve people from their screens. During this free time, we will invite people to stay connected if they wish, to chat together informally while they eat and have coffee. To keep things interactive and lively, we have a diverse mix of activities, including a number of break outs, supported with google docs to capture outputs from breakouts and other small activities (polls, stretching, etc.) to keep things moving.

This format of this workshop is relatively close to our original F2F agenda, and I think in some cases the makeover of a F2F workshop to a virtual using this model can work well with a few caveats. This would include a rather small group (we are 20) of very dedicated people (this will be tiring so need to manage their attention) with a well- defined task (we are finishing a co-creation project to develop a set of guidelines). I think the fact that the majority of this mixed stakeholder group has worked together before will make the social dynamics side work. We invested significantly in building social capital in our first F2F workshop that we can draw on now for trust, commitment and creativity. For this workshop we are using zoom and will have two facilitators supporting the team in their work, one of which will operate the technical aspects (splitting people into breakouts, launching polls, etc.)

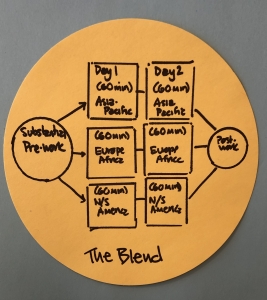
Model 2: The Blend

Not many of my flipped workshops are taking this compact block shape. For others we are opting for shorter synchronous meetings (where people are all together) and taking a lot of the planned work out of that full contact time. We are blending substantive pre- and post-meeting work that is asynchronously completed (e.g. undertaken by individual participants whenever they want), with the meeting times for synchronous engagement and discussion.

Here’s an example: For one previously scheduled two-day F2F workshop where we were gathering feedback to guide a consultation process, we asked the 40+ participants to review and comment on a google doc in advance of the meeting, and to answer 3 higher-level strategic questions about the document on a separate google sheet before we met online. As participants were located all over the world, we conducted our workshop through three 90-minute meetings held each day for two consecutive days – one call for participants in the Asia Pacific region, one for Europe/Africa/MENA, and one for North America, Latin America and the Caribbean. To support these virtual meetings, we made three identical copies of the document to comment upon and labeled each by region. The google sheet with the strategic questions had the instructions on the first sheet and then three tabs, labeled by region, each with an identical set of strategic questions. Note that we sent out the links to the google docs, but also sent the files as attachments in word and excel. Some people are not able to use google docs due to their location or institution, or not familiar with them, so they had the option.

The calls themselves were used to present an overview of the document as a reminder, and then an analysis of the comments and feedback received. We asked for more feedback and could ask specific probing questions on each region’s responses where we had them. With the documents split by region, we could easily see what the people from the region on the call said, so we could seek further clarification and detail on their comments efficiently as need be.

For the Day 2 meetings, we synthesized what we had heard on the Day 1 across the regions, and identified five topics that emerged across the calls to bring back to the groups. For example, we had a couple of points that needed further clarification, others where the different groups offered conflicting advice, etc. The second call allowed us to share what we had heard and to go further, bringing in some of the good ideas across the different calls.

It is true that not everyone attending this larger workshop did the pre-work, especially at this time when people are working from home and juggling many things. Many did, but said they would value more time to reflect on the comments others had made, or in order to do some internal consultation in their organizations. As such, we are leaving the documents open for another week to capture as much of their input as possible, let them build on other’s ideas, and reflect further. Also, if someone could not join the calls for some reason, or did not want to speak out on the call, they are able to contribute their ideas in this way. This was our plan, and was also requested by participants.

Our workshop goal was to get this senior group’s comments and ideas, so we needed to make this as easy as possible for participants. This workshop was the first step in a longer consultation process so it had to generate good quality input, in addition to being satisfying for the participants. This model blends asynchronous work before and after the call, with shorter synchronous virtual meetings. It was run by one facilitator on the Go-to-Meeting platform.

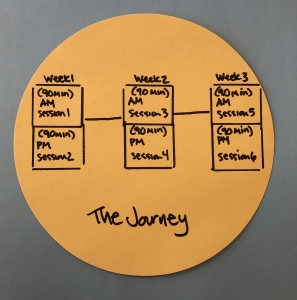
Model 3: The Journey

The third model that we’re working on flips a very large-scale 300+ community workshop into virtual space by spreading the content out over three weeks. Six interactive webinars will be held in total. Once a week on the same day, two webinars will be held on the same day, one in the late morning and one in early afternoon to accommodate as comfortably as possible the largest number of the global participant group.

As this was more of a conference-style gathering for a larger group, even with many interactive elements in the F2F format, there was a lot of content to work with. This gathering will be postponed until early 2021, so we are pulling out the good practice exchange, community updating and storytelling aspects into this webinar format and featuring the work of different community members. We will still have interactivity through the introduction of a back chat polling tool (polleverywhere for example), as well as a crowdsourcing exercise to draw ideas from the group. This latter task will be introduced in the first webinar and the results analyzed and presented in the last webinar two weeks later. For this we are exploring Zoom, and will have a facilitator and a host of moderators and technical resource persons.

So there you have it, what started out as three F2F workshops planned to be held over 2 and 3 days, have ended up as three dramatically different models of virtual workshops. The diversity of options makes it exciting to re-design in virtual space.

Design Questions

Your choice also depends on the design parameters you are working with. Once you know your objectives and desired outputs, you ask:

  1. How many people?
  2. Where are they located (time zones)?
  3. What kind of connectivity do they have? (Can they support video, calls, other?)
  4. How committed are they to your process and the goals?
  5. Do they know each other? Do they need to?
  6. What experience do they have with virtual work? Do you use some platform already?
  7. Will people do asynchronous work? E.g. Will they devote the time if we give them tasks to do before and after the contact time?

Then as a facilitator, you use your design skills and creativity to put together your virtual workshops, which, just like their F2F counterparts, come in a delightfully wide variety of shapes and sizes.


There is an excited flurry of activity right now among meeting, workshop and conference organizers -and their facilitators -as travel restrictions due to the coronavirus cause cancellations of face-to-face (F2F) meeting formats. Planning meeting agendas are being taken over with the exploration of different technologies, tools and platforms to help hold these events virtually.

But in many ways, virtual gatherings are not so different to their F2F counterparts.

It’s worth remembering, and I am talking to myself here too, that these meetings, workshops and conferences themselves are tools – a means to an end. We don’t organize workshops or conference just to have them – they are not boxes to tick in our annual workplans. We use these gatherings for other goals that are important to us. The most useful thing to bear in mind when looking at all these different models, tools and platforms to convert our F2F meetings into virtual formats is, “What was the end we had in mind?”

What did we want to change or be different as a result of our workshop? What did we want people to know, think or do differently after attending our conference? What did we want to have in our hands as outputs at the end of our meeting?

No doubt there was a task you wanted to complete – whether it was to collect useful input to a strategy development process, collectively write an article, review a set of draft guidelines, or exchange good practice to build community capacities, and so on. There were also probably some softer outcomes in mind, like helping build relationships in a community, reinforcing trust in a process, or inspiring buy-in and support in promoting the final co-created product.

Putting your desired outcomes first will help make choosing the right technology to support it much easier – form follows function (if you will pardon my invocation of an over-used design cliché.) If we take a step back and remember our desired outcomes and outputs, that will help make this conversion-to-virtual process easier, and potentially tap into some creativity in terms of how we get things done virtually.

A couple of other thoughts on virtual workshop design – length and complexity

We observe in our F2F conferences and workshops that even the most well-intentioned participants have finite attention spans. It may be less obvious when people are sitting in an auditorium as they can easily dream away while still looking fixedly forward at the person standing at the podium. They can of course also choose to keep talking to the person they just met at coffee break and leave their seat empty in the plenary room. (It is of course harder to disappear when there are only 15 or 35 people – although they may invoke the “sorry, I couldn’t reschedule this important call.”)

Online, there are a multitude of ways people’s attention can drift away or be drawn away – pulled by their computers, email, various devices. And there is no way to tell if they are even there at all, or just popped out to make a coffee, if they are on mute and no camera is being used.

So the same rules apply to virtual as F2F, keep things short and to the point. In F2F we rarely have sessions that are more than 90 minutes to two hours maximum before taking a break. Within those blocks we use a lot of techniques to keep messages focused, interventions short, pithy and discussions interactive. Virtual sessions should use the same rhythm, sticking to these familiar timeframes, and include well-prepared interventions.

Technology adds a layer of complexity for both participants and organizers. Even in F2F, preparing a presentation and standing up to speak is something that most people are happy to do. But add a PPT projector, slide changer, microphone and sound system, and things can fall apart if not practiced and tested. This is the same for virtual environments where seasoned speakers can be perplexed by talking, keeping an eye on the chat stream, and changing their slides at the same time – especially the first few times they do it. Speaker preparation is something that needs built into both formats.

Although we all have our phones in our hands at every moment of the day, even using polling apps in F2F workshops (like polleverywhere or mentimeter) with an increasingly tech-savvy audience, still creates complications for some. This is why we take time for set up and do some low risk test questions before we use these tools for real data gathering. With online interaction it’s the same, and we do need to add in that additional time for people to get used to the tool – take it slow, make it easy with clear instructions, and practice. It also helps to be humble and invite the audience to join in the experiment of trying new things and invite them to give feedback afterwards on what worked and what could be different next time.

The good part is that people are getting more comfortable with these technologies, at least as users. With this current situation, many more will also get more comfortable with the back end of these platforms and tools as administrators. Whether it is using a polling app on our phone F2F or using zoom in our offices or at home, we are now more quickly domesticating these technologies.

It’s actually a great opportunity right now, and a great responsibility. By doing a good job with your virtual meeting or conference, you are building the capacity and confidence of the whole community to work together in this way. Once people feel comfortable with the technical aspects,  and have a productive and enjoyable experience working together virtually, they will show up differently next time.

This is a valuable mass learning opportunity for our community to learn how to work effectively together virtually. It’s possible that, even without travel restrictions, we may never go back to the same meeting culture we had before. We will still gather, but may be even more ambitious with precious F2F meetings, with their substantial investments in carbon, budget and time. If we get our methods right, we may get the same valuable outputs in virtual formats as F2F, demonstrating that they are not so different after all.

(Note from Gillian: This is a very long, detailed, and rather geeky post. I write this as I have been asked a few times recently for “how to” information on how to set up these kinds of group work templates for virtual workshops.)

As we get more comfortable with getting work done collectively through No-Fly Workshops, innovations begin to emerge as we challenge ourselves with facilitation questions like, “How can we run this interactive activity virtually?” Rather than lowering our ambitions about what we can accomplish with an entirely or partially virtual group, we can take these as facilitation design parameters (similar to having to work with theatre format, or not knowing how many people will show up to your parallel side event) and come up with a design that is fit for purpose.

Everyone is now familiar with Google Docs, although perhaps less so Google Sheets (the Excel equivalent). These are both incredibly useful in virtual workshop contexts. Below are two ways to use them to support group work. I expand at the end into one application of Google Sheets that is perhaps less well-known, but very valuable in helping to solve a couple of familiar workshop issues around identifying key messages from group work and (too) long report backs. I provide detailed instructions at the end of this post for how to set up an Aggregator Google Sheet that collects highlights from different small groups’ work recorded on individual sheets, and automatically pulls them together into one summary sheet.

I start with two scenarios for how to capture and guide a group’s work with Google Docs/Sheets – 1) Co-writing a product document of some kind; and 2) Capturing ideas/answers to questions through small group work.

Preparation for both these scenarios:

  1. Decide on “permissions” in advance – can everyone or only some people edit the document (with others in read only)? If the group is small, you might give everyone the right to edit. If your group is larger and you will have smaller sub-groups working on sections, then pre-assign the small sub-groups and decide who will be the recorder/rapporteur for that group and give them editing permission. If you pre-assign groups and recorder, make a table that indicates which group people are in, and who is the recorder, and share that table in advance.
  2. Set up a “Back Chat Channel”: This could be a WhatsApp group for all participants, and if the Facilitator sets this up, you will also have all members connected to you in case you need to contact them individually during the workshop.
  3. Always write the exercise instructions on the Google Doc or Sheet. When people finally get into their part of the document or groups, they might very well have forgotten what they were supposed to do!


Scenario 1: One virtual group needs to collectively write a document or write parts of a document (e.g. a proposal, a strategic plan, a book chapter, etc.)

OutputA collectively written document.
Online documentGoogle Doc
PreparationIf you have the headings for the different sections of the document (e.g. table of contents), paste that into a new Google Doc. If you do not, then your first exercise might be to have a brainstorming about the section headings (you can also do this BEFORE the workshop). Number the sections.
Activity (small group – 8-10 people)
  • Provide people with the link to the google doc.
  • Slower approach: If you want to discuss collectively and write the sections all together in real time, then have one person type and the others contributing ideas. This becomes a plenary activity. This is slow and can get messy. Plus even with a small group, people will struggle to jump in if you have any louder people, so this can be boring for some people. This can still work with a small group that  knows one another well and has good group dynamics.
  • Faster approach: Assign people to the numbered sections (this can be based on competencies or randomly assigned – e.g. putting your writers in alphabetical order to assign them.) People will write on the same document at the same time, but only initially on their assigned section.
  • Step 1: Give people a set amount of time to write. It is better to write in chunks and check in with people periodically for questions or comments. You can send an announcement in the chat to provide a 10 minute “warning” and the end.
  • Step 2: Once people are done with their sections. You can start a new activity asking people to read and comment on the other sections. Assign a time, and give them a 10 minute warning just before it is up.
  • Step 3: After the commenting period is over. Ask people to go back to their original section and review the comments, taking them into consideration and making a next draft of their section. Have them highlight any comments or questions for which they might need more information.
  • Step 4: After the writing, open a plenary discussion that allows section writers to clarify any comments or questions that they didn’t understand or would value more input. If it is useful, after this clarification round, you can give the writers some more time to finalise their sections.
  • Step 5: Open a final plenary discussion about the experience, what is missing, or what is to be done. You can create a new google doc that has Next Actions, Responsible person(s) and a Timeline or Deadline section. You might need to iterate your document further, or involve more people. This can potentially be done asynchronously after the workshop.
  • Note: While people are working, they can stay connected to the main workshop platform (Zoom, GoToMeeting, Skype, etc.) but mute themselves and take off their camera while they are writing their sections or comments on others, coming back in for the plenary check-ins and discussions.
Activity (large group – over 10 people)
  • Follow the above activity sequencing, but create small sub-groups (assigned in advance) and have them work together on another platform (Skype, MS Teams, or use the breakout room function in Zoom, etc.)  so they can talk while they write. They are still using the same shared Google Doc and link. The sub-groups can decide if one person writes and the others talk. Note you need to allocate more time for this kind of group work. It takes more time when a group is working, versus one person writing alone.
  • People can still stay on the same platform and mute themselves while they are doing their sub-group writing.


Scenario 2: Small groups need to brainstorm and provide responses to a question or set of questions.

OutputIdeas and answers to a question or questions (this might also provide input into a strategy etc.)
Online documentGoogle Doc for each group OR a Google Sheet with one tab per sub-group.

How to choose? If you have a report back, it is a little fiddly to click through to different Google Doc links, especially if you have some people who are only connected through audio (e.g. dialed in through their phones) who are clicking through themselves following along. It is easier to have one Google Sheet with multiple tabs, and then people can just click tabs to see the results of the different groups’ work. This latter also has the advantage of keeping all the information in one place for ease of sharing and use later.

PreparationYour choice of a Google Doc or a Google Sheet also depends on what you are doing. If you have, for example, four groups working on a complex set of questions in parallel and you don’t necessarily need to share their detailed results with the others, then you could make 4 separate Google Docs. This could be more appropriate for longer and more involved group discussions.

If you have four small groups that are brainstorming or answering one or two questions, then you might want to set up a Google Sheet that has 4 tabs (each labelled with a different group name), and ask people to work on the same Sheet but on their designated tab.

Designate the groups in advance. If you want to let people choose their group, then ask them to choose in advance through email or a polling tool like survey monkey, etc. Make a table to share to ensure that people know which group they are going into, what document they will work on (link), and how they will convene in their smaller groups. This can be through the breakout group function of your platform, or you can set up skype, MS Teams or other channel.

Activity
  • In “Plenary”, announce the activity and remind people of their groups by sharing the table that lists the group members. Explain what they will be doing once they get into their groups, ask for any questions then.
  • Give people a way to contact you if they have any problems (e.g. through WhatsApp).
  • Tell people when they need to come back to the Plenary.
  • As a facilitator you can watch the Google Docs or Google Sheets fill up, and if one of the groups is not making progress, you can check in with people in their small groups through WhatsApp or other backchannel. Note you may need to refresh your browser as there might be a delay in updating the shared doc.
  • Report backs? After the designated time period, when people come back to the “plenary”, you can ask for a representative from each group to share some highlights and share their screen, or you can share your screen, or you can ask people to click through the document themselves.
  • This part can be very long! You need to time it (e.g. give each group 5 minutes) or come up with another way to limit what people say, particularly if it is not essential for everyone to know every little detail about another groups’ work! For a neat way to help groups synthesize their discussions, you can create an aggregator Google Sheet (see below).

Helping groups identify key messages and be concise in their report back – Creating an Aggregator Google Sheet

When people have their group’s entire results in front of them, reporting back can be very long and overly detailed. It is hard in real time for many people to synthesize on the spot, and they want to honour the whole discussion. This is the same for both a F2F workshop and a virtual one. In addition, sometimes people don’t care very much about the nitty gritty of another groups’ work; they just want to hear the key points. However, report backs are expected, they can be useful for making bigger picture observations, and can acknowledge and appreciate a group’s work. So it is hard to avoid them. But you can make them better!

In a F2F workshop, I might give a group a template to work on with the key questions, and at the end of their discussion another smaller template asking them to distill out 3 key messages or highlights from their group’s work. Then I ask them to report back using the highlights template, rather than their longer, group work artefact.

You can do this in virtual meetings as well. A ninja tip (as my Luc Hoffmann Institute colleague who created one recently called it) is to develop a Google Sheet that has an aggregator function. By this, I mean, on each group’s tab there is one space where the group can discuss their question and record their answer in length, and a separate place where they write in their 3 highlights or key messages. Anything written in this second spot is automatically aggregated on a separate tab on the Google Sheet labelled “Summary” or “Highlights”.

When the group then gets to the report back part, you display the Summary tab’s sheet and that is all they and the other groups see. This Summary sheet gives you an overview of responses from all the groups, supporting a more focused and concise report back, as well as any subsequent observations for pattern spotting.

With this type of Sheet, as the organizer, you now get a write up of the longer discussion as recorded by the group on their designated tab, as well as their highlights on a separate one. Now you don’t have to wade through a lot of information to find key messages from the whole exercise.

Making this kind Google Sheet is very easy but takes some knowledge of Excel. For those who are whizz’s at Excel you might already know how to do this and be happy that it is similar in Google Sheets. If not, here is a description to follow below:


Setting up your Aggregator Google Sheet

First set up your Google Sheet with your “Group” tabs and a separate tab for the “Summary” (see below). Note that you need to have a one-word name for each sheet with no spaces. E.g. instead of “Group 1” you need to call it “Group1”.

Note: You can make the Sheets on the separate tabs as pretty or as plain as you like – this is a template, you can be creative! Below I changed font colour and font size for the title, put borders around my question and answer area, and highlighted the aggregated cell/line so it was easy to see. For each separate sheet, write in the group name again at the top, the question, as well as instructions for group work. (click on the image below to enlarge)


Next you will set up your aggregator page. Go to your Summary tab, here you need to enter a few simple formulas so that this sheet pulls the answers from the other sheets automatically (same as in Excel) (click on the image below to enlarge):


For this, you need to:

  1. Click on the cell in the SUMMARY sheet where you want the highlights to show up (e.g. the cell under Group 1).
  2. Type “=”
  3. Now go back to the sheet from where you want to draw the information and click on the cell where that information will be written (e.g. the “Highlights” cell)
  4. Press RETURN (it will automatically take you back to the SUMMARY sheet). Now your formula is there that links the key cells from the two sheets (SUMMARY and GROUP1)

Now when you go back to the SUMMARY sheet, you see the following formula in the cell under Group 1 as follows: =Group1!A2  (A2 is the cell you connected to on the Group 1 sheet)

  1. Repeat for the other group tabs until you have all the highlights connected with the SUMMARY sheet. Now in subsequent cells you have =Group2!A2   =Group3A2, etc.

You will see how easy this is once you try it. What you get in the end will be a helpful support to your virtual group work, making reporting back more efficient, pattern spotting easier, and giving you concrete outputs to work with in the next steps of your No-Fly Workshop. (And please feel free to add additional ideas on how to use them in virtual workshops in the comments section below.)


No-Fly Workshops are becoming increasingly popular as people become more sensitive to carbon emissions from air travel, respond to budget freezes or higher scrutiny of trips and travel, and try to profit from the time savings afforded by avoiding long flights or trips to meetings.

We know that face-to-face (F2F) meetings are good for social capital and relationship building, and can be important for achieving soft outcomes from group identity creation to shared ownership of a great collective result. But after relationships have been built, what are the options for teams or partnerships that have work to do, but also want to benefit from all these environmental, economic and personal productivity savings?

I recently had the great pleasure to work with a tri-continental team on a strategic consultation exercise during which: a) The whole team needed to share an understanding of future organizational objectives; b) Team members in different constellations needed to work together to generate key inputs; and c) These inputs needed to be shared with the whole group for further validation and value-adding discussion so that the process could go forward to the next step with everyone’s support.

This workshop would have taken a day or more to accomplish the stated goals. To execute in F2F format, it would also have produced over 20.5 tonnes of carbon from the air travel it would have needed to convene the team in one place, not to mention cost many thousands of USD in travel costs, and implied days of travel time for team members in other parts of the world – in this case, Europe and Latin America. We had bigger groups in two of the organization’s offices, and a few individuals joining from other locations.

In the end, the following virtual format was used:

  1. Four, 2-hour online workshops were held starting from 09:00 EST/14:00 GMT/15:00 CET and ending at 11:00 EST/16:00 GMT/17:00 CET. These were scheduled over an 8-day period, with gaps of a few days in between the first three calls (which helped with collecting feedback from those participating and tweaking the meeting process).
  2. Go-to-Meeting was the platform that we used for plenary discussions. MSTeams was used for small group work. The largest group always stayed in the Go-to-Meeting space, keeping that open for the duration of the workshop.
  3. A Google doc was designed to help small groups capture the outputs of the breakout discussions for each of the days (each day had a different theme), with one tab for each breakout group (labelled with the group name) created for each day. The questions to be answered through the group work on the different sheets were the same for each group in this case, although the groups could modify the questions and the framework for responding.
  4. A Word doc was sent to all participants in advance of each of the online workshops with the link to the Google doc for that session, a reminder of the Group topics, and the list of members for each group. Instructions as to whether the group would move to another room, or stay in the main room were included.

The first of the 2-hour sessions was somewhat of a pilot. We spent that session entirely in plenary using a Mindmeister mind map to capture the outputs of the plenary discussion. However, we quickly understood that we needed some further discussion on the overall framework and rationale for the exercise, so some time was devoted to a presentation during the next scheduled staff meeting. This happened to fall between Workshop 1 and 2, and had a more traditional online presentation format with a Q&A afterwards.  After that, as we were 14 people and wanted to have as much time as possible for individual contributions, we decided that small group work would be more effecient at least for part of each workshop. Therefore, for calls 2, 3 and 4, we used the following design:

  • Plenary opening (in the Go-to-Meeting space):  Welcome and reminder of the purpose of the 2-hour session, overview of the group composition and topic areas for this day, instructions for the group work, and the time to reconvene in the Go-to-Meeting space. (10 min)
  • Small group work: The largest group stayed in the main virtual meeting space. Some other people physically moved rooms if they were with one of the two larger groups in one of the offices.    Those people not in the larger group muted their microphones and turned off their cameras in Go-to-Meeting, and went onto the other platform for their small group calls (MSTeams in this case, but this could also be Skype or another). All the groups connected to the one google doc, and used their appropriate group tab to discuss and answer questions and capture notes. Each group designated a facilitator, as well as a rapporteur who would capture the discussion on the Google doc. In the bigger group, the external facilitator (in this case, me) stayed with that group and supported facilitation as needed and helped keep track of time. Some groups found that people had already included some ideas on their Google doc – this was because the Word document with the links had been sent in advance, and those who could have contributed to more than one thematic discussion encouraged to add some of their ideas in advance, with their initials.   (45-50 min)
  • Plenary exchange: After the parallel work, the groups reconvened in the Go-to-Meeting space to share the results of their discussions. For this plenary discussion, we used the “record” option for Go-to-Meeting, so that the discussion could be referred back to later. For the plenary exchange, we each clicked on the appropriate tab of the google doc to follow along as one team member shared their discussion. After each report, we took questions and comments, and added any additional thoughts to the template. As the plenary group was large, people also had the option to add comments and ideas to the google doc individually and noted their initials, so that we could get back to them if there were questions about what they added. This way it was not necessary for everyone to share in plenary – some could, and others could add their ideas in writing directly onto the Google doc.  (55 min)
  • Closing and Next steps: We had a little time at the end to take some closing comments from the host, and to talk about the objectives of the next call/the next steps in the process. We noted that the Google docs for each of the workshops were live and that people could also add ideas afterwards, again including their initials. (5 min)

This process got smoother and smoother, as people got used to the technology. We also tried a few different ways of recording the results of the small group discussions. Initially we let groups that went “off piste”  record the notes of the discussion outside the templates. But we eventually decided that it was better for people to use the templates, and answer the questions (bearing in mind that they could tweak the questions) for more task precision. We definitely saw the benefit of using this format a number of times over a few days – practice helped!

From the Facilitator’s perspective, I took some notes for myself that I wanted to share – I will want to use these the next time I facilitate a No-Fly workshop:

Before: Design
  • Design needs to be taken seriously by both the Facilitator and the hosting organization. It is tempting to think that this is like the conference calls of yore, when you just ask a question and (some) people talk. You will go miles further with a more complex design, a good discussion capture tool, and the technology and groupings decisions made in advance, written down and shared with all participating. Make an agenda just like you would with a F2F workshop, with timing to keep you on track.
  • Two hours is really the longest you can keep people’s attention online, and moving into groups keeps people engaged for that period. If you stayed in plenary the whole time you would need a break in the middle, and even with the break, two-hours in plenary would still be taxing, and guarantee a bit of attention drift for even the most committed participants.
  • All the discussion supports need to be made in advance, the Google doc, the instructions sheet (with links and groupings). This can be sent to people in advance so they can review them and have them handy.
  • Don’t make the templates too complex, and include the group work instructions at the top so that once people are separated from you in their small groups they won’t spend a lot of time trying to remember what it was they were supposed to be doing.
  • Build in extra time for some initial technical difficulties. As you will normally be using the platform that the team uses, someone from the team will likely be the adminstrator/convener of the session.  Know who your technical support person is – that is the person in the team who always knows how the technology works (in my experience, there is one in every team and probably one of the younger team members!)
During the Workshop
  • Remember that as the facilitator, your video camera will be on the whole time. People will be looking at you the whole time (in the breakouts you will stay with the big group, camera on, with your smiling face!) So think about that. Movements that you will make will be distracting, every turn of your head will be noticed, your facial expressions, your yawn, and everything else. If you are a fidgiter, you might want a stress ball nearby, as well as your water glass, your notes, your phone (on silent), your watch (also on silent), etc. all in your immediate reach so that your head is not bobbing in and out of the camera frame as discussions ensue.
  • As the facilitator in a virtual workshop, it becomes pretty obvious when you are doing something else. You can’t stand at the back of the room and take a break while people are watching the speaker. And to make matters worse (or more obvious), if you have glasses, the reflection in your glasses will show what is on your computer screen (this is the same for individual participants in front of their computers too). You are there to pay attention, support the group and deeply listen (if you are not trouble shooting or taking notes, or trying to find a participant, etc.)  – two hours is a long time!
  • Look behind you. I wrote a whole blog post about this: Look Behind You – it’s funny that I wrote this post 10 years ago, so the technology we were using is long gone, but the tips on how to manage your environment for an online workshop still apply.
  • Check your own  technology. I used a wired headset, as over a couple of hours (and as the facilitator I connected 30 minutes before the 2-hour call, so my online time was longer), my earpods can run out of battery if I’m not careful.  Also, if I have an option, I don’t rely on wifi for my connection, and have a wired cable, just to avoid any ups and downs in the wifi. You need to judge the reliability of your work environment.
  • Create your “cockpit”: I facilitated all of these workshops standing, using my standing desk. On this I have a large additional screen on which I displayed the Google doc and instructions. Beside this was my laptop with my webcam, as well as showing the webcams of all the other participants. I needed to be looking most of the time at my webcam, and still following the other documents, so they had to be in my line of sight. The workshop agenda I had in hardcopy and it was there that I took my facilitation notes by hand during the call. I had my phone on a stand-up charger just by my laptop so I could also see the skype chat (and WhatsApp). My “cockpit” had three screens of differing sizes and all my documents open or at hand.
  • Set up a communication means with the organizer. I used Skype to call and chat with my counterpart, but on reflection, during the workshop it would have been handy to have two WhatsApp groups available – one with the whole group to remind them about timing (e.g. when to come back from breakouts) and to see where people were (if someone didn’t come back, you could message them), and one WhatsApp with the main organizer so that you could ask bilateral questions, or check things as people were talking.
  • Remind people while they are speaking to speak slowly, and to pause from time to time. Similar to your role as facilitator in F2F environments, you will be helping other people jump in, so it is important that people not talk for too long. There seems to be even more of a barrier to entry for people to jump into a conversation virtually and it is harder for them to make eye contact or use the body language that they might employ in an in-person workshop to signal to the speaker that they want to get into the discussion. You will spend more time helping people contribute in this virtual environment.
  • All of the issues that would emerge in a F2F workshop will also emerge here and potentially affect people’s willingness to contribute. Whether it is trust, transparency, confidence, hierarchy – everything you as the facilitator may be keeping an eye on in an in-person workshop, you will need to keep an eye on in a virtual environment as well. Having methodologies that allow people to contribute without always speaking in plenary  – for example, using the google doc, allowing people to contribute asynchonously before and after, or even during the workshop,  in writing, etc. all these can help to manage some of these very human dimensions of collaborative work.
After: Feedback
  • It is incredibly useful after each of the workshops to have a debriefing call with the organizer to talk through what worked and what could be different next time. That helps continually modify the agenda.
  • It is also important to let all the participants know that they can send through observations on the process and suggestions, to you bilaterally, or to the organizers. Again this helps with adjusting the process.
  • I also used 10 minutes at the end of one of the early calls for people to write in their thoughts about “What worked” and “What could be different next time” on the side of the Google doc. In real time I wrote those two headings and asked people to take a moment to provide some quick feedback in real time. It just took a couple of minutes and everyone who had a reflection could contribute it without noting their name.

No-Fly Workshops have been around for a while, and they are certainly not going away. More and more people are considering this option for getting work done within distributed teams and networks, to cut carbon, costs and time. As technology advances, and our organizations invest in better platforms, so too do our motivations to learn how to use them more effeciently to get our collaborative work done.  Similar to sharing facilitation and design tips, as Facilitators, let’s try to share more and more of our “how to’s ” for these No-Fly workshops, as without all that flying around, we should have more time to do so!

We’re going to Online Educa, 17th International Conference on Technology Supported Learning & Training, purported to be the “Largest Global E-Learning Conference for the Corporate, Education and Public Service Sectors”

This annual global virtual learning fest is held in Berlin from 1-2 December. Lizzie and I will be tweeting from the conference (follow us @GillianMMehers and @Lizzie_BGL ). We will be especially looking out for game-based learning, badging, and video learning innovations. We will also blog the conference. If you are interested in these kinds of things, they have a great online newsletter called OEB News.

We’ve written a number of posts about both facilitation and the use of online tools for virtual and face to face events. See, for example:

“The Connected Facilitator: What’s in the Online Toolbox?”,
“Look Behind You! The Webinar Facilitator’s Non-Technical Checklist”,
The Two-Day Total Twitter Immersion: Using Twitter for Social Learning“,
“Knowledge at a Distance: Skype Video – It Works!“; and
“Create a Facilitator Role for Your Conference Calls and Webinars

In this two-part blog post, we are sharing (in part 1) some examples of tools that are either free or have a “freemium” model (you pay for increased functionality) and which we think can be usefully used in online facilitation; and (in part 2) some ideas about how you might adapt facilitation methodologies to an online environment using these tools (plus IRISnotes – as we haven’t yet discovered a lower-cost option…). We hope you find it useful, and that you’ll share your ideas and experiences too!

Twitter.com
● Contribute to / follow conversations in real time with short bursts of info: max 140 characters
● Hashtags aggregate related content
● Content can be ‘retweeted’
● “Follow” option
● Tweetdeck

Backnoise.com / Yammer.com
● Similar to twitter
● Private option

Skype.com
● Conference call diverse group sizes
● Option to add video (max 10)
● Screen-sharing
● Instant-messaging with chronological display
● Send files

Screenr.com
● Create screen-casts, recording screen and voice to share online

Slideshare.net
● Share presentations, documents and professional videos publicly or privately
● Create slidecasts (slideshow + MP3 audio synced)
● Create channels & favourites

YouTube.com
● Upload video content
● View video content online
● Create channels & favourites

Wikispaces.com
● Co-create documents collaboratively
● Track changes / contributions
● Password protection option

Docs.google.com
● Co-create documents collaboratively
● Similar editing to word / excel (and can export in these formats)
● Design surveys (google forms)
● Auto-generate survey reports with graphics

SurveyMonkey.com
● Design and manage online surveys
● Auto-generate survey reports with graphics

PollEverywhere.com
● Create multiple choice or free-text polls
● Collecting info in real time via text message, web, twitter, and smartphone responses which can be instantly combined
● Charts update instantly as people respond (online or embedded in ppt)

Doodle.com / MeetingWizard.com / TimeAndDate.com
● Propose dates / times and gather responses online to quickly and easily determine preferred options

MindMeister.com
● Co-create Mindmaps online in real time
● Working simultaneously and see changes as they happen

Wordle.net
● Generate “word clouds” from text with greater prominence given to words that appear more frequently

Smart Phone / computer video cameras
● Create short videos for sharing (by email if video-bites)

Smart Phone / computer audio / voice recorders
● Create audio files for sharing

DimDim.com
● Slideshow, chat function, audio for presenters, recording, private chat, whiteboard, video link for the facilitator, and more.

Online-stopwatch.com
● Keep time online, counting up or down
● Customize the visual (stop-watch, clock, egg timer, etc.) and sound (bell, alarm, laughing, beeping, etc.)
● Once customized, download the link to your timer. (Personally, I like the egg timer with applause as here: http://www.online-stopwatch.com/eggtimer-countdown/full-screen/?ns=../../s/3.mp3)

And here’s another one we love but that’s not free (you’ll need to make a small purchase):

IRISnotes
● A pen and mobile note taker
● Capture handwritten notes and drawings
● Edit, save and export them
● Convert handwritten notes into editable text

Following part one of this blog post (which shares some examples of tools that are either free or have a “freemium” model and which we think can be usefully used in online facilitation), this part two shares some ideas about how you might adapt facilitation methodologies to an online environment using tools that are either free or have a “freemium” model (plus IRISnotes – as we haven’t yet discovered a lower-cost option…).

1. Scheduling future events
• Use Doodle.com / MeetingWizard.com / TimeAndDate.com to quickly and easily determine favourable dates and times for future events (e.g. future conference calls). Not only can this be done to schedule your online event – you can effectively use it during the online event to efficiently schedule your next in real time!

2. Presentation
• Use Ignites (igniteshow.com) / Pecha Kucha (http://www.pecha-kucha.org/) (timed presentations) to keep to timing in online events and make sure presentations are well prepared and maintain a good pace.
• Use Prezis (Prezi.com) for variety in presentations (a change from powerpoint), creating visual interest.
• Use short videos and/or screen casts via YouTube.com / Screenr.com or Slideshare.net

3. Work in small groups with online “job aids
• Provide a participants list to everyone in advance, including names and Skype.com IDs (or equivalent). Divide the group up into small groups, designating a host.
• Pre-create job aids using Wikispaces / Google Docs / Mindmeister etc. These will most often be templates, to which you can provide links.
• Direct people to your ‘job aids’ with links (plus log-in and password).
• Provide an online timer to keep time and remind people to promptly rejoin the whole group at the specified time.

4. Report back (after small group work)
• Use Screenr.com to create screen-casts for report back
• Create video or audio recordings – using computer and smart phone programmes / applications to pre-record report-back and share using YouTube.com or Slideshare.net – helping to avoid lengthy monologues and add diversity to the event
• Use an online timer (such as online-stopwatch.com) to help with time-keeping and speaker management

5. Prioritizing questions (e.g. for a Q&A with a speaker)
• Use Twitter.com / Yammer.com / Backnoise.com. Determine a hash-tag in advance and provide this to participants.
• Give participants a few minutes to submit questions. To prioritize these for the speaker (so they respond where participants are most interested in learning more in a limited time), then ask participants to ‘retweet’ the questions others have posted that they are most interested in hearing the responses to. The questions most ‘retweeted’ are then prioritized and the speaker addresses the questions according to this prioritization.

6. Clustering questions / ideas
• Use a mind-mapping online tool such as Mindmeister.com (or do a hand-drawn version using IRISnotes). Set up the mind-map in advance and provide all participants with the link / access (to edit or view) or, just use Skype.com screen share (or equivalent) to share the map and designate one editor.
• Ask all participants to think of a question / idea and then cluster these as follows: Ask any person to start, sharing their idea using instant messaging (this is important to keep it concise and to the point) – as well as reading it aloud (but not expanding on what is written unless someone asks for clarification!).
• The mind-mapper copies and pastes the idea from the instant message into the mind-map. With this done, ask for someone with a like / similar idea to share it (again, instant messaging it and reading aloud), which is then copied and pasted into the mind-map / or summarized by hand if using IrisNotes. Do this until there are no more like / similar questions or ideas. Then start with a different ‘branch’ of questions / ideas on the mindmap. Repeat until all questions or ideas are represented.
• The mindmap will clearly show where there is greatest interest, most clarification needed, most energy and/or ideas and conversation in plenary afterwards can start from here.

7. Voting
• Use an online tool such as PollEverywhere.com to do real-time voting (with an anonymous option). Prepare the questions / options in advance, or generate them online and set the poll up in the course of the online event. Either-way, if you think you might vote on something, get familiar with polleverywhere and its parameters (e.g. more than 30 people and you may need to pay a subscription fee) ahead of time.
• One advantage of poll-everywhere over google docs and survey monkey (see below) is that rather than having to download the results as a pdf, you can actually see results live – as they change second by second, creating more excitement and anticipation.
• Google docs (‘forms’: docs.google.com) and SurveyMonkey.com could also be used for voting prior to or during an event. Both enable results-exporting as visuals (pie charts / bar graphs) in pdf.
• All give you the option to track – or not – who responds and how, so you have the option of anonymity or respondent profiling and analysis. (e.g. how do responses vary by sector / region…)

8. Carousel
• Use Skype.com video conference calls (or equivalent) for small group discussion (Note: make sure all participants are in one another’s contact list in advance and provide a participant list with names and skype IDs, as well as who is in which group for the carousel so that the host / facilitator of each station discussion knows who they need to include in the conference call)
• Use wikispaces.com / google docs (docs.google.com) / Mindmeister.com mindmaps in place of flipchart stations
• And/or use IRISnotes for visual / hand written work in combination with Skype.com screen share (can save and share doc with next group for further editing, or have same station ‘facilitator’ throughout)

9. Open Space Technology
(visit openspaceworld.org for the ‘how to’ steps in a face-to-face environment)
• Use instant messaging (e.g. Skype.com chat) for people to submit topics / questions to schedule
• Prepare a blank timetable (in word / google docs / wikispaces.com) and copy and paste across questions and topics as they are submitted
• Provide each topic ‘host’ a few minutes to decide where they would like to capture the key points of the discussion as it progresses (e.g. wikispaces.com / google docs / Mindmeister.com / irisnotes), to set up the appropriate ‘page’ and send you the link plus log-in / password if necessary. Note: If you prefer, you could just pre-determine that everyone will use (for example) a wiki and provide the topic hosts with links to appropriate wiki pages – labeled topic x through to topic y.
• In the same doc as the timetable, include the following info:
(a) Who is hosting the conversation (plus their Skype ID)
(b) Links to the page(s) where the conversation will be captured, plus log-in / password if necessary.
• Use a screen share tool (e.g. Skype screen share) to share the timetable with everyone as it is developed
• Ask participants to instant message the topic host when they wish to join a conversation
• As the facilitator, keep time and use instant messaging to inform groups when they have 10 mins / 5 mins / 0 mins until the end of their session (OR use an online timer such as online-stopwatch.com) and then invite everyone to revisit the timetable for information on where to go for their next conversation.
• Use Skype conference calls (or equivalent) for small group discussion, in combination with Skype screen share as necessary.

10. World Café
(visit theworldcafé.com for the ‘how to’ steps in a face-to-face environment)
• Provide a participants list to everyone in advance, including names and Skype IDs (or equivalent). Include also in this list some coding (in a table) to facilitate organizing three different groupings of 4 participants for each round of the World Café, and nominating a host.
For example, for the first round of the World Café / first grouping of 4, you might group people by simply going through the participant list organized alphabetically by surname, and counting people into groups of four – giving each person a letter next to their name – e.g. the first four participants would be coded ‘Group A’, the second four ‘Group B’ etc. For the second grouping of four participants, go back through the list and this time number them from 1 through to the total number of participants / 4 (e.g. if you had 40 participants you would number them 1-10 four times. For the second round of the World Café, all the 1’s will chat together, all the 2’s together, etc. Then for the third round, you might assign different symbols or colours. You choose – the important thing is to determine in advance how you will group everyone, and include this ‘coding’ in the participants list so it is clear and easy to create the groupings.
Additionally it is important that, for each round of the World Café, you designate clearly in the participant list who is responsible for hosting the conversation (i.e. hosting the Skype call, keeping time and making sure everyone contributes!)
• Once everyone is clear about with whom they will chat in the first round and who is hosting the call (plus their Skype ID), you can launch round one. But first – set an online timer (such as online-stopwatch.com) that everyone can see and which will ring to call everyone back into plenary.
• Back in plenary, take some highlights ‘popcorn’ style from each group (call on the hosts of each group of four) and capture these in wikispaces.com / google doc / Mindmeister.com / irisnotes using screen share at the same time.
• Repeat.

11. Point and counterpoint (read the description of this methodology for the ‘how to’ steps in a face-to-face environment in the book: Thaigi’s 100 Favourite Games)
• Provide a participants list to everyone in advance, including names and Skype IDs (or equivalent).
• With everyone on the conference call, use Polleverywhere.com (or google forms / or SurveyMonkey.com) to gauge participant’s positions regarding a controversial statement. Set the poll/survey question up in advance, putting opposing controversial statements at either end of a scale of 1-10, with 10 fields in between into which they must enter their first name. (You need the names later!) Give participants only 30 seconds to decide where they are on the scale.
• As soon as you have all the results, generate the report (export the results) and share this with participants using Skype screenshare (or equivalent). You should be able to see the names of all participants on the scale from one to ten. At this stage, make a comment on the distribution. Then ‘count off’ participants, starting at the person nearest 0, putting them alternately in team 1, team 2, team 1, etc. Note: Designate one (or two) participant(s) – you want to ensure there is an equal number of participants in each team) who fall in the middle of the distribution as ‘judges’ who won’t participate in the work of team 1 and 2. Then designate the person nearest 0 as the “captain” for team 1 and the person nearest 10 as the captain for team 2. They are then responsible for hosting two team calls (using the list of participants shared prior to the meeting).
• Use a tool such as wikispaces.com / google docs / Mindmeister.com as a work space for each of the groups (having set up a space for each team in advance). Provide them with the link and (if necessary) login/ password and set them to work brainstorming all the arguments in favour of ‘their’ controversial statement – capturing all contributions on the tool provided. (This capture is essential for later.) Use an online timer (online-stopwatch.com) to keep time and remind them to return to a full group call.
• Meanwhile, set up 2 quick slideshows. Make sure you can play both on loop. In the first, go through the results from the poll, entering one name per slide into the slideshow starting with the name closest to 0 (and remembering to remove the judge(s)). With all the names in place, make the slides with the names of all participants from team 1 one colour, and all the names from team 2 in another colour. When you play the slideshow, as it goes through the names, the slides should alternative team/colour one and team/colour two. You will use these to call on the members of the teams to share their arguments, as well as helping everyone keep in mind who is talking and on behalf of which team / position. A second slide set is just two slides with just the two team colours (no names).
• Back in full group, launch the ‘debate’, determining who speaks when using your slide set, until all the arguments captured are exhausted. The switch to your second slide set and invite people to ‘change teams’ and spontaneously argue from the other team. You will not have names, so just switch from colour one to colour two. Participants can only share if they are adding a new argument from the other team to the one in which they participated.
• Once all arguments are exhausted. Invite the judge(s) who have listened to the debate to give their ‘verdict’ with a brief synthesis of which arguments they found most compelling.
• Finally re-do the poll that you started with. Generate the report and compare the results! Have people shifted in their thinking?

Please let us now how you get on and what you think!

Full disclosure: I ran a workshop at the  International Association of Facilitators Europe Conference a little while ago on Facilitation and Web-based Tools. It went well, and the participating facilitators were enthusiastic users and happy to share. We did a quick mass collection of what and how people were using different tools – I diligently took down the flipcharts and promised to send out the results.

Well, in an office clean today I found those flipcharts, buried in a stack of papers. Hmmm, to keep my promise, I thought I would share the results. If any of you who attended read this post – I will apologize profusely and sincerely hope that “Better Late Than Never” is actually true. A sheep seemed to be the best picture I could use for this blog post.

So here they are, a list of tools that this group of facilitators reported using (I have checked, added some notes, and updated them where necessary). Some of these are obvious and some a little less so, in any case it is an interesting snapshot of what web-based tools are in a facilitator’s online toolkit:

YouTube

  • Creating and posting video clips to be played in face-to-face events or a WebEx event when participants/speakers cannot attend live, or to save costs or carbon, or just for additional time-restricted content (e.g. you need an on target 5 min clip and not a speaker who will go over by 10 min);
  • Using video clips as an information and learning source for facilitation (“Facilitation” has 2,970 YouTube video clips available today);
  • Uploading videos of you in action for promotion of your facilitation work (and to answer the “What is Faciliation?” question as you would answer it);
  • Uploading videos of your work for funders as a part of evaluation or reporting process;
  • Uploading video for participants of projects and events in addition to or replacement of a written document (as in a final “video report”).

Blogs (e.g. WordPress or Blogger)

  • Sharing written blog updates relating to facilitation work and linking them to your company or institutional website as information about your work;
  • Blogging for knowledge sharing on facilitation;
  • Setting up a new blog to support a particular training or facilitated event (I also like http://www.posterous.com/ for this, as it is very easy to use it in sessions to share group work and keep real time track of products created, mainly because posting is done by email);
  • Creating an internal blog for a group of facilitators- for in-team learning, requests for help and challenging management decisions (sic);
  • As a place to connect to and share web-based facilitation resources (e.g. you could set up a blog to aggregate other blogs and online resources on facilitation, or you could simply connect up to relevant blogs through a dashboard, a reader, or using something like Delicious (one of a number of social bookmarking sites – Note: Delicious is owned by Yahoo and might be closing, so do some research if you want a good social bookmarking site – I personally just switched my Delicious links to Evernote). 

Ning

  • Setting up one to support specific training or facilitated events, for posting updates for a distributed community during an event, and community development more generally before and after a facilitated event;
  • A place to facilitate or join topical discussions related to any theme (there are 65 nings that are tagged with Facilitation);
  • As a support platform for building new organizations or networks (Note: This used to be free, and is now a pay platform).

Wikis

  • Creating an internal wiki in an organization to collect and record learning (such as pbworks);
  • Using other wikis as an information source and for sharing on things like games – such as the gaming wiki  WoWWiki to understand everything from “chat” to “bloodcurse” about how the game works (you might wonder about using World of Warcraft for learning – try a 30-day trial and see what you think – I enjoyed exploring it for examples of negotiation, teamwork, collaboration etc.) (Anyways, another facilitator put this down as being useful for him, so you don’t have to take my word for it 🙂

LinkedIn

  • Useful for promotion and business for facilitators (I have now had a number of requests come through LinkedIn and not email initially);
  • Helping to manage professional links – especially people who work with many different teams and organizations;
  • There are many functions for networking (e.g. slideshare, events, etc.);
  • As a place to tap into ongoing discussions through LinkedIn Groups – today in the Groups Directory there are 219 Groups that deal somehow with Facilitation and 8,280 with Learning. 

Twitter and Twitter-like tools

  • Can be used to generate energy around a project (keep people posted, update on activities, achievements, learning etc.);
  • A place to talk facilitation business with other facilitators (“Follow” other Facilitators – and see who they are following to find others);
  • To identify communities through hashtags (such as #Facilitation, #AppreciativeInquiry and #Learning and anything else you care to find);
  • Useful as a way to gather customer appreciation (what are people tweeting about your facilitation work?)
  • Using Yammer  (a private Twitter-like tool) internally in an organization to keep track of people and their work, ideas, etc.;
  • Using Backnoise in events for more audience participation.

Facebook

  • Maintaining “social” work contacts;
  • Using the Events (+CreateAnEvent) function for announcements and promotion of your facilitation work;
  • Starting a business page for your facilitation work (to inter alia “Invite your friends”, “Tell your fans”, “Post status updates” etc.)

Second Life (This dates us a little)

  • Useful for dialogue and storytelling practice;
  • Keeping in touch with the virtual world technologies;
  • Useful as an alternative to conference calls, to make them more interactive.

Others

  • http://www.doodle.com/ for meeting time planning and invitations (MeetingWizard is another);
  • Basecamp for project management and as a collaborative tool for teams of facilitators or facilitators and their partners;
  • Personal Brain (http://www.thebrain.com/) – Useful to develop self-managed learning applications or even as support for group mind mapping, brainstorming, and more;
  • WebEx and DimDim– video conferencing for facilitation and training;
  • Campaign monitor – for email marketing campaigns;
  • Zoomerang and Surveymonkey – free places to create and run surveys and questionnaires – useful for both demand articulation/needs assessment as well as post-workshop evaluation/feedback.
  • To this list I would add Evernote to keep track of the photos of flipcharts that I take, and I attach any other job aids I produce, I also have an image of all the visual facilitation icones that are standards that I might want to include on a flipchart, this is in addition to all my online links which have become a valuable on-demand resource for me (as mentioned above)

I think this list is interesting as a snapshot of what and how Facilitators are using web-based tools in their facilitation work, as well as a way to acknowledge that we all are using new media today in so many different ways. (Please feel free to add to the above!) I’ll bet you are using something in each category above – before you read through this list did you realise how many online instruments were on your facilitator’s dashboard?

Oh, and next time I hold a workshop at an IAF conference, I won’t wait so long to report back (she said sheepishly).

We were very sad a few weeks ago when Joan Davis, one of our speakers, and a Switzerland-based founding member of the Balaton Group, let us know that she was not able to attend. She was to be an important part of our programme, focusing on organic agriculture, and scheduled for Day 3 of our annual Balaton Group Meeting on “Food Futures”.

We are a group that focuses on sustainability, and very sensitive to travel and carbon emissions, so virtual contributions would be acceptable from a philosophical point of view. However, everything we have tried in the past to have virtual participation at our meetings has not really worked for many reasons. We thought we would try again this time, our of sheer necessity – and as I watch Joan on the big screen through skype video, we can see that it really works!

The quality of the connection, video and sound is excellent. We are just using a regular laptop with an integrated video, connected to a PPT projector, and a speaker connection (used for showing videos). The wifi is strong in this meeting room. So this is a good start – the technical support is great. However this is only part of our expectations.  One of our group’s values is that speakers stay with us throughout the meeting. This means that they get to know the group and can connect with our conversations and help us move ahead in our thinking through their inputs and contribute substantively to generative dialogue. Too often speakers parachute in and give their usual talk and leave, especially easy for a web-based part of a programme, giving the feeling of disconnect and potentially taking a group off in another direction. Here are a few things that we did to get this depth of connection with a virtual speaker:

  • Skype connection previously in the meeting week: Joan has been monitoring the presentations and discussion all week, so she is able to make comments on the previous speakers points in her skype presentations.
  • Know the participants: She knows the participant group and can mention names of participants and their relevent backgrounds, and can mention them as people that the group can speak to for further engagement around some of her points.
  • Support the two-way conversation: As you can see in the photo above, the laptop on the desk of our Chair Kevin Noone is facing the group, so Joan can also see us. Conversely, seeing this small image of ourselves in the upper right hand of the screen helps us be aware of the 2-way nature of this conversation. The Chair is also actively moderating, repeating questions if the microphone doesn’t pick them up, etc.

This was an excellent experience for the group, which has strong traditions and values around speakers contributions and social interaction during their events. However, in a time when travel restrictions (whether self-imposed or infrastructure/nature-imposed) and other things like health and finances increasingly keeping people home, this doesn’t need to impede good quality knowledge exchange and dialogue that creates new ideas, new meaning and new initiatives. We believed this in theory, and now know this from experience.

One of the most useful conferences I go to each year is Online Educa, held annually in Berlin in November/December. It’s a gathering of several thousand people from all over the world who work, live and breathe technology-supported learning.

It follows a rather traditional format of plenary and parallel break-out sessions on a wide variety of topics. And at the same time, there is much tolerance for the truly weird and wonderful in terms of stories, cases and experiments in learning. Not only do they get top speakers to present in plenary – I have written in the past about big ideas presented there by George Siemens on Connectivism, for example, and Professor Sugata Mitra of the Hole in the Wall experiments in India – conceptually they are also really pushing the envelope when it comes to knowledge and new media. I remember first hearing about knowledge management in stock and flow terms here in 2006, and most recently of the future in cloud computing. I wrote a post this year with all the collected new ideas (for me) called Ahead of the Curve; I always have ample new ideas when I come away from one of these conferences.

This community is continually testing new techniques – here is where I used Twitter so successfully for social learning (see my post on the Two-Day Total Twitter Immersion), where I met Jay Cross first and learned about his paradigm-shifting work in informal learning, and met some of his colleagues from Internet Time (see my post on Follow the Leaders). It’s where I experienced a Pecha Kucha, and saw a Panel using a backchannel (Backnoise.com) to “talk” to the audience. And where Jane Hart who runs the online Centre for Learning and Performance Technologies speaks, where university programmes talk about how they are using virtual worlds and mobile technology for learning. It is always an exciting two days.

I just received a “Call for Papers” message from the team that runs Online Educa asking me to post it on my blog, and in this particular case, I agreed – here you go! If you have an innovative learning process, or something to share, this is the place to go to interact with a trending learning community:


OEB 2010 Call for Papers Open Now

Online Educa Berlin, the largest global e-learning conference for the corporate, education and public service sectors, has opened its Call for Papers. Deadline for receipt of all proposals is 14 May 2010. The 16th edition of Online Educa Berlin will take place from 1-3 December 2010 at the Hotel InterContinental Berlin.

Under the banner of Learning for All, this year’s conference looks for contributions relating to the four core themes: Learning Content, Learning About Learning, Learning Ecosystems and Learning Environments. Each of these themes should be explored within the context of either Institutional Learning, Workplace Learning or Lifelong Learning, or any combination of these three.

Online Educa Berlin is the key networking event for the international e-learning and technology-supported learning and training industry, bringing together more than 2000 learning professionals and newcomers from around the world.

For more information: www.online-educa.com/programme

Maybe I’ll see you there!

I am currently in the middle of an online sustainability learning project that includes facilitating a number of webinars (10 to be exact) for a big multi-national company with staff based all over the world. For this project, I am one of a distributed delivery team from AtKisson Associates which is located in North America, Europe and Asia, because every module features virtual events in all these three regions. Webinars are the main “person-to-person” component of this programme, so they are the anchor of the learning process (and they need to be good!)

I’ve worked with online learning in the past, such as Horizon Live (an early webinar-like platform, but with no video input or participant audio interactivity possibilities), and even earlier with CD-based, email-mediated distance learning. This is the first real experience I have had faciliting webinars that have so many bells and whistles. For this project, we are using DimDim (http://www.dimdim.com/), which provides the slideshow, chat function, audio for presenters, recording, private chat, whiteboard, video link for the facilitator, and more. For these webinars we are adding the audio interactivity for participants through a call-in conferencing number, which I access by skype.

Needless to say, the first time I facilitated (after a trial run of course) it took me a while to get my head around all the moving parts of this delivery system. At any one moment, I could be presenting slides myself or advancing the slides for a presenter, tracking and answering chat questions, watching myself on video, private chatting to the technology support person in Stockholm, looking for my skype mute button, while trying not to cough or type too loudly, and so on! AND you have to pay attention on top of it, because you are facilitating after all and may need to bring a point back into the discussion later on. (Don’t worry, it gets easier each time to do so many things concurrently – for the video game generation this is probably no big deal.)

I’ve participated in three so far, and during last week’s webinar, anything that could happen seemed to do so technology-wise, testing our creativity, resilience, and Plans B and C on the spot. This morning I facilitated another one, and again, there were multiple, delightful surprises with Dimdim and even Skype at various times within the length of our one-hour event.

Because weird technical things happen during these online sessions, combined with the fact that I need to be fully present in terms of my attention, I find I need to prepare much more than I would have ever imagined prior to this one hour of sitting-at-my-computer facilitation. As a result, I made this checklist for myself – a non-technical checklist for facilitating a webinar. It considers things that I have noticed, about my computer, the content, my environment and myself. With these things ticked off, I am ready for (almost) anything – or at least I am not distracted by things I could have anticipated myself!

Non-technical Webinar Preparation Checklist:

My Computer
There are a number of checks that need to be made on your hardware that is not connected to any particular webinar package. For example:

  • (I assume that I have already tested the webinar package and accepted the webinar invitation.)
  • Close down all competing open programmes that may be running, and shut down any open documents, except exactly what is needed: internet and skype – (all those extraneous open windows, half written email messages and blog/Twitter/FB/LinkedIn pages need to be shut down/saved)
  • Check that the mute button on the computer is not on.
  • Unplug the extra monitor, stick to one (nothing more maddening than having to look two places at once on top of everything else).
  • Check that headphone/microphone cables are in the right jacks.
  • Make sure you have enough money on your skype account.

Content

Whether you are the presenter/facilitator or facilitating another speaker, you will need to be able to anticipate the next slides and have your discussion questions/notes queued up and ready to go.

  • Have a copy of the printed slide set in handouts (6 per page – latest version of course).
  • DON’T staple (it’s hard to turn pages with one hand on your mouse/keyboard/pen).
  • Print slides one sided (as an exception to the rule – turning pages is also noisy).
  • Make sure the pages are numbered legibly (so easy to keep in order as you slide them across).

Environment – Ambient Noise

This is critically important, whether you are in a cubicle or a home office – the latter can be even more unpredictable, as is my case. As the facilitator, you have your audio on 99% of the time, so any kind of noise is a big issue.

  • Turn your cell phone on vibrate (even if it is across the room).
  • Move any other phones like landlines out of the room (they tend to all go off at the same time as someone tries one, and then when you don’t answer it, they try the other).
  • Put a DO NOT DISTURB sign on the door (with the time frame of your call).
  • Lock the door.
  • Tell anyone in the house with a penchant for spontaneous hoovering to wait until after your call (nicely so they don’t decide that they never want to hoover again).
  • Let the cat in (especially if it likes to sit outside the office window behind your computer, meows loudly, has incredible persistence and suffers from bad timing).

Environment – Your Office

Managing and preparing the space around you is incredibly important and easy to forget until you are right in the middle of your webinar and shuffling through stacks of stuff looking for a pen.

  • Clear the desk from EVERYTHING except your slideset, one note paper and pen (everything else will be in your way at some point).
  • Add tissues (seasonal)
  • LOOK BEHIND YOU! (Use your video for this -move dead or past-prime plant, coffee cups, extraneous rubbish, strange photos, from view behind you).
  • Straighten up any pictures on the wall or put up some visual interest behind you (NOTE Business Idea: Backdrops for webinar presenters that cover messy office spaces and add pleasing, unfussy visual interest. Swiss alps, Tibetan monastery, Carribean beach view.)

You

You and the slideset are the only thing that people are seeing/hearing for an entire hour, have a heart and think about it from their point of view.

  • Think about what you are wearing (top half only). Can you add colour, pattern? (Same consideration as for a stand-up facilitator, but from the waist up.)
  • Comb hair
  • Apply lipstick (or increase your video contrast controls – only half kidding here – nothing like a bland, washed out presenter.)
  • Do you need coffee or water on hand?
  • Don’t forget the washroom (you won’t be nipping out during the group work on a webinar)

When I first started this checklist, I couldn’t believe how many things needed to be considered prior to facilitating a webinar. I imagined that if I had my slides prepared I could just sit down, plug in and present.

But there is definitely more to it than that – especially if you want to be able to concentrate on the content and dynamics in a virtual environment where you are getting much less sensory input. In this kind of setting many of your facilitator senses are cut off or drastically reduced -you have no sight to speak of and certainly no visual cues on how people are feeling and following. You also have very little hearing, as most of the time participants are on mute until they want to speak, and certainly none of that sixth sense that helps a facilitator in a face-to-face setting read her participants in order to know how and when to engage them and adjust the process to fit their needs.

So for webinar success, increasingly a feature of a facilitator’s work, you need to anticipate and prepare much more than you might expect. Make your own checklist or add to mine – what have I left out?

(For the checklist without the bla, bla, blah, click here: Webinar Facilitators Checklist)

Many people do not see the point of Twitter. I know this because I counted myself as a proud member of this large, non-plussed group until a few days ago. We had followed the hype and set up an account, followed some people (quickly stopped following some people), Tweeted a few times to see how it worked, and then thought, “so what?” Nobody tweeted back to me, most of my “followers” didn’t know me, and it felt a little silly to be sending these cheeps out alone.

Using Twitter in a conference setting however completely changed my mind about its utility and possible applications for learning.

The Online Educa Conference was full of Tweeters. I know that because I spent a lot of time looking at the hashtag that was set up by the conference organizers (smart, they printed it in the front of the Conference Programme Catalogue in “Important Practical Information”.) A hash tag – like #oeb2009 – is a tag that people include in their 140 character Tweets that is searchable on Twitter. If you put the hash tag in the search box on your home page, any post that includes it will come up in an aggregator window on Twitter. So you can keep track of the whole conversation happening in real time, even if you are not following the individual people Tweeting (yet).

Believe it or not, a big conference was a great place to be totally immersed in Twitter as it had so many useful applications at the event. Here is what I was noticing about how people were using Twitter for social learning in this setting (remember there were some 2000+ people attending).

  • At any time, there were up to 10 sessions going on in parallel and obviously you could only attend one, but you could count on the fact that a dozen or so people in each session were Tweeting the main points, and if one of those sessions sounded better than yours you could always split and go find it. Twitter helped make more purposeful the Law of Two Feet.
  • Speakers were using Twitter to publicise their sessions in advance (plenty of healthy competition with participants spoiled for choice). They also used Twitter to share their websites and papers. They even used them to announce changes to rooms, speakers line ups etc.
  • Being active and thoughtful on Twitter helped people gain visibility in a large conference. In vast plenary halls, no one could really stand out, and very few got to make their points publically, but on Twitter anyone could jump in with good ideas, and be rewarded with comments and engagement.
  • Participants were using Twitter to gather people together – for example plenty of Tweets announced snacks and discussion at a certain time at some stand in the Exhibition Hall, or at the bar. As one Tweeter lamented, “Shoot!!!…. i see i missed the Tweet meetup at the oeb bar yesterday…always good to meet tweeps in RL.”
  • In each session, there were assistants handing out paper feedback forms, but I noticed that not too many people were filling them in. I think they didn’t need to, people were giving real feedback to speakers and organizers on Twitter on everything from the quality of the presentations to lunch. One Tweeter wrote, “maybe we need an online course for silently closing the door!” (obviously sitting too close to some conference room exit).
  • Panel Chairs could use Twitter to gather questions from the audience. At least one Chair monitored Twitter for questions, that she then used to launch discussion when the panelists were done with their formal presentations. One Tweeter even asked his “followers” (not at the conference), “going to mobile learning session- mates of mine, any questions I should ask?”
  • People were using Twitter to be a part of the larger conversation and interact with many more interesting people. We noticed that we could talk to about 20 people face-to-face in the breaks during the two-day conference. However, we heard from and engaged in conversations with hundreds on Twitter.
  • Now, after the conference, Twitter acts as an archive of content through Tweets, with their links, ideas, and connections to a previously unknown group of like-minded people.

Overall, I was impressed by how much Twitter added to my conference-going experience. It took me a while to get into it. I needed to install Tweetdeck on my I-phone before it got really easy to use it for all the things above. It took me some time to find my “voice”, make some personal policies about what, when and how I would engage with the community through Twitter. And suddenly, I wasn’t learning alone anymore.

I just spent the last two days at Online Educa, one of the largest global conferences for technology-supported learning and training, held annually in Berlin. It is my third time attending and every time I return full of new ideas and a glimpse at the future learning trends through the eyes of some of the top thinkers, academics and techno-geeks. This year was no different.

Each year there is some tool or topic that is capturing the excitement and imagination of the 2000+ participants. When I first attended in 2006 it was blogs and wikis, with many people enthusing about their experiences with these young tools. At that time we had just started this blog, so were eager to hear how people were experimenting with theirs for learning. Informal learning was also a topic with Jay Cross’ original book on this published.

In 2007, the buzz was around real learning applications in virtual worlds, like Second Life (SL), which most people had discarded as playgrounds for slackers. Many formal and informal learning experts were exploring and exploiting their potential for all kinds of learning. Podcasting was also a hot topic, and mobile learning was a beginning topic of conversation then, but was being drowned out by SL avatars and a much bigger conversation about the quality and quantity of user-generated content. (I’ll never forget plenary speaker Andrew Keen -author of The Cult of the Amateur: How Today’s Internet is Killing Our Culture- who was boo-ed for proclaiming to the audience of thousands of otherwise very polite internet enthusiasts that wikipedia and the internet was being written by monkeys, or something to that extent.)

Trending this year were a few things: Tools like Twitter were not only mentioned in practically every session, but also was being actively used to extend the learning beyond the seminar rooms throughout the conference. All kinds of video application was also a trend, from having school kids use the video clips they took with their phone for show and tell, to the question of whether YouTube and its mega supply of how-to, just-in-time learning content might ever replace formal training. Mobile learning was also very big this year, with everyone doing it on their I-phones (or other, although I saw lots of them) as well as discussing the future of learning as being “hand held”. This was linked to an ongoing discussion about the coming of cloud computing, having everything in the “cloud” with ubiquitous access, where any user can access any content, anytime with their phone, PDA or even a TV. One plenary speaker heralded the end of “bulky” laptops, while holding up one of the smallest I’ve seen.

I myself found it fascinating that I only turned on my own PC once the whole two days (and that was for a skype call to Sweden). Not that I was taking notes and talking instead, no, I was on my phone the whole time. I used it to Twitter the conference, used it to give feedback in sessions on Backnoise.com, to ask questions of other participants, to meet and interact with many people, and more. Instead of sitting down to write my blog posts, I micro-blogged the whole time (I would have never found the hour it takes me to write a proper blog post during that fast-paced conference.) And in doing got some experiential learning in “going mobile”, learning alot about this new handheld future, from many who do it so expertly.

In fact, my last Tweet from the Conference was: “#oeb2009 Difference @ OEB for me this yr: Didn’t use my laptop at all- all interaction with mobile & found it great- Next yr no pc 4 me!”

Last week I was asked to facilitate a conference call. Sound odd?

Well, originally it was supposed to be a face-to-face meeting on sustainability reporting for a high-level company review panel. In its first iteration it had two people conferencing in from distant time zones. That meant we had to design activities that the participants physically present could do, as well as meaningfully engage the people who were virtual. We created a design and it seemed like it would work, using in part the interactivity of an internal webinar platform. However, before the meeting occurred, the format changed again.

For financial reasons, for time reasons, and for environmental reasons, the organizers decided to hold the meeting entirely virtually, and yet, they still wanted interactivity and a facilitator. Why a facilitator for something that would end up as a modified conference call? Surely someone from the team could convene the call and walk the group through the agenda? It turned out to be a good idea to have a facilitator. Here is what we learned…

First, having someone facilitating the call helped the team hosting it to concentrate entirely on what people were saying (the content), rather than focus on process -and I can tell you that it is hard to do both for a virtual event. In the end, we decided on a blended format – we used a webinar platform to show a Powerpoint slide set which we could control in our HQ office. Then we added a phone-based conference call so that we could talk to one another, as we went through the slides. So my facilitation included managing the telephone (calling on people, mute button, helping people come in and out, getting technical advice), as well as paying attention to the webinar slide show questions and the transitions (thankfully I had someone else changing slides, I just called them and facilitated their content.) I was surrounded by technology, and still it took just a few minutes to get used to it so it would run smoothly. (Note: We did a thorough test of the system a week before the event.)

Second, having a facilitator also meant that another layer of structure could be incorporated into the virtual meeting and there would be someone there to handle that extra complexity. Rather than asking the question to the group and then opening for comments -thus having people jump in at the same time and potentially speak over top one another (the case in both conference calls and in meeting rooms), I managed the inputs by having a list of participants beside me and calling on people by name. I varied the order so it wouldn’t get too monotonous, and each person got the chance to comment on each question without fail, or say “Pass”. And I could go back to people if someone built on their answer in a way that might change their comment. This way there was no stress on the part of participants about how and when to jump into a conversation, as it is in open conference calls, and no fear of interrupting people. We set some norms at the beginning around brevity and conciseness and people seemed to be happy to support these. Because they were called by name each time, they always knew who was saying what.

Third, we added another interesting facilitating feature of this virtual meeting. We took the decision to send out the slide set in advance, and to design it as a job aid. Instead of just descriptive information, we used the slide format and made it more instructional, guiding participants through the agenda. We included the various questions for discussion and formatted them into something that could be used as a preparatory worksheet for participants with places to fill in answers, and visuals (matrices, scales) to capture responses to different questions. For example, one question included a continuum, which we put on a slide, numbered the options along the continuum (1 to 5), and asked people to place themselves along it in advance with a cross. When we got to the call, we showed the continuum on the webinar and asked people to tell us where they were using the numbers as a guide for precision puroses. We collected these orally and made an aggregated visual continuum for the group and report.

Having the slide set also meant that the few people who for some reason (firewall, etc) could not access the webinar, could follow along on their printed slideset, using the page numbers. Because it was a worksheet, everyone had been able to think about their answers to the questions in advance and have a place to record them for use during our call. We got brief, considered responses and the participants got a practical way to prepare. Because people knew they would be asked each question they could hold their comments/questions and elaborate on their previous answers in the next question.

On final reflection, we are not sure that a face-to-face meeting would have produced very different results. Certainly it would have taken more time for a number of reasons. We probably wouldn’t have sent through a worksheet in advance with the exact questions, and as a result, people might not have prepared as much. Also the quick feedback (supportive/opposition) and the spontaneity of facilitated face-to-face meetings might have encouraged people to speak longer as they took the cue from the group to define their points of view as well as their role/value in the group. Our virtual meeting took exactly 2 hours, and I think it would have been twice that at least for F2F meeting. And we still had good interaction, with people listening to each other (that might also have been because I was calling on them in different order, so as to not miss your turn you had to pay attention and not just lurk and do your email in the background- although I didn’t do that on purpose!)

Conference calls and webinars are getting more and more popular for the reasons cited here. Consider establishing a facilitator role, and some facilitation structure to help your meeting be te most productive learning environment possible.

Well, it turns out that many institutions have figured this one out – using blogs for reflective practice. A quick google showed that many environments that are education and learning-based are using them.

I found an interesting upcoming conference titled Online Educa Berlin 2006 http://www.online-educa.com/ with a parallel stream titled, “Social Technologies in Educational Practice”. Some of the presentations were:

*Blogs as Reflective Practice (Dicole Oy, Finland)
*Wikis and Blogs: Teaching English to the ‘Net Generation’ (University of Padua, Italy)
*Everything 2.0: What Do New and Emerging Social Technlogies Offer Learning and Teaching? (King’s College London, UK)
*Learning by Storytelling in Weblogs (Newlearning, University of Erlangen-Nurnberg, Germany)

Apparently there are many organizations who are exploring how they can use blogs and other new technologies to help people learn.

Another presentation in a different stream was titled, “Are we Sinking or Thinking? Language Learning at the Workplace Re-Invented Live Online” – I adapted it as the title of this blog entry (I think perhaps it could be more appreciative!)

Many people say that they do not have time for reflection in the workplace. Meetings after meetings with two minutes in-between, emails interrupted by visitors in turn interrupted by telephone calls. Forgetting to have lunch?

Reflection however is what helps people process the various inputs that they are receiving. It helps them develop their own opinions; link new ideas to their own experiences to either validate them or question them; and consider possible actions (proactive or reactive.)

Building in reflective practice however takes commitment, perseverence and motivation. You have to make the time and you need to see positive results in order to have the incentive to keep it up. Learning and change can be that incentive, the possibility of dialogue can also be an incentive.

I am interested in how blogging can be used for reflective practice in the workplace – how it can be used to capture the progress that people make when they are thinking through issues and ideas. And how it can be used to start discussions, both within an institution and outside. Discussions that might not happen otherwise due to lack of time and attention.

How can we get our organization to promote blogging by staff members to help them reflect on the work they are doing and develop conversations around the things they are noticing, and the questions they have? It could help people understand more about the work staff members are doing and the processes that they are undergoing themselves as they develop their own capacities in many areas. It would help people get to know each other.

Are there any non-governmental organizations that actively promote blogging for this kind of purpose? Imagine an organization where every individual or team kept a blog. One that captured for themselves, their team and others some of the things they notice every day, funny things, celebrations, learning points, frustrations even. I can imagine myself checking one of my colleagues blogs thinking, “I wonder what’s going on in the DG’s office today?”