(Photo by Martino Pietropoli on Unsplash)


What is a DACUM?” I asked, when I received an email inviting me to join one from an IAF learning webinar co-presenter.

DACUM, which stands for “Developing a Curriculum,”  is an occupational analysis technique developed in the 1960s that employs a panel of master practitioners in a field to “capture the observations of high performing, incumbent workers regarding the major duties and tasks included in an occupation”. This descriptor was included as a part of the brief from the host of our DACUM, the Eastern Kentucky University (EKU) Facilitation Center (Facilitation.eku.edu).

A DACUM analysis can form the foundation for the development or updating of competency-based curricula. The occupational profile and curriculum developed can then be used to inform the design of university, vocational or training courses and programmes. Whatever your occupation – engineer, designer, project manager, trainer – there could very well be a DACUM behind it all that informed your learning journey.

It was a new experience for me, and I thought it might be of interest to others how this behind-the-scenes process works.

How a DACUM works

The DACUM is a highly structured, multi-step facilitated process. It starts with the work of a panel of experts, on which I participated, and this step produces a first draft occupational framework. The framework goes through a number of other steps, including a shorter validation workshop with another group of facilitators, a management review, task analysis, and then this outcome is used to support curriculum development or to update an existing curriculum.

Our DACUM process was virtual and held over two full 8-hour days using Zoom and an online whiteboard. In advance the EKU team kindly sent us each a parcel that included a printout of the slides, a set of worksheets, as well as some fidget toys, a doodle pad and colored pencils, and a bag of lollipops and sweets. The expert panel was composed of 8 senior facilitators located in Canada, the USA, Switzerland, and Jamaica. Collectively we had 199 years of experience as facilitators! An initial occupational background exercise helped us understand the range and diversity of the panel members’ experience and perspectives, which is useful in analyzing and understanding the outcomes from the group. This included identifying the industry or sector with which we each work, as well as the languages we use, and the different specializations we had.

After introductions, we started Day 1 by collectively developing a working occupational definition for a Facilitator, comprising short statements on what they do, how they do it, and why. This exercise sparked an intriguing discussion that exposed some differences in how we approach the role of the facilitator, feeling more or less comfortable using words such as leader, manager, guide, and not always agreeing in these early conversations. Because Day 1 of a DACUM process is a generative/brainstorming day, if any one facilitator had something in their practice or vocabulary, it is captured. On Day 2, however, we worked together to go back to what we generated on Day 1 to dig a little deeper into the meaning, and to refine, reduce, and agree on the core elements.  In all of our discussions, the shared norms on which we agreed included having balanced conversations and not use “killer phrases,” which may work to take ideas or suggestions off the table (“I don’t do it that way!”). Instead, we aimed to listen and dig into the essence of what was being shared. We often helped each other find words to describe concepts.

Facilitating the DACUM

The process was skillfully facilitated and managed by EKU (bravo!) A Miro board was created to support “display thinking” and to capture the outputs of the discussions.  We were all surprised that the facilitator of the process took on the rapporteuring role, writing everything on the Miro board for us while we discussed ( the panelists noted that when we facilitate we normally ask participants to do the capture work). For the first 1.5 days of the DACUM we did everything together collectively in plenary (interspersed with individual thinking work). This was the case until the very end when time constraints made it more efficient to do some of the final analysis in pairs.

The DACUM workflow process is rigorous and methodical. All tasks and terms are clearly defined to reduce differences in interpretation, and conventions established for labelling (e.g. three words – verb, qualifier, noun) to ensure that responses are similarly captured and easily compared.  After developing the working occupational definition, we went through a series of steps to identify and winnow down the major duties of the facilitator, and then within each duty a set of differentiated tasks. As we reviewed each duty and task set, we identified the associated knowledge, skills and traits. At the end of the process, we undertook a series of ranking exercises to share our perspectives on how critical the duties and the tasks were in relation to one another. We also indicated, from our perspectives, which of the duties/tasks would be most useful for new facilitators to learn, and which we felt there were gaps in the current facilitation training on offer.

Identifying the occupational profile of a facilitator

The DACUM was not simply a platform for a set of senior Facilitators to present what we do, to differentiate ourselves from one another, or to judge the merits of the different approaches. We acknowledged the differences in our clients, our tools, and even our language. The overall goal of the DACUM was instead to identify what was at the core of our shared practice. The invitation to diverge on Day 1 in order to generate the most exhaustive possible list of Duties and Tasks that could be identified from across all of our practices, was then in Day 2 reviewed, clustered, discussed, and refined to identify the core Duties and Tasks on which we could all agree.

It was energizing to be led through a structured process to share my practice as a facilitator using the DACUM format. It was also an outstanding peer-learning opportunity for me to spend 16 hours with 7 other highly-experienced facilitators deconstructing their well-formulated practices, which in some cases differed from my own and gave me some good ideas. For example, I was impressed with the steps that some of the facilitators took in the post-workshop/follow-up stage of their work – including how they ran their debriefing sessions, their reporting processes, and how they were using AI tools in different ways at this stage.

In trying to be comprehensive in our identification of the Duties of a facilitator, we identified “Administration” as one of the set, which then was reframed as “Manage Facilitation Resources”. Initially I couldn’t think of many related tasks, but in analyzing that duty we collectively defined a long list of resource-related tasks that facilitators undertake (manage a supplies inventory, manage technology resources, keeping certifications current, setting up folder structures, adhering to GDPR compliance with documentation, etc.). Many of these tasks are mechanical and we may undertake them without much thinking, and they are virtually invisible to others. However, they take time, can be done with varying degrees of effectiveness, and most importantly are not typically included in training for facilitators.

Our DACUM panel’s work now goes out of our hands and into those of other facilitators in subsequent steps. I am eager to see how our initial thinking is further validated and shaped, and how it ultimately informs facilitation curriculum development. As both a trainer and student of facilitation, the experience was valuable and both what I learned from my peers, as well as our output will undoubtedly inform my own work.

(photo credit: Marc-Olivier Jodoin, Unsplash)

Inspired by Oliver Burkeman’s Book, Four Thousand Weeks: Time Management for Mortals, I reflected over the New Year about how I had spent the last 12 months of my professional life. The concept of “4,000 weeks”, that make up (on average) an entire life,  provided a useful lens for envisioning this upcoming year, which was part of my objective for doing this particular piece of reflection.  The book made me think “time”; my foray into statistics for my PhD work made me think “numbers” instead of “narrative” for this reflection (plus I had the time tracking data).

This was another Covid year of almost entirely virtual work for independent organizational learning professionals, like me, who facilitate, train, write, and undertake MEL activities (monitoring, evaluation and learning).

Amongst the overwhelmingly virtual activities, were two exceptions of face-to-face (F2F) retreats held with local (to me) organizations in the months between Covid waves in Switzerland (September and early November). For both of these, my commute time was less than 15 minutes, one group was 8 people and the other was 20, and they were intact teams where they had complete control over logistics and could cancel, postpone, or flip into virtual format at a moment’s notice.

There were other events that were also planned to be F2F, but that took one of the other options instead of holding their events as planned in 3D. It goes without saying that all kinds of Covid protocols were put into place for those teams who did hold their workshops, but that is another blog post.

Here is what happened, with three qualifiers – 1) This represents the work that I did (and my colleague Lizzie will have a similar list); 2) this includes both paid and pro-bono work; and 3) where hours are given, they do not include preparation time (I estimate that later), only delivery. After these numbers I will include some observations.

  • In 2021, I completed 46 activities. An activity is a distinct project or workshop/event. Preparatory meetings don’t count. Many were spread over 2-5 days – however these still counted as one activity. Some five activities did not have a workshop/event attached, but were design, advisory, data collection (interviews) and/or writing. These latter five are considered “virtual activities”, but their time does not feature in the “facilitation delivery” hours accounting below.
  • Of the total: 44 activities were virtual and 2 were face-to-face.
  • A total of 269.5 hours were spent in “delivery” – facilitating or co-facilitating workshops, webinars, training courses and other events (this is “participant facing” time and does not include preparation).
  • Of the total delivery time, 242.5 hours were spent in facilitating or co-facilitating virtual workshops and 27 hours of the total were spent facilitating F2F workshops.
  • For the total virtual delivery, 219.5 hours were spent on Zoom, and 23 hours were spent on WebEx.
  • 13 virtual workshops used simultaneous interpretation (for 2 to 4 languages).
  • 77 days of this year (2021) featured the delivery of a workshop/event, and 7 of these days had two (e.g., one event in the morning and one in the afternoon).
  • These 46 activities were undertaken with 23 different organizations.
  • Total activities by sector: 8 with foundations; 16 with NGOs; 5 with government and United Nations (UN) collaboration; 3 with UN; 13 with standard-setting organizations; 1 with a university.
  • 6 activities were entirely or partially pro-bono.

How these delivery hours (workshops) were spread out over the year:

  • The top 3 months for delivery hours were: October (60 hours), November (46 hours), and May (39 hours).
  • The bottom 3 months for delivery hours were: January (0 hours), August (0 hours), and July (6 hours). These lower times were in part due to quieter times of the year and part due to my holidays 🙂
  • The monthly average over the 10 months with delivery activities was 26.9 hours of facilitation delivery.

My observations from this exercise and reflecting on the year:

1. The nature of my work has fundamentally changed. That is a lot of time to be sitting at my computer.

I used to do most of my work in F2F workshops where I was standing up all day in front of a group, and walking around a room, or zipping around a conference venue. I used to travel to and from workshops, local or on other continents through airports, around bus stations, through cities. I have absolutely had to integrate other physical activities into my days (hello online pilates and yoga, walking and cold/warm water swimming).

2. Virtual workshops for facilitators are incredibly intense from an attention and focus perspective, and you are almost entirely immobile for the duration of the event.

When you are facilitating workshops virtually you can not move around, you are on camera, you are deeply listening, you are looking ahead in the agenda for online tools you need to use, slides to share, music or timer to launch for the break, managing participants with low bandwidth, answering questions in private chat.

Large events may have a team to help with the “backstage” work, but that doesn’t reduce the intensity of work for the lead facilitator who is using the WhatsApp back channel for timekeeping or prompting team members, and the platform chat to keep speakers to time and signal changes to those speakers who are to come.

As a result, the facilitator can’t tune out to regroup, zip off to walk around, or decide to take a break. Even the scheduled breaks often have planning discussions or activities you are queuing up, or slides you are revising. You are lucky if you can grab a cup of tea in a 3-4 hour period.

3. The intensity of virtual workshops means they can be exhausting and can take more time to recover energy and focus than expected.

You think you are just spending 2 or 3 hours on Zoom, but the quality of focus needed means that you are not able to muster that kind of mental energy again in that day. As a result, it is not wise to have more than one virtual workshop per day. You can combine F2F with virtual workshops as there is more respite time built into F2F workshops (you can walk around the room as you talk, stand at the back of the room, look away, sit down.)

4. I am very competent at Zoom at this point, ask me anything.

Zoom seems to be winning the platform race. From my facilitator perspective it is by far the easiest and most flexible online workshop platform. Over these last two years, we have used many of them, and are increasingly seeing less diversity. If I can become competent so can others.

5. Virtual events can take much longer than expected to prepare.

Focusing on the number of delivery hours is deceiving. It does not reflect all the preparatory meetings to develop these activities, nor the email correspondence and any reporting (several projects had substantial reporting components).

This amounts to anything from a 3:1 to 10:1 ratio of preparation hours to delivery hours. Online workshops can easily take MORE time than F2F workshops to prepare if you are trying to do more than just hold a webinar with a few speakers that only need light briefing. A 6-hour strategic workshop spread over 2 afternoons for 250 people with simultaneous interpretation can easily take 50 hours to prepare the facilitation component, with interpretation testing, coordinating the delivery team, creating online tools and templates in languages (google forms, slides, etc.).

Another 9-hour symposium spread over three afternoons for 50 people took 72 hours to prepare the facilitation element, including 8 parallel sessions, a complex MURAL to capture outputs, numerous interactive elements, speaker videos, etc. It takes organizations some time to understand the complexity of facilitation preparation, for what seems like a very short workshop.

Based on this learning, I will…(connected to the above observations)

  1. Not skip my daily exercise and I will use my standing desk more (I got a varidesk desktop riser that lifts your computer and screen to standing position), I have a balance board (Simply Fit Board), and an under desk stepper.  I forget to use these or are too embarrassed. But I need to get over that. For workshops I can stand, for preparation meetings I can use these other movement tools periodically.
  2. Space my virtual workshops out so that they are not every day in a week. (I had a couple of weeks last year when I had a workshop every afternoon of the week.)
  3. I will certainly not schedule two workshops in one day.
  4. I will help some of the organizations I work with take over the Zoom technical elements and help them learn some of the tricks so that they can run their own events. I can help with design and providing ideas or “makeovers” to add more interactive elements or fun into agendas. But I don’t need to run all these workshops myself when they are relatively straightforward and when my role involves a lot of technical backstopping.
  5. Based on a further year of experience and data collection on the ratio of preparation to delivery hours for facilitation, I can be confident in my estimation of the time it takes to add a facilitation component to an online meeting. We still had many workshops where our estimation for preparation was significantly under what it took to prepare and deliver. This should be a thing of the past in 2022.

Overall, 46 different activities was too many for me. I love my work and I am called to support organizations that are committed to positive change. And at the same time, I didn’t always build in enough respite time between these surprisingly intense activities to reenergise, to context shift, and to get away from my desk (for exercise, for enjoyment, for day dreaming, for music, for culture).

Granted this past year we still weren’t able to do all the things we used to do to take care of ourselves, our minds and bodies – travel to see this wonderful world, visit dear friends and family, attend weddings, celebrate anniversaries, go to concerts, festivals and theatre shows…

As facilitators, we love our work helping groups solve wicked problems, generate radical new ideas, support transformational change. Out of my 4,000 weeks I reflected on one year; fifty-two weeks; five hundred twenty five thousand six hundred minutes….there is of course only one answer to the question:  How do you measure a year in a life?  Measure in love! Measure your life in love! (oh gosh, I miss going to musicals!)

Fellow facilitators, how did you spend your year, and what will you do differently in 2022?


Virtual workshops need a team to produce them behind the scenes. One person will struggle to do everything quickly and smoothly, and it is nearly impossible to both do the technical hosting and be the participant-facing facilitator if your design is at all complex (interpretation, breakouts, trouble shooting, spotlighting, music, videos, using tools like MURAL, mentimeter, etc.) All this is going on behind the scenes while you are supposed to be listening, watching the time, introducing speakers, taking questions, managing a sensitive conversation, and there’s always that WhatsApp back channel humming away on your phone in the background. The technical hosting becomes even more important with a large group  – 100 to 300 people and you will benefit from a small army of people to help behind the scenes.

We have had very competent teams helping with a number of large workshops recently. Here are the roles we assigned to various organizing team members in addition to the Host. They were designated in-session as “Co-hosts” as they need this designation to be able to do many of these things:

  • Participant-facing facilitator: Speaking, on camera, listening, timekeeping, managing the flow of the workshop and briefing and debriefing the different activities – this is the traditional facilitation role in a F2F workshop. (Note: sometimes we have two people in this role)
  • Screen sharing: This role focuses on what is being shown. This can include sharing speakers’ presentations (or being erady to do so in a pinch), sharing videos, music (at the breaks or during individual work), countdown timer, etc.
  • Recording the session: Hitting the record button at the right times, and pausing it at the breaks and during breakouts.
  • Managing participants: Letting people in from the waiting room (and continuing to do this after the session starts), private messaging participants who come in as “Galaxy 421” and renaming them, muting them if need be.
  • Spotlighting: Using the spotlight function for speakers, adding people, taking the spotlight away – all at the correct time (timing is everything here).
  • Pasting in the chat: Pasting in the chat instructions for group work, questions for reflection, biographical data on speakers, and links to a variety of things – from groupwork templates and feedback forms, to translations of speeches made in other languages (when there isn’t interpretation available)
  • Launching polls: Zoom polls or mentimeter, polleverywhere, etc.
  • Trouble shooting: The person(s) designated by name to help people through private messages who are having problems of any kind.  You can also provide an email address if they cannot use the chat or communicate in the meeting.
  • Managing questions and answers: This can include watching the chat for questions and pasting them into a google doc for the facilitator to use during the Q&A period, or answering questions that are asked in the chat.

The Technical Host may take on some of the above roles, but they should try to delegate as many as possible. Note that there is only one Host for each Zoom meeting, and certain things can only be done by the Host. As the Technical Host in a number of recent meetings, here is my checklist:

Long before the meeting:

  • Go incognito (because I have my own Zoom account) into the Organizer’s Zoom account and set up the meeting, checking settings, security, putting in Zoom polls, sending invitations to interpreters.
  • Turn off the “ding dong” sound of people entering the meeting.
  • Check that “Mute participants on entry” is checked.

Two hours before the meeting: 

  • Set up all your tabs on your browser so you can flip through them quickly (as you will be sharing Chrome and not Screen 1 or Screen 2).
  • Tab: Upload holding and introductory slides into google slides so that I can share them from my browser (click “Exit full screen” to present).
  • Tab: Pre-set the timer for the break (online stopwatch timer).
  • Tab: Open the google drive where the presentations are stored (just in case you need to share them to cover for a presenter that cannot).
  • Tab: Have any videos lined up and tested (checking the two boxes for sharing sound and video).
  • Tab: Have the Rainforest birdsong white noise YouTube video stopped AFTER the advertisements ready to play in a break (or the music video or music from Spotify, or all those).
  • Tab: Google translate if you need to quickly send a private message to a participant using interpretation (they will write you in their language, and you need to write back).

One hour before going “Live” – Tech Checks: 

  • Open the room an hour early, rename yourself (if you are using the organizer’s account).
  • Let in Organizing Team from the Waiting Room for a final briefing; make them all Co-hosts.
  • Let in Interpreters from the Waiting Room. Add them to the interpretation and “Start” interpretation. Test all the channels. Trouble shoot if needed. (See post: Tips for Working Successfully with Interpretation in Zoom).
  • Rename Interpreters: I rename them as “__Interpreter NAME” – the double dashes make them stand out and so you can ignore them when making breakout groups. You can also see if they are there or disappear (lost connection).
  • Let in Speakers from the Waiting Room – do this as soon as they arrive.
  • Make Speakers Co-hosts. There are two good reasons for this especially with large groups: 1) Security – If you turn OFF the ability of participants to share their screen (security feature), then only Co-hosts can share their screens. If you need to “Mute everyone” then Co-hosts can still unmute themselves and speak. 2) Finding speakers quickly – Co-host names go to the top of the participant list, so if you are spotlighting people you don’t have to scroll through 200 people to find them.
  • Rename speakers if they don’t have full names or correct names, as the Facilitator will be using their name on the screen to find and address them.
  • Run a test with speakers: Test their audio and video and make sure they can share their screen. Do this even if they say they know how to do it. Make sure they can find how to go into presentation mode (this is the biggest issue for many).
  • Final briefings – agreeing with speakers how the facilitator will give them a time check for their presentations, remind them of timing, etc.
  • Check that your polls are in Zoom.
  • Send a message periodically to the Waiting Room that the meeting will start in X minutes.

At the start of the meeting: 

  • Let participants in from the Waiting Room (Admit All – then the designated other person will continue to monitor the Waiting Room and let people in).
  • Share a holding slide and a slide about how to turn on interpretation (in the languages of interpretation).
  • Spotlight the opening speaker…
  • Create the first breakout groups (rename rooms, decide on how participants will join – automatically, etc.)

During the meeting:

Here is an example of the things I did as the Technical Facilitator at a recent meeting (I held a number of the above roles):

  • Admit people after the meeting started (someone else was doing this too).
  • Shared opening slides about how to use interpretation and norms etc of the meeting.
  • Ran a Zoom poll to see “Who’s in the room?”
  • Checked speakers to make sure they were all there.
  • Briefed late speakers (who didn’t have the tech check) by private message, and checked they were happy to share slides.
  • Made late speakers co-host, and then took this privilege away from all speakers after their respective sessions (to minimize disturbances).
  • Messaged people who were incorrectly named, and then renamed them (in some meetings which are sensitive, if people do not respond after a few attempts, they are removed from the meeting).
  • Spotlighted all speakers (sometimes tricky as some people were sitting with a colleague, or changed computers just before their presentations due to tech problems).
  • Muted people who came off mute accidentally.
  • Trouble shooted with people who private messaged me with audio or other problems (in two languages).
  • Answered questions by private message (can we get the slides? etc.)
  • Transferred questions etc. on Whats App back channel.
  • Listened in from time to time on interpretation channels to make sure all ok. Relayed any issues on WhatsApp so facilitators could intervene. Problems included: too far from microphone, unstable connection, two people sharing speaking, speaking too quickly.
  • Shared the countdown timer at breaks.
  • Looked ahead in the schedule to keep an eye on next speakers (they would drop off and come back in again with tech and connectivity problems).
  • Watch timing and let the facilitators know how we are doing on timing.
  • Help make decisions on WhatsApp about issues – missing speakers, not enough time for Q&A, last minute changes.

Two fiddly things (for me and the team) to remember:

  1. Decide who is letting people in from the Waiting Room after the start. If two or more people are doing that, there is a risk that if you do that simultaneously, missing the person by a split second. Then you might end up muting the next person in line (who could be the speaker) because once they are admitted their name will disappear immediately from the top of the participant list and in that split second, the person you thought you were letting in is gone, and your click does something else (like mute the speaker who is near the top of the list)!
  2. Remind speakers and those who are Co-hosts that they have some “superpowers” and they can accidentally mute someone, or stop your poll/share the results prematurely, so ask them to be careful and perhaps not push buttons!

I made this list for myself to use the next time I take the Tech Hosting role, and wanted to share it for anyone who might be newer to this role. Things seem very smooth and easy from the participant perspective, but there’s a lot going on back there!

What did I miss? Please feel free to add additional tasks or roles!

This post is generally translating “serious games” (games with learning messages) that we normally play in face-to-face settings into versions that can be played in a Zoom or other online evironment. Here I am writing specifically about games in the Systems Thinking Playbook and the Climate Change Playbook, the latter of which I wrote with two co-authors Dennis Meadows and Linda Booth Sweeney.

Recently I attended an online seminar, hosted by the Systems Dynamics Society and Linda, about how to use Playbook games online. These books are great resources for face-to-face workshops, but in Covid times these are virtually non-exoistent. As we all move online, Linda shared how she is using some of the games in virtual environments. We played Arms Crossed, Circles in the Air, and Paper Tear and they mapped over easily and effectively. It got me thinking about how to translate some of the longer and more complex games into Zoom workshops. I fully believe that every game can somehow have a virtual counterpart, with some creativity! Three of my favorite games are Triangles, Speed Catch, and Thumbwrestling. In this blog post I will write about Triangles. In subsequent posts I will tackle Speed Catch and Thumbwrestling.

A Few General Comments

1) Different Kinds of Games

In the Climate Change Playbook, we divide the 22 games into three categories: Mass games, Demonstration games and Participation games. Mass games are those that can be played by very large groups of participants, for example in conferences or during presentations or lectures. People can be seated in theatre style or around tables and everyone plays.

These Mass games translate rather easily into virtual environments as there is a game leader who provides instructions and people follow these. Examples from the books are Circles in the Air, Arms Crossed and Frames. These games are played by individuals, although there can be some that benefit additionally from group play for deriving lessons, like 1,2,3 Go! or Paper Tear.

With Demonstration games, you can get a lot out of them by simply watching – if you have a small group then everyone can play, but if you have a large group then a subset of the group can play and others can watch and learning can come from either role (player or observer). For many of these kinds of games, you can use videos that are already online to show people parts of the game, stop the video, ask some questions, and then go on. Thumbwrestling is one of these. We call it a Mass game in the book because you can do it in an audience by playing with someone next to you, but because on Zoom you don’t have anyone next to you, I will move it to this category for now.

For Participation games, these can be played by larger groups (up to 30 we say) but learning really comes from participation, and “observation only” provides less value to participants. Triangles and Speed Catch are examples of Participation Games.

The games I want to makeover fall into the Demonstration and Participation game categories.

 2) Time for Debriefing

Virtual workshops and meetings tend to be shorter. People are regularly compressing 1.5 day workshops into a 2-3 hours session. As a result, it might be tempting to reduce the games and skip the debriefing. However, debriefing is the MOST important part of the game. The game mechanics show a dynamic that you then learn from through reflection and discussion. So it is really important to preserve the time after the game for the debriefing discussion. During our Systems Dynamics Society workshop we used Zoom breakouts to debrief the Paper Tear game in smaller groups of 3-4 so that everyone could talk (we were around 115 people). If your group is small to begin with, then this could be done in plenary. The key is that you use your powerful debriefing questions to do some mining of the game experience for the key messages and lessons you are trying to surface.

3) Consider the Environment

If you are doing a Mass game, for example, that depends on your demonstrating something (asking people to draw a circle on the ceiling, or cross their arms, etc.) you need to consider your own environment, camera angle, your distance from your video camera, etc. so that people can effectively see and hear what you are doing. As such, you need to test this, with your camera on, in advance so that you can see what other’s are seeing. You need to make sure you are not crossing your arms too low and out of the camera view (Arms Crossed), or that you are not too close to your camera for people to see your arm making a gesture towards the ceiling, that you want others to make (Circles in the Air).

Consider also that people may be connecting from different devices. Some people might be with you on their mobile phones, or on an ipad, with a smaller screen. As a result, it is important to speak the whole time you are showing people what to do – describe vividly what you are doing, so that even if they cannot see you well, they can still follow you.

Making Over Games to Virtual Environmets

Making “over” games is similar to making them in the first place. You have to think first about the message you want to get across, then think about a dynamic that can do that (with debriefing questions), and then you make the game. It is not always easy to do that, game design is a skill. In translating the following games into a virtual environment, I started by thinking about the games I wanted to redesign in this way.

What follows below is not a complete game description, for that you have the book (hopefully!) but will get you started thinking about how to do this, and maybe give you some ideas of how you can make over some of your own favorite workshop games.

Triangles: Makeover for Virtual Play

The Triangles game shows, among other things, how interconnected players are and how they form a system. It sets up a system in which you (the game administrator) intervene and can show how a change in one part of the system may or may not impact another part of the system (depending on the rules), and it can show delays in that things may change gradually and unexpectedly and not all at once. It helps explore leverage points – places where you can make large changes (if that is your goal), or no changes to a system (if that is your goal) – illustrating high or low leverage.

In the face-to-face (F2F) version of this game, people initially stand in a circle to set up the game. They select two reference points (people) around the circle and, once the game begins, are instructed to stand equidistant between those two people, making a triangle as needed to maintain equal distance. People move and the system starts to move. People laugh and try to maintain equidistance even when others continue to move and shift. Eventually the system settles and the game administrator can make changes to the system (moving selected individuals) to see how it reacts.   In the F2F version, you can add instructions at the start for people to select some characteristic (“pick someone with glasses as one of your reference points”), or NOT to select another characteristic (someone wearing red). So that you know when you move these people there will be a large change or no change.

How on earth could you do this virtually when people are sitting all over the world behind their computers???

Here’s one way:

Using a Google Jamboard or Miro or another white board tool on which people can interact. Set up a page in advance (or if people are used to the tool, they can create their own “avatar” post-it) with one post-it for each person. Start in the circle.

When you set up the Jamboard in advance, you need to change the settings so that everyone with a link can edit. Then you can share the link in the chat window during your workshop, have people click it, and then they are on your Jamboard and can participate, and are still connected with Zoom (for example).  At this point I would ask people to unmute themselves so that you can hear what is going on while people are playing (laughter or frustration) but you need to tell people that they should ideally not talk while playing the game.

Now you can provide the same instructions as in the F2F version, with some modifications. Once the game starts they will move the post-it with their name only when you say “Go”. They first need to pick two reference points (two names on post-its in the circle) and not tell anyone. Once you say “Go” they will need to move the post-it with their name (their “avatar”) so that it is equidistance between their two reference points. You can also add some qualifiers BEFORE people pick – e.g. make sure one of your reference points is orange, and don’t pick one that is yellow. I would say not to “personalise” it too much by using people’s names (same in the 3D version of the game).

When you say “Go” people will start to move their post-it avatars and things will get messy for a while. Then the system will settle probably spread out all over the Jamboard or Miro board. Once it has settled you can reinforce this by saying “STOP” and tell people that you, the game administrator, will intervene and make a change in their system and that they should just let this happen and not move anything. You now make a change (tell the person that you will be moving their post-it) – then move one of the post-its to another part of the Board. Then you ask them to again be equidistance between their two reference points. If you have selected one of the colours that no one has chosen (yellow), then nothing happens. If you choose an orange post-it, then chances are that everyone will have to move again. You can observe delays, where people initially don’t have to move, but eventually their two reference points are affected and they do. The general dynamics of the game should show up as you intervene a couple of times and in different ways. The debriefing can follow the book at this point. What real life behaviours does this exercise remind you of? Where have you seen high or low-influence individuals or policies in your own organization? etc…

Curious? Try it and leave some comments on your experiences.

I have also thought about a way to run Speed Catch and Thumbwrestling which I will write about later, this post is already pretty long!

This post isn’t about how to run training in Japan, it’s about how to get your body ready to do training in Japan, if you live 7 time zones away in Switzerland.

Normally, I would be enjoying a Bento box right now in Tokyo, preparing with my Japanese co-trainer, the interpretation team, and colleagues there for 3 full days of facilitation training for a large group of local facilitators and change agents.

I’m still doing that, at least most of it, except I’m eating muesli, it’s 3:30am and I’m still in Geneva.

For the last few years, I’ve had the great pleasure to join Change Agent Inc. to deliver a Foundations of Facilitation training programme in Japan.  This year, as with many other programmes affected by Covid-19, we are taking the training into virtual space. All the preparations are going well, the content is tight, and we are all now seasoned at online delivery from a technical standpoint. But biological? I will be delivering training for 8 hours a day, from 2:30am-10:30am, for 3 days. This is not a one-off 90-minute webinar in JST – this takes more thorough preparation to get body and mind ready for this.

“Have fun in Japan!”

That’s what my husband said to me last night at 7pm as I walked down the stairs to the basement bedroom, arms laden with clothes, pillows, and cables. Not quite the expertly packed samsonite that I would have been taking on a long-haul JAL flight to Narita. At least I can pop back for my forgotten toothbrush in 2 minutes. By 7:30pm I would be asleep.

Now at 3:30am I am up and at my desk. This is Day 4 of my preparation to be on Japan time by Wednesday.  I have 2 more days to get to the point where I am asleep by 5:30pm and up at 1:30am and ready for work by 2am for last minute tech and sound check, with a “go live” at 2:30am.

I have been following this schedule, which I planned weeks in advance, to gradually shift my normal 10pm sleep time up, and retain an 8-hour sleep window each night as much as possible:

  • Starting point: 10pm sleep – 6am awake
  • Day 1: 9pm sleep – 5am awake
  • Day 2: 8pm sleep – 4am awake
  • Day 3: 8pm sleep – 4am awake
  • Day 4: 7:30pm sleep – 3:30am awake
  • Day 5: 6pm sleep – 2am awake
  • Day 6: Ending point: 5:30pm sleep – 1:30am awake
  • Repeat for Training for 3 days

So far on Day 4 I am on track, and although I am still a big foggy in those early hours, it wasn’t that hard to get to sleep and get up early as the change has been gradual. The house is quiet and a little creepy at this time of night and I have to be careful not to make noise and wake up others. In a reflective moment, just me and the other noctural animals, here are a few observations:

After Day 3, your hours are anti-social. The alarm wakes others up and moving around to get dressed is bothersome. Others will also wake you up when they go to bed later, which can affect your sleep. So, at this point, you will need to move to another room in the house, if you can, if you are co-habitating.

“Jet lag” will present itself in other ways. You will eat breakfast in the middle of the night and have lunch when people are having breakfast, and dinner will be at the time of a mid-afternoon snack. That will be weird, and you won’t be very hungry at those odd times. But you need to eat or else you will be starving at midnight and that will wake you up. You also can’t rely on the sunshine to get your body on track as you would if you were onsite – try to go outdoors when you can as soon as it is light, and have a good dark room with blackout blinds for sleep if needed.

Your periods of overlap with others IRL will reduce dramatically. No evening television, no family meals for a few nights. You’re basically gone if others go off to work or school during the day. Just as though you got on that plane. You need to make arrangements for others to take over things that you might normally do in the evening. Tell friends who call and text you regularly in the evening that you won’t be available as normal.

Protect the rest of your day. It is tempting to take on additional meetings or work during the “regular” workday after your training ends at 10am. You could effectively be working every minute of your waking hours if you are not careful. A meeting from noon to 2pm after your training seems perfectly logical and you have that time free in your calendar, right? But you have to remember that you will have just worked a 10-hour day, and that will be like scheduling every waking moment. I guarantee that this is hard to explain to colleagues who wonder why you can’t join their meeting even though you are done with your training and not yet sleeping, and it’s only 4pm.

Take it seriously. It is pretty easy to let things slide and default to normal in the run up to your workshops, but the result could be a zombie on the training team sitting on the other side of the video camera that makes little sense in English and even less when translated into Japanese. This is part of the preparation stage of facilitation and training processes, so needs to be built into your schedule, recorded in your agenda, with all alarms set and followed.

I’m excited about the training course, it will be enormously fun and full of learning. I am a little more nervous about this biological part as this is the first time I have had to get my European body on to Japan time without physically moving it, and I want to do this in a mindful and structured way. Maybe tomorrow when I get up at 2am, I will start thinking about how to reverse my schedule to get me back on to Central European Time at the end of it all…


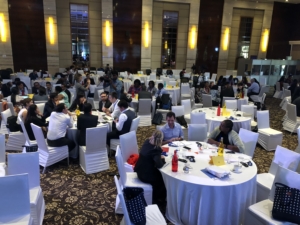
If you can’t run your Open Space session in real life (like this), how can you do it virtually?

This is a very detailed account of how to use Zoom and the Breakout room function to replicate Open Space Technology-like sessions online.

Executive Summary:

  • You can run Open Space Technology (OST)-inspired Sessions in Zoom with large groups using the breakout rooms function.
  • Pre-assigning people to our 10 groups didn’t work for us, so we assigned them manually once the session opened.
  • To do this, participants need to log-in early and you need a specially formatted excel list of names to make manual allocation most efficient.
  • Don’t change Zoom Host rights in the middle of preparing the groups, how to prepare and other learning.


If you might be tempted to run something similar in the future, read on…


Recently we ran an online peer learning and good practice exchange for a specialized global biodiversity community whose 350+ members normally meet bi-annually face-to-face. At these conferences, there has traditionally been an Open Space Technology session where community members share their work, learning and big questions on a set of salient topics. We wanted to replicate the dynamic of this virtually in an online event featuring a number of rounds of hosted small group discussions offered in parallel. For each round, participants chose the small group discussion to attend which was of most interest. This blog post shares ‘how to’ information and some learning from our experience doing this.

Using Zoom Breakouts for Parallel Small Group Discussions

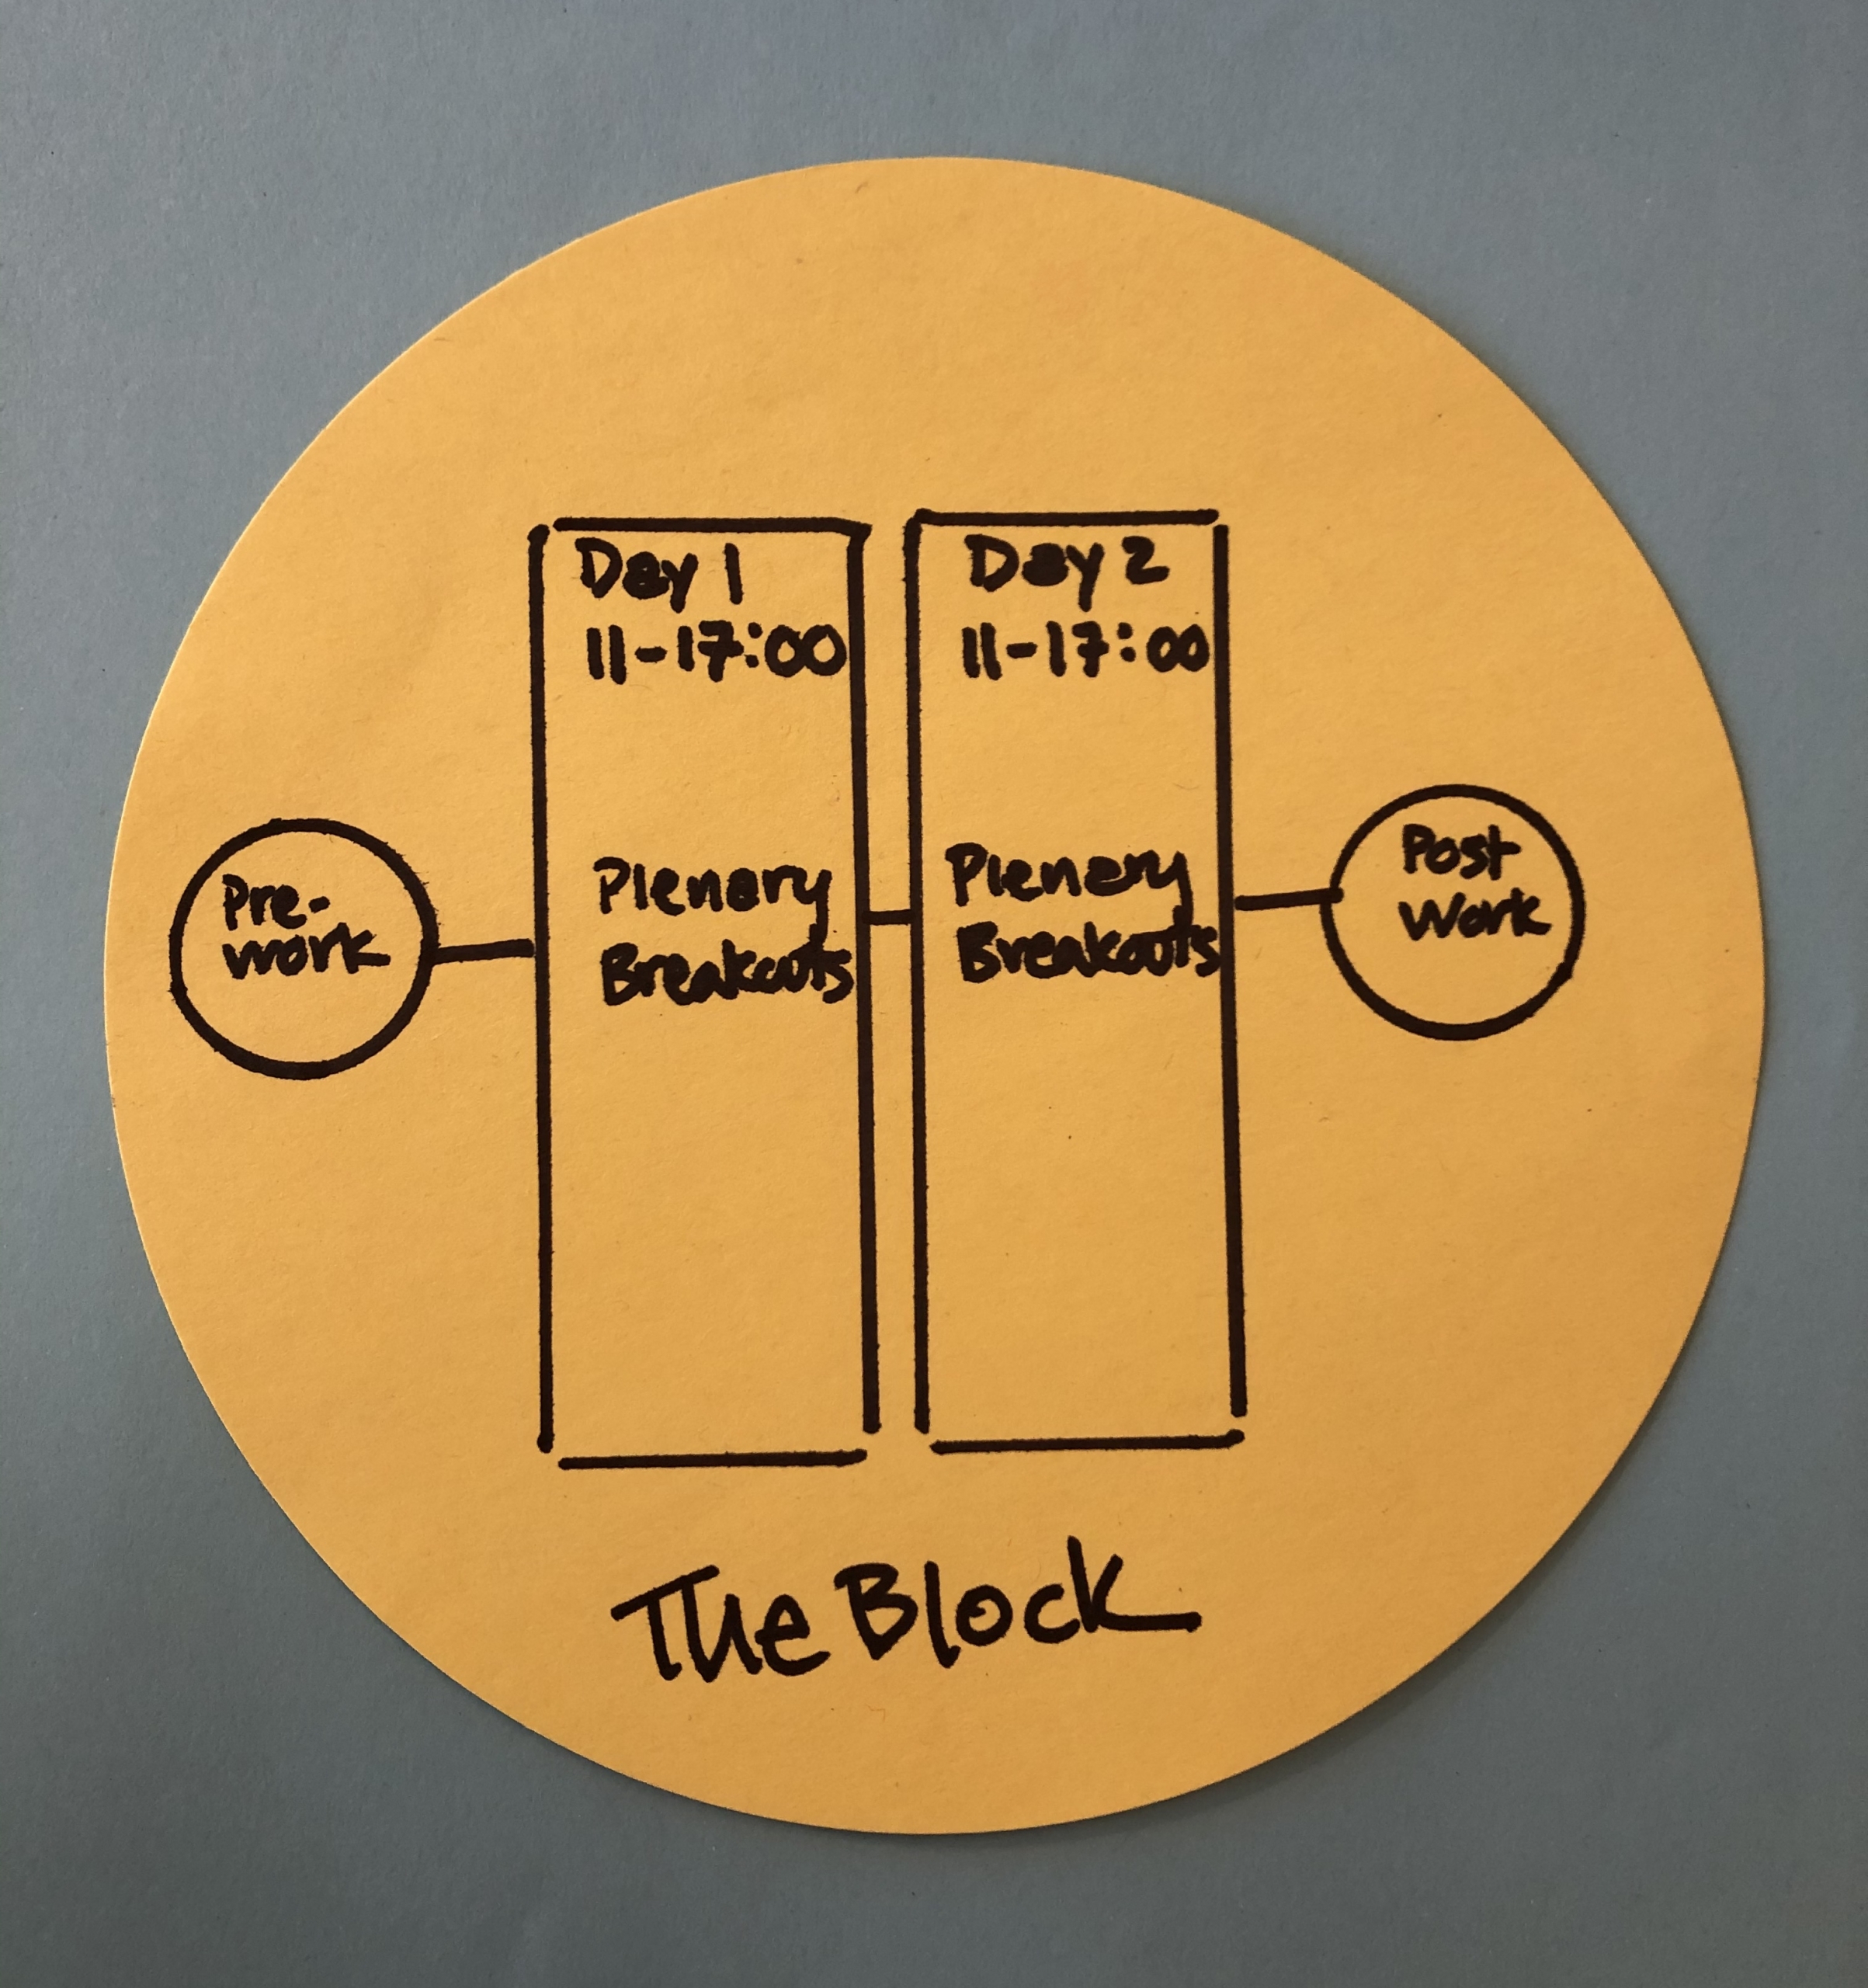
We chose Zoom as the platform because of the breakout room function which allows you to designate up to 50 separate breakout sessions that can run in parallel at any one time. We had 10 topical discussions that we wanted to host, and we wanted to run two consecutive rounds (e.g. people picked one topic to attend for Round A, and then, after a break, they attended a different topical discussion for Round B). We ran the whole sequence of two rounds twice to accommodate participants in different time zones.  People could attend one or the other, and a few people attended both.

The schedule looked like this:

Session 1 (09:45 – 12:00)

  • Check-in (09:45 – 15 minutes in advance of the opening to set up breakouts for Round A)
  • Plenary opening and how the exchange will work (15 minutes)
  • Move people into breakout groups
  • Round A: 10 topics in parallel (40 minutes)
  • Break (15 minutes – people stay connected – create breakouts for Round B)
  • Move people into breakout groups
  • Round B: 10 topics in parallel (40 minutes)
  • Plenary highlights and closing

Session 2 (15:45 – 18:00) (Repeat as above)

Preparation – 7 Steps

To prepare for the Community Exchange, there were a number of steps we needed to follow:

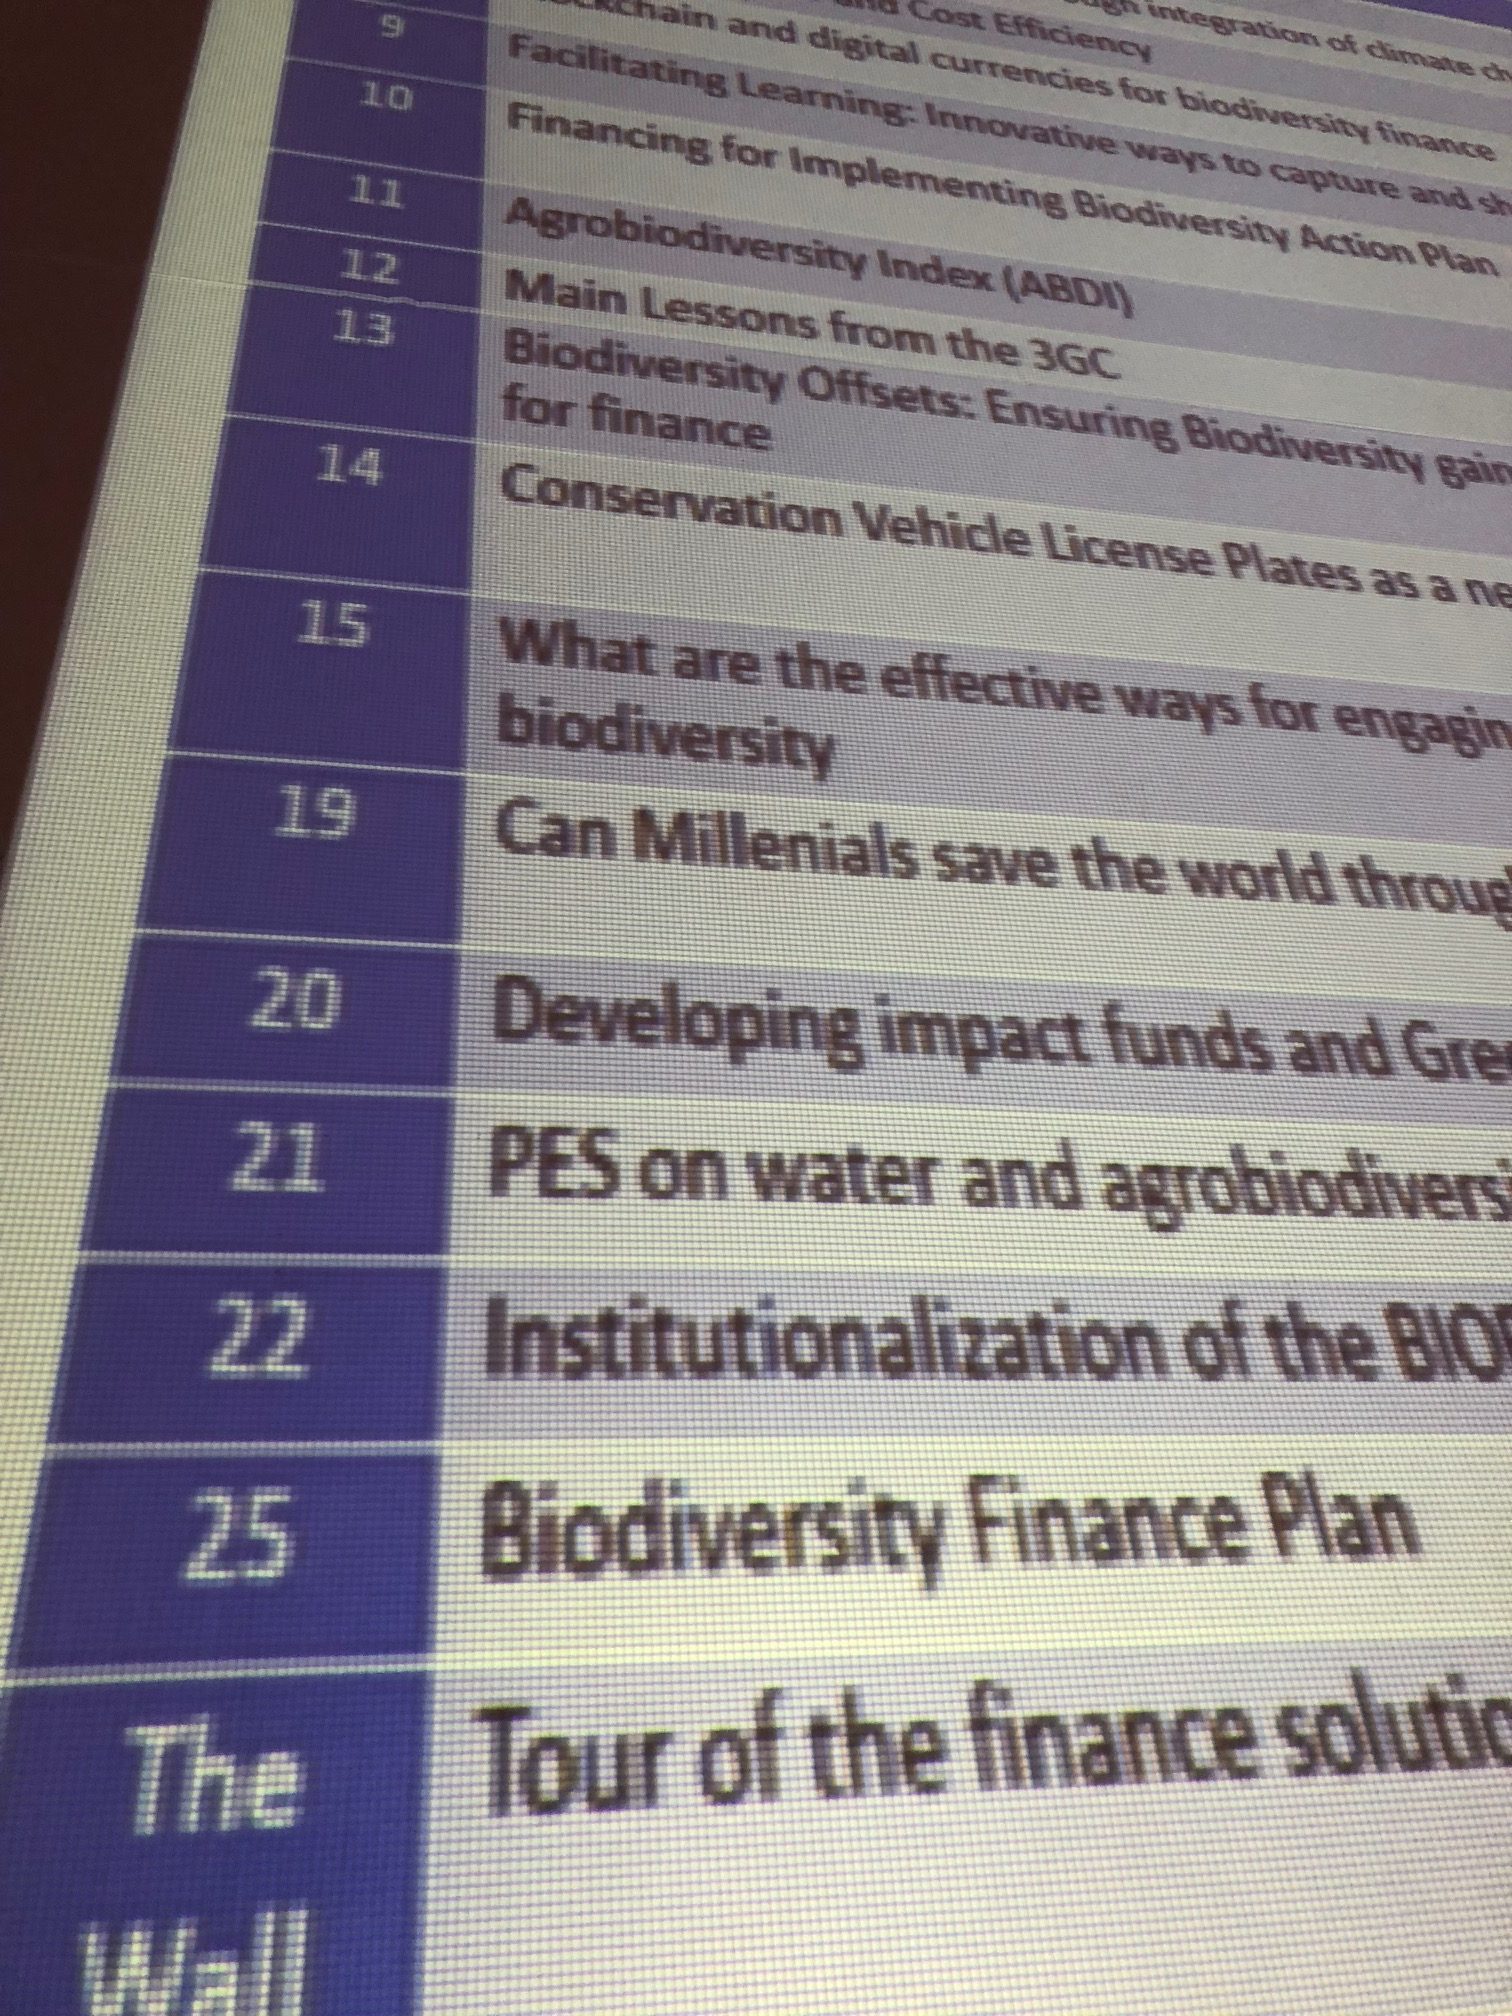
Step 1: Pick the topics. This was done based on feedback from the community, from which the organizer selected the 10 topics.

Step 2: Identify a discussion host for each topic. The organizer identified country representatives and global team members from within the network who had expertise in one of the topics and invited them to host that small group discussion.

Step 3: Schedule the Zoom session(s). The Host does this (in this case it was me, the facilitator). As these were large group sessions (from 60-100 people expected at each session), we enabled the Registration, Password, and the Waiting Room features of Zoom. For Registration we asked for name, country, and organization. In Zoom, the Registration feature enables a two-step process – once people fill in the online registration form, they automatically receive an email with a link and password to the Zoom meeting.

Step 4: Send out an announcement with event information to the network, with: 1) The Zoom link that takes them to the registration page;  2) A link to a google form asking people to select their top 5 topics from a drop-down list of the topics on offer; 3) Information about how it will work – for example, tell people that you will do your best to place them in one of their top 5 choices for each round, and that if they do not specify preferences, they will be put in a group at random on the day.

(Note: This was one of the lessons – while 100% of people registered to attend (you can’t join the Zoom meeting without doing that), only around 50% of people filled in the google form to indicate their preferences. The others just showed up, so they were randomly placed in rooms which takes extra time. We will do this differently next time as we want more people to identify their topics in advance so discussions can be more focused – how, is explained at the end of this post.)

Step 5: Prepare your topic discussion hosts. For this step we organized three 30-minute Zoom sessions where the hosts of the 10 topics, as well as the organizer’s team (who supported the discussion hosts) were invited to attend a preparatory session. During this short session, we talked through the schedule, their role and responsibilities, and then let them experience the breakout room function from both a participant perspective, as well as a Co-host perspective, as we made all these people Co-hosts once the meeting started. They learned how to share their screen, use some of the Zoon security functions, etc.

Step 6: Put together the participant lists by topic. We needed to make 2 Lists for things to work smoothly. This was a particularly important step! Once people filled in the google form with their preferences, we put together an excel worksheet for each session (Session 1 and 2) and round (A and B) within each session (so four worksheets in total.)

Each worksheet had 2 Lists. For List 1, we created a column for each of the 10 topics on offer during that specific round, the host for the topic and the team support person, followed by the list of people who signed up for that topic as their first choice.  This helped us initially place people, as well as see how many people were signed up for each conversation. (click on images to enlarge)

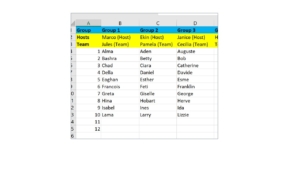
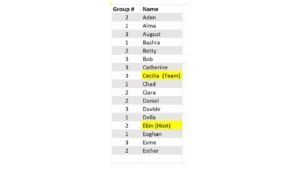
List 1 was useful to see how the groups were shaping up as we had a limit of 12 people per group. Once full, we would put people in their second choice group.  List 2 was more important on the day for putting people into the breakout rooms. This list was a master list of all the people who had signed up for a topic, organized in a column alphabetized by FIRST name (as that is how the Host sees names in Zoom), preceded by another column with their topic number.

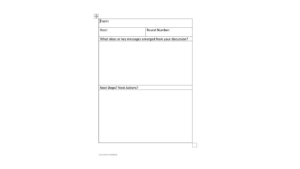
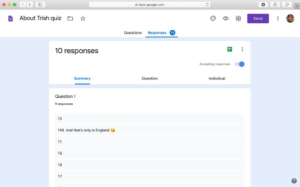
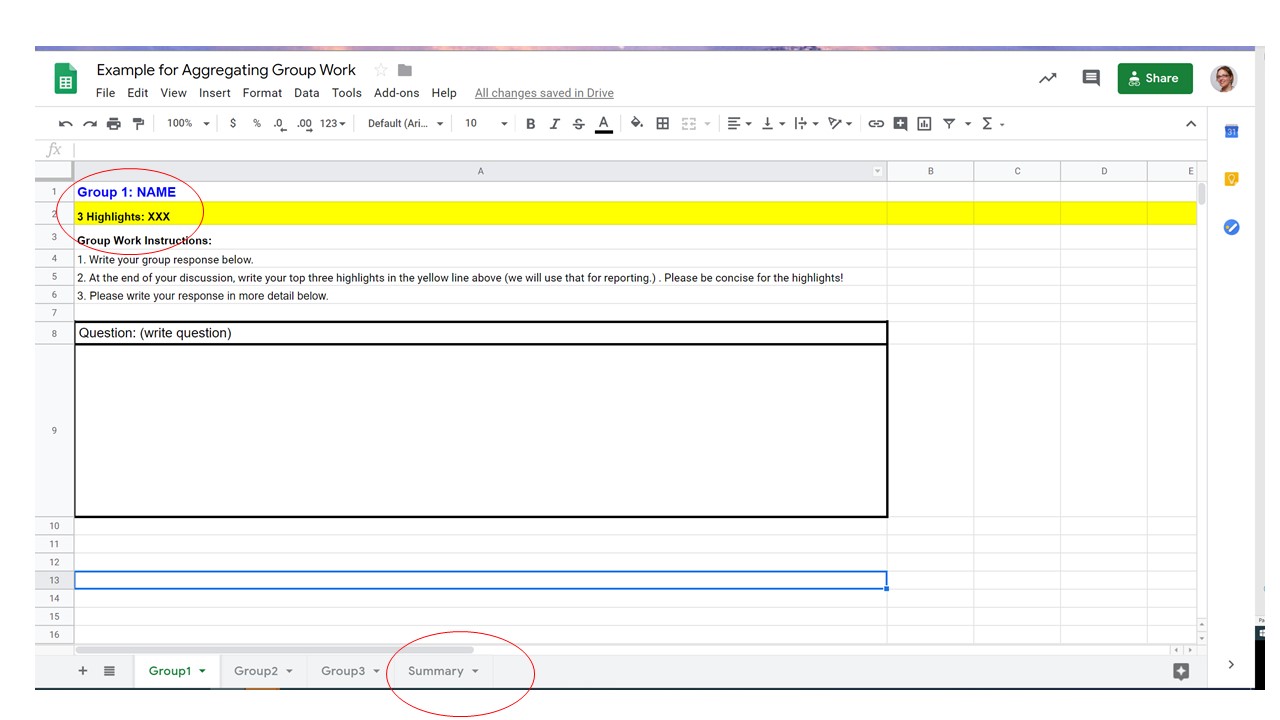
Step 7: Prepare the facilitation materials. We wanted to use a Zoom poll at the beginning of our session to map the group and see who was “in the room” (we asked about region, sector, etc.) and we scheduled a short poll at the end to understand people’s experiences – e.g. to see on a Likert scale how well people felt they could share their learning and experience in this format, and if they learned something new. We also created a simple word template for topic hosts to capture take away messages and next steps from their discussions. We sent this template in advance and asked them to fill it in after their sessions and send it back for reporting purposes.


What we learned about assigning breakout rooms – before or on the spot?

One thing that we did NOT do in preparation was set up the breakout rooms in advance in Zoom. It is very tempting to try to “pre-assign” the rooms in Zoom, especially when you have 60-100 people attending. Ostensibly to do this, when scheduling your meeting, you can choose under meeting options “Breakout Room pre-assign,” and Zoom offers you two ways to do this. That seems so easy, but in our tests this didn’t function reliably. I did two tests in advance, one using the option which invites you to “Create Rooms” and the other option with “Import from CSV” – CSV is a simple excel-like spread sheet. I had 5 people for each test meeting.

With the first “Create Rooms” option, you get a pop up that invites you to “Assign participants to breakout rooms by adding their email”. I did this for my 5 people. I changed the names of the meeting rooms in advance which you can do to match the topic names. Tip: Keep the group number in front of the topic name as that will make it easier later to find them. (“1. Green Bonds”) This will sound silly, but it took me AGES to find how to edit the room names – you need to go to the “Add participant” window and then hover over the room name for the little pencil to pop up.

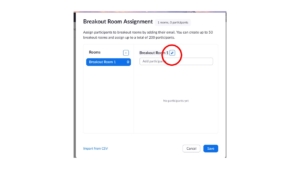
So, the room was set up – now to see if it worked… Unfortunately, when I opened the breakout rooms for this first test meeting, only 1 of my 5 people had been pre-assigned into the designated room. The others were frustratingly unassigned – 20% success.

The second option to pre-assign people to breakouts is to use the CSV format. If you click on that option, it invites you to “Import rooms and participants from CSV File”. It also offers you a simple downloadable CSV file template to fill in.

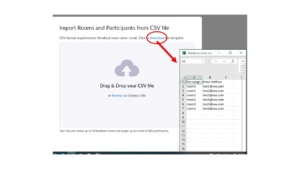
I downloaded the file and put in the email addresses of my 5 people. In this second test, I got 3 out of the 5 people in the breakout rooms as pre-assigned. Better but still not 100%. And we could not figure out why this variation was happening even among 6 experienced Zoom users. As we had a large group, it felt too risky to wait and see if it would work on the day – who would be assigned and who wouldn’t be, and then try to fill in the gaps.

There are a couple of things to note about the Zoom breakout room function that figure in here:

  • People need to be signed into their Zoom account for pre-assignments to be applied.
  • You need to enable “join before host” for this feature to work (don’t ask me why)
  • (from the Zoom website) If you have Registration enabled and have external participants (those without Zoom accounts), you need to assign them to breakouts during the meeting.

It seems like pre-assignment option might work better if you have a closed system – just a group of colleagues sharing a company zoom account, or a class of students who are taking the same class week after week. This was not our case.

As we could not do a test with a very large group, the pre-assignment feature seemed to have a lot of caveats. We were enabling Registration for security purposes, AND we had two rounds per session, so we would have to manually allocate participants for Round B anyways (you cannot pre-assign two consecutive breakout sessions if you want to change the people in the groups). As a result, we decided to manually allocate participants to their selected breakout rooms, using the two lists described above.

What to Do During the Zoom Community Exchange Meeting

We opened the meeting 30 minutes in advance for organizers, the discussion hosts and the team members who would support them. I had enabled the Waiting Room, creating two-step process to join the meeting – first you enter the Waiting Room and then the host lets you into the main room. I admitted the facilitation team into the main meeting room, and had the other participants stay in the Waiting Room until the official start of our event.

As the Host (and the Co-Hosts can do this too), you can admit people into the main room from the Waiting Room individually, or you can choose to let everyone in all at the same time. When people are in the Waiting Room, you can send them messages. I sent them a message every couple of minutes that said, “You are connected to our meeting. Please stay connected, we’ll start promptly.” (I wrote this text on the Notepad app on my computer and copied it, so I could just paste it in as a waiting room announcement periodically and not have to type it over and over.) Note: We needed all participants to connect early and stay connected so that we could create the breakout rooms, which you can start assigning when people are in the Waiting Room.

We let all the topic hosts and team members into the main room as soon as they showed up so that we could do some last-minute briefing and Q&A and make them all “Co-hosts”. We wanted them to be Co-hosts so they had some powers in the breakout rooms– that is, they could disable screen share for participants, move themselves to another room, etc. if needed.

As soon as participants started to show up in the Waiting Room, we began to use our lists to assign them to the various breakout rooms.

Tip: What it means to be “Host” when using breakout rooms

Only the Host of the meeting can work with the breakout rooms (e.g. name them, make assignments and move people around). And there can only be one Host for any meeting. The Host can give up her Host rights to another person but cannot take them back. The other person must give them back to you. This is important for creating the breakouts; you cannot start this work (renaming the breakout rooms and starting to assign people), and in the middle pass the Host responsibilities to another person without losing all the work you did.

The same Host needs to start and complete the breakout room assignment process. Then once the breakouts are launched, they can hand over hosting rights to another and nothing is disturbed. This means you cannot be smart and get in there early, name all the rooms, and assign the early people, then hand over hosting to another person to carry on while you brief people etc. Everything is lost and the new Host will start from scratch.

As a result, you really need two facilitators to work with Zoom in this way – so Lizzie and I teamed up to make it work smoothly. We asked participants to come in 15 minutes early, as you can only assign them to their breakouts once they are logged into the meeting (they can be in the Waiting Room). But not everyone was there 15 minutes early; many people came in at the last minute, and some people joined 10 minutes late!  So, if you are the main facilitator (this was my role) opening the meeting, welcoming people, giving the first presentation and poll etc. then you need a second, technical facilitator who can take over as Host (this was Lizzie’s role) that can complete the breakout room assignments with the people trickling in after the meeting starts. The alternative is to not finish the breakout assignments and ask people to wait while you do that (time for a musical interlude?) OR keep all those unassigned people in the main room once the groups start and then assign the latecomers after that, which means they will start late. As we did not know how many people might be in this category, we decided to use two facilitators and have one solely dedicated to putting together the breakout groups.

Behind the scenes – assigning people to breakouts

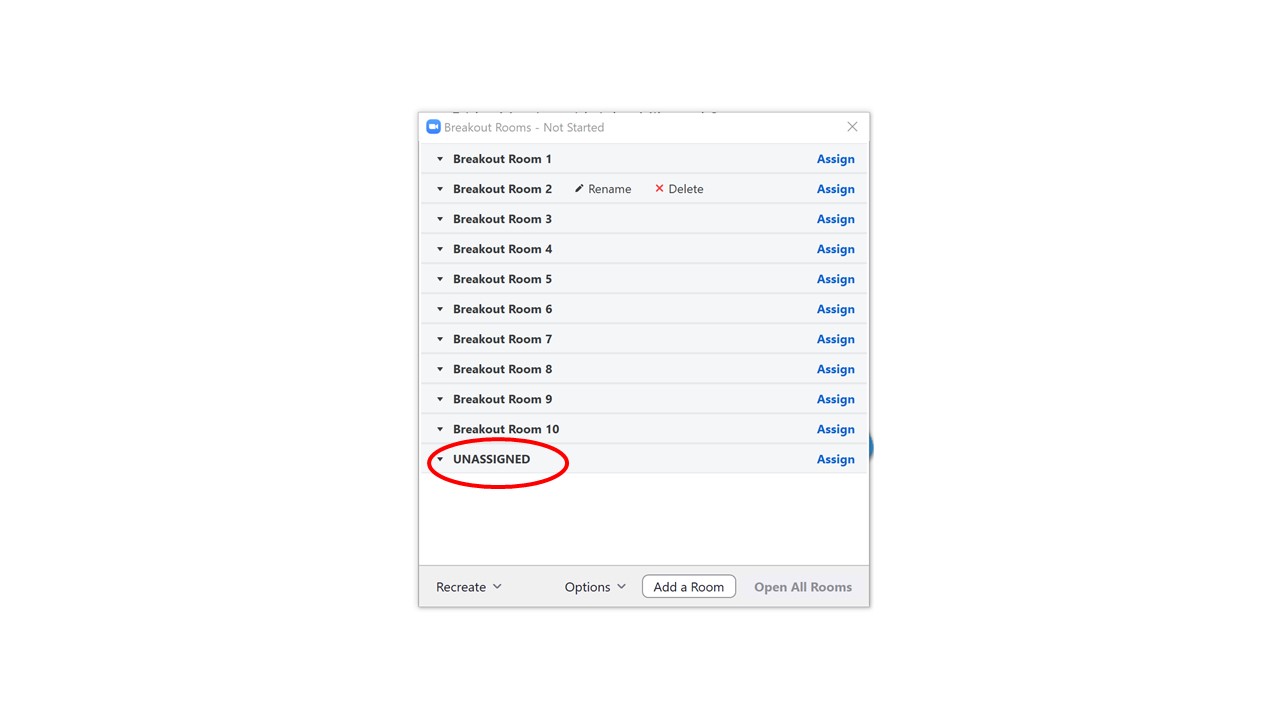
The Host assigning people to breakouts needs to have the two lists described above and needs to work quickly with the long list of names. In our case, part of which had signed up for a specific topical discussion, and part of which had not, thus would be randomly assigned to rooms. One thing that we discovered to dramatically increase efficiency at this stage was to create 1 more breakout room than needed (e.g. we needed 10 topical breakout rooms and we created 11 rooms), the final room was called “UNASSIGNED”.

As people logged into the meeting, the Host located their name on the long alphabetized list, along with their group number, and immediately placed them in the right room. However, if someone came in that had not signed up for a group, they were immediately placed in the UNASSIGNED room. This meant that at the very end, just before launching the breakout groups, you could see exactly how many people were in each group that had signed up in advance, see the total number of those in the unassigned room. You can then quickly move those from the unassigned room to fill in open spaces in the first 10 groups – we aimed to fill all rooms up equally with the same number of participants.

In the end, it worked just fine. We had enough time in the 15 minutes before (and well into the opening) to make Round A assignments manually, and had enough time in the 15-minute break between rounds to make the second set of assignments for Round B. We asked people NOT to disconnect during the break. Of course, a few did, but we manually added them into groups once they logged back in.

Last thoughts

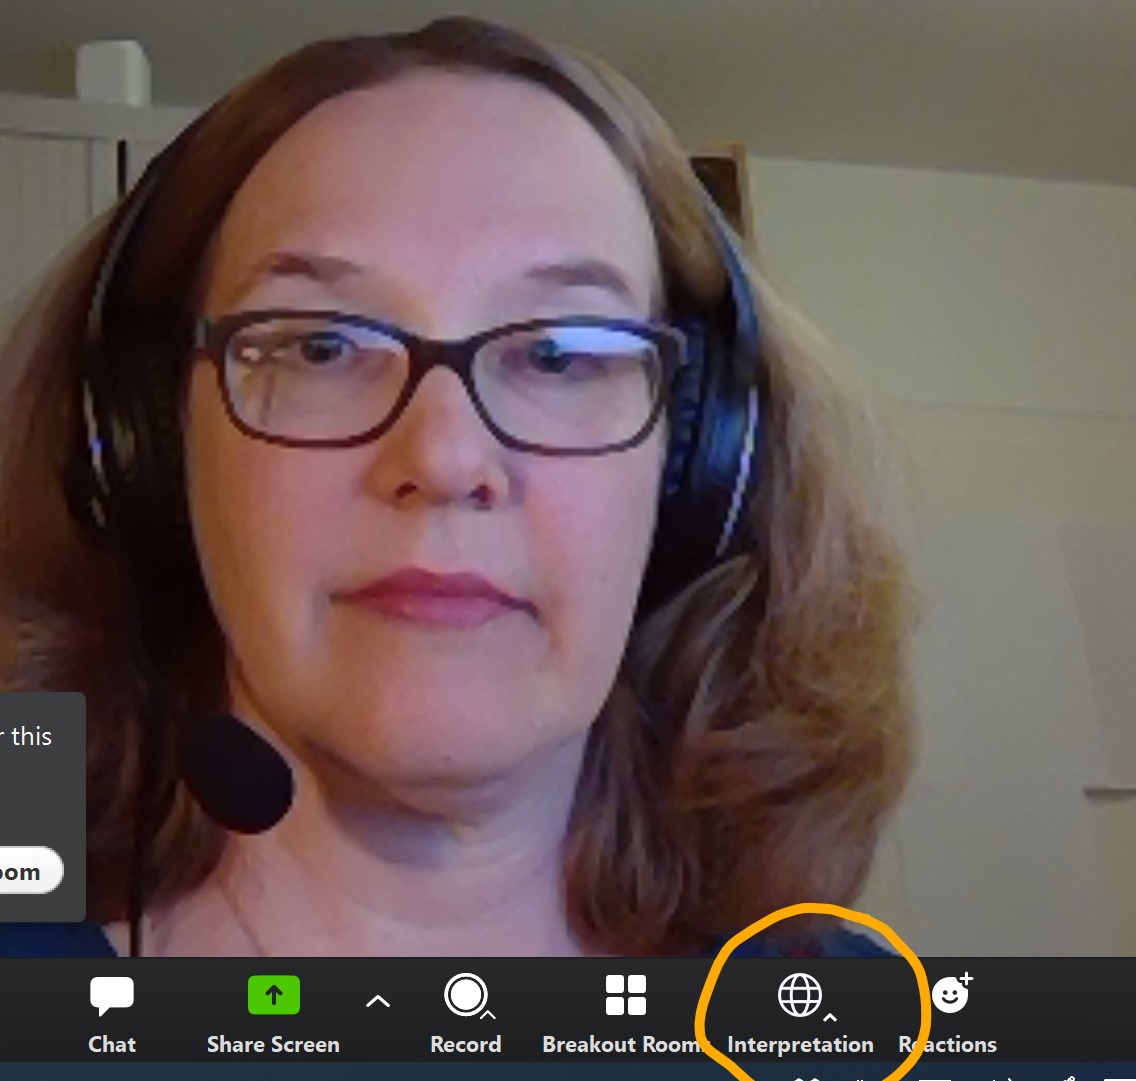
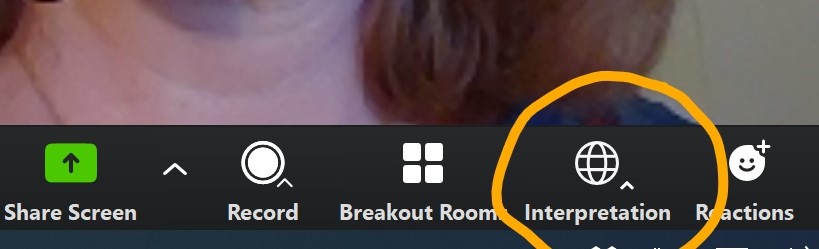
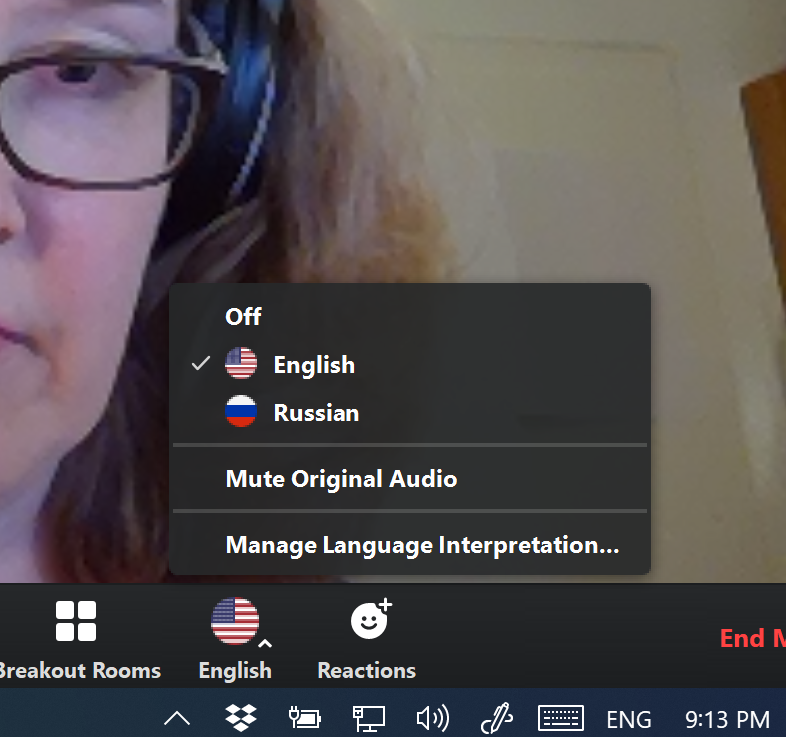
Languages: We had some people for whom translation would have been useful. If you enable Interpretation on Zoom, it only works in the main room – thus in theory you could keep the group needing translation in the main “plenary”. For a large group this would not have been a great option, as there was a small but steady stream of people who lost connection and kept coming back into the main room, to be sent again to their breakouts. This would have been very disruptive for the group trying to work in the main room (with translation no less!) It might be easier to have a “whisper” interpreter (professional or informal) in the same breakout room with the person desiring translation support, and between the two or more of them, they set up a back channel for communication, such as a WhatsApp call or a phone call. Through Zoom they can see what is going on in their breakout room, but the audio is now coming from another source (mobile phone).  The person could still unmute to ask questions, and the interpreter could sequentially translate these for the group, then they could both go back on mute and resume interpretation. This is a work-around, but we thought it might work.

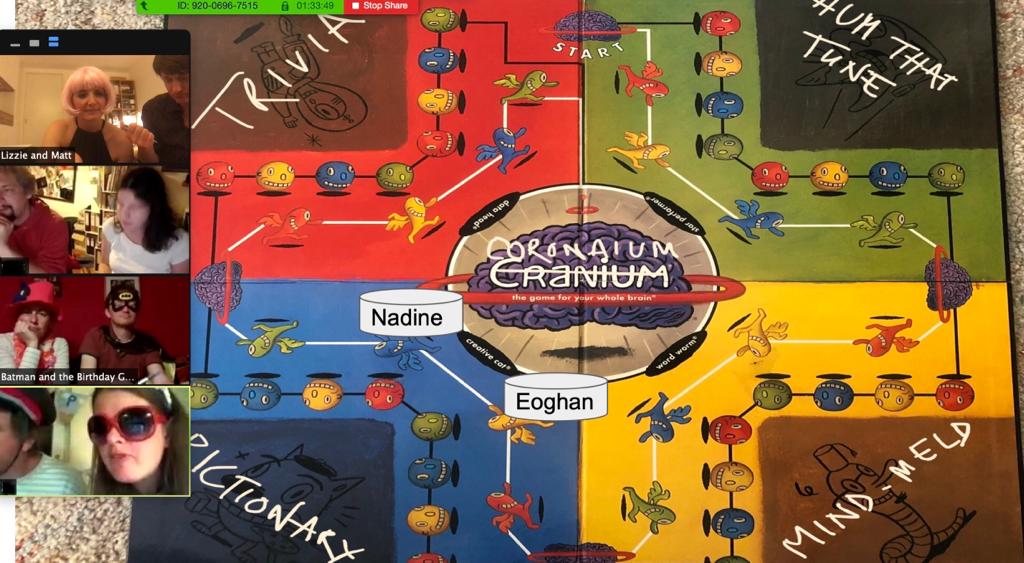
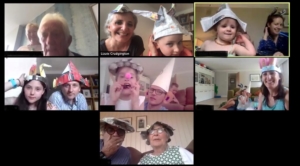
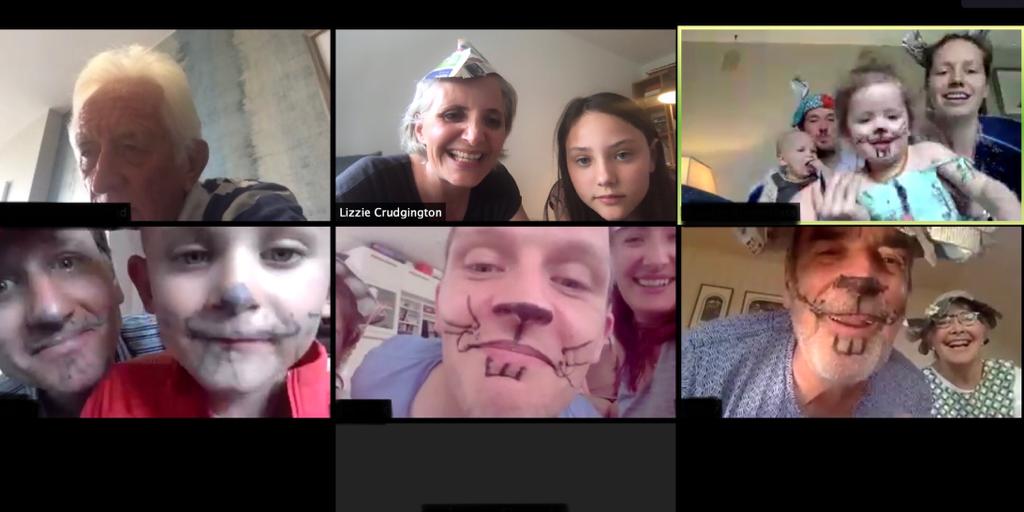
Technical Support: For a large group you really need ongoing technical support throughout the session. In addition to our two Facilitators, we had one person from the organizer team designated for tech support and provided his email address. Occasionally someone without sound or another problem would contact him either through chat or by email and they would work with together to try to get the person properly connected.  Also, while the breakout groups were in session, as the Facilitator, I stayed in the main room and responded to requests for help, or let people in from the Waiting Room who were late, or had gotten disconnected, placing them back in the breakout rooms. At times, I would have up to 4 people briefly in the main room before moving them back into a breakout room.  Our participant group was logging in from all over the world, with almost all of them working from home offices and laptops, so occasionally there were connectivity or other problems.

Also, under this technical support heading, it has to be mentioned that we did find that people using Chrome OS, Chrome Book and Zoom Rooms could not be placed in breakouts, no matter how hard we tried. After some struggles, we found this mentioned on the Zoom website. These people needed to log out and log in again using a different pathway. And finally, for a couple of people, no matter what they did, and what we did, they were either perpetually stuck in the Waiting Room, or in the plenary room and there was simply nothing we could do. This mysterious situation befell only 1 or 2 people with whom I had nice chats as I waited with them for the breakouts to end – interestingly, for the second rounds, they both moved smoothly into the breakout rooms with no problem. You have to just keep trying.

Overall, the sessions were very dynamic and the feedback from participants has been enthusiastic! The breakout rooms worked very well overall, with only some coming and going which was only obvious to me as the Host. To reduce movement in and out of the breakout rooms and to encourage people to settle into their discussions, we did disable the setting allowing people to come back to the main room on their own (now they needed to wait until they were automatically moved back by me). We also reduced the friction for new Zoomers by moving people to the breakouts automatically (this is also a setting when you are creating breakouts), versus requiring them to click on a pop-up asking them if they want to Join Group X.

One thing to try next time – Custom Questions for Registration

One thing to consider next time, to encourage people to register their topic preferences and have less people in the unassigned category to allocate, we will use the Zoom Meeting Registration process to embed the questions about which group people would like to join, instead asking people to separately respond in a google form.

Here is how to do that:
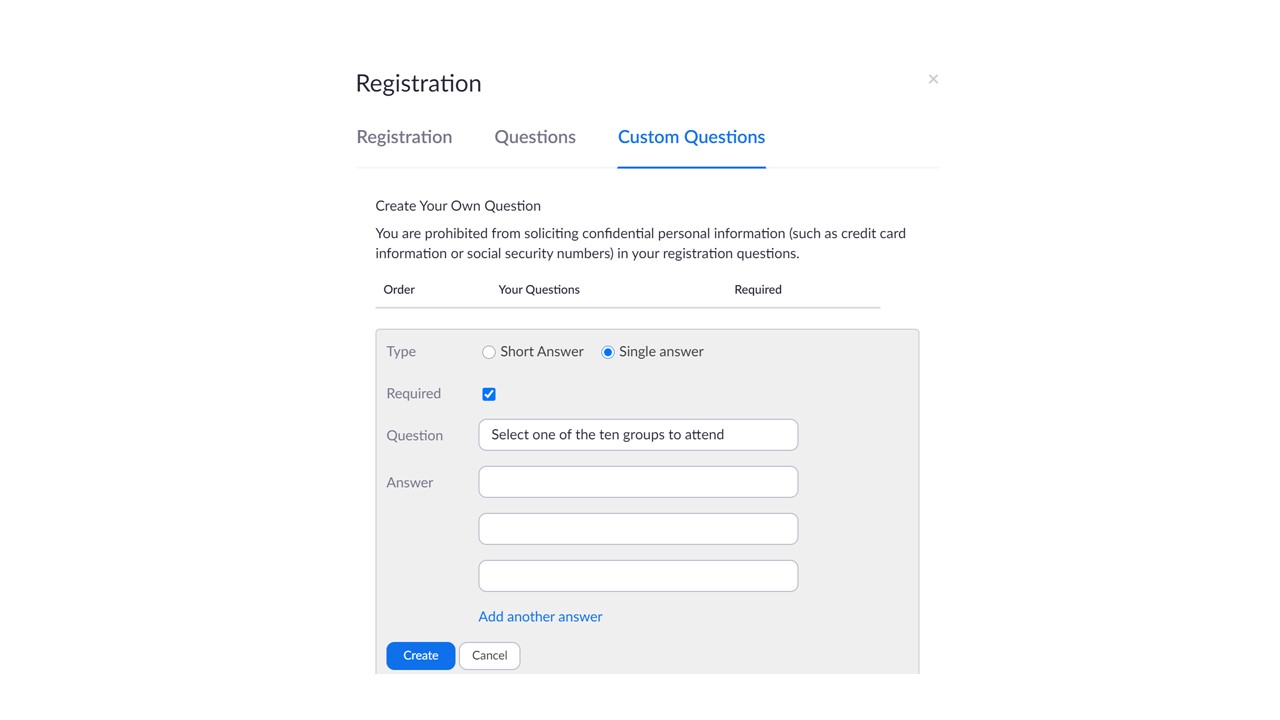
  • Enable Registration
  • Under “Manage my Meeting”, scroll down to “Registration” at the bottom of the page
  • Click “Edit” on the right, that opens a pop-up window
  • Go to “Custom Questions” – this adds questions that you want people to answer during the registration process.
  • Under “Create Your Own Question” click on “New Question”
  • There you can add a question of your choice. For us, we would want to require a “Single Answer” (so people have to pick one, versus “short answer” where people write in responses. You simply type in the question – e.g. “Select your first choice from the following ten themes”. Then add additional questions asking people to select their second and third choices. You can write in the 10 themes as answers to choose from.

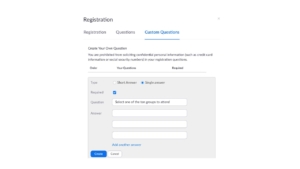
This would make sure that everyone who signed up could be placed quickly into a group. Of course, one of the answers could be “Surprise Me!” if people really don’t care, and then you could place that person anywhere.

This was a long post, as we learned a great deal from running our Community Exchange in an Open Space Technology-inspired format. As this group intends to replicate this model at the regional level in their network, and for others who may want to try, I wanted to write down the steps before I forgot them!

Article by Lizzie Crudgington, Bright Green Learning

When helping clients design online meetings and workshops, we often face all sorts of assumptions about what you can and cannot do online.  Usually we find that you can do MUCH more than you first assume.  What you need is some creativity and thoughtful planning!

Here I share a few examples of some of the more unusual ways in which I’ve used Zoom in the last months for more informal online convenings and gatherings, such as various birthdays and other fun events. These are being shared in the hope that these times push us to challenge our assumptions about what we can and can’t do online, have fun testing new ideas (for example with kids, friends and family- push yourself to try new things in a ‘safe space’), and then find ways to adapt and integrate more lively and creative interactive elements in our professional as well as personal virtual lives going forward.

I’ve included some ‘how to’ steps below with these 20 examples, revealing some of the things to think about when preparing for these online activities.  If you feel so inspired – have a go!  And reach out with questions if you’d like more details. Included below:

  1. The Maker Challenge
  2. Read Together Online
  3. Sewing Workshops with Grandma
  4. Playing App-based Games
  5. Online Face-painting Game
  6. Hum that Tune
  7. Charades
  8. Mind-meld
  9. Pictionary Online
  10. Online Quiz with Riddles and Emoji Questions
  11. How Well Do You Know…? Game
  12. Guess the Song
  13. Musical Statues
  14. Blow Out The Candles on the Cake
  15. Choose a Themed Virtual Background
  16. Get Physical with a Speed Hunt
  17. Collective Cocktail Making
  18. Online Spinning Wheel
  19. Celebrity/Who’s in the Bag?
  20. Taking Cranium (the Board Game) Online


OK, let’s start!


  • The Maker Challenge. The week before Easter, we planned an online family party and asked everyone to get scrap paper ready. We ran the party on Zoom with families in five locations. Each family had 5 minutes to make their Easter Bonnets from scrap paper – ensuring the camera was lined up so we could see one another’s creative process – and of course we wore the bonnets for the remainder of the party.
    (Other versions: Instead of an Easter bonnet, make a space helmet, pair of glasses, diving mask, a dress, a bouquet of flowers, a trophy, a car, the strongest bridge, the tallest tower…. The fun is in the making! And why stick to scrap paper?  Could be modeling clay, twigs found outdoors, LEGO…)

  • Read Together Online. Take photos of the pages of illustrated children’s books and upload these to Google Drive. In Zoom, screen-share the book and simply click through the pages.  We’ve had reading sessions with grandparents, as well as 6 and 7-year-old cousins reading their favourite books together.

  • Sewing Workshops with Grandma. This was really simple.  We just set up Facetime (could use Zoom or other platforms too) with the cameras carefully positioned, and away we went. Home-sewn face masks – tick.

  • Play App-based Games such as Connect 4 and Rummikub – whilst using Zoom or Facetime to interact. We use two devices (a smartphone and tablet or computer) so that we can chat and see and hear one another’s reactions during the game playing – maintaining the social dimension.

  • Online face-painting game. How about it? Also during the Easter party, we played a face-painting game using only an eye-liner pencil. We gave a willing volunteer the challenge of giving face-painting ‘instructions’ to everyone else (based on an image provided), without using certain words (i.e. they couldn’t use the words rabbit, bunny, nose or whiskers). We did the drawing part with backs to the cameras and then, once complete, we had ‘the big reveal’. Ours was a Easter-themed bunny, but you could choose any face-painting theme.  An interesting exercise in the power of communication too – usually with entertaining results.


  • Hum that tune. To play this one, we combine Zoom with WhatsApp.  The name of the tune is picked from a hat, by the “game master”, photographed and WhatsApp’d to the player who’s turn it is to hum.  Then those ‘guessing’ the name of the tune race to submit the correct answer – either to a WhatsApp group or the Zoom Chat.  (We find that using the Chat for answers works better than shouting out the answer as it can be hard to hear the person humming, especially if the group playing is large.)


  • Charades. As we did for for ‘Hum that tune’, we combined Zoom with WhatsApp. The charade is picked from a hat by the game master, photographed and WhatsApp’d to the player who’s turn it is to act out the charade.  Those in the same team call out over Zoom.


  • Mind-meld. The idea of this team game is that a word (suggested by the one team) is given to all players on the other team who then have 30 seconds to each write down three words associated with that word.  If there is one word in common in what all players in the team write down, they win a point. To play this, the word is called out, and players simply use simply pen and paper to write down their three associated words.  After the 30 seconds they then hold their papers up to the webcam so everyone can see what they wrote and whether or not they win the point.

  • Pictionary online. For this, we’ve done it in various ways. One option is to use the whiteboard in Zoom and have players ‘annotate’ it using the ‘scribble’ tool.  Others can then guess either shouting aloud or submitting their guesses via the Zoom Chat or a WhatsApp group. Another option – which allows for a better touchpad drawing experience – is to invite players to use a drawing app on their smartphone or tablet.  If they connect it to their computer via USB, they can then screenshare what they are drawing.  The downside of this option is that it requires a bit more tech set up (getting people to install drawing apps on their devices), and you need to change who is screen-sharing every time there is a change in who’s turn it is to draw.
    (Another option: use paper and pen in view of the webcam.)

  • Online Quiz. There are so many ways to do this.  A few things we’ve done to ensure the quizzes are fun and interesting to all – ask everyone to contribute questions in advance. Include riddles and try some questions with emojis (e.g. Which film is this?).

  • How Well Do You Know…? Game. A great variant on the quiz – especially if you are throwing a party for a birthday girl orboy – here Person X. We asked everyone to submit questions about person X in advance (e.g. Where were they born?), and we created a Google Form with questions numbered 1 to however many questions you have.  Note: Don’t actually include the questions themselves in the form – just the question numbers.  During the party, announce the game and send everyone the link to respond to the Google Form.  Read question 1 aloud and invite each player to write their response in the form.  Repeat for question 2, and so forth.  (The fact that the questions aren’t written into the form keeps an element of surprise!). Make sure that person X also responds in the Form!  Once you’ve gone through all the questions, go the summary of responses (in the Google Form) and screen share these, looking at them question by question. Person X reveals the correct answer (and all are amused by the variety of responses).   If you like, you can give points for correct answers but this is totally optional.

  • Guess the song. Different to ‘hum that tune’, in this game we play songs from a playlist in Spotify and it’s a race for players to guess the song – using the Zoom Chat or a WhatsApp group.  To ensure a good sound quality, mute everyone and play the music through your computer, clicking on ‘Share Screen’ / ‘Advanced’ / ‘Music or Computer Sound only’. Not only does this help with sound quality – it also means people can’t see the songs you are selecting to play, which would defeat the object of the game.
    (Another version of this game: What’s the next lyric?)


  • Musical statues. A classic party game, super for expending some energy and loosening up bodies. As in ‘Guess the Song’, play music for musical statues using ‘Screen Share’ / ‘Advanced’ / ‘Music or Computer Sound only’. Before starting, check everyone has their web cam set up such that you can see them in their ‘dancing space’.  And then play musical statues as normal – when the music starts every begins to dance. When the music is stopped, everyone freezes (stops dancing), and the person who is still moving is out of the game. This continues until there is one person left.  A great and easy party game for small and big kids.


  • Blow out the Candles on the Cake. Just for a bit of fun – when it’s a birthday, have a real (or ‘model’) cake with a real candle held up close to the web cam and have the birthday boy or girl blow the candle out from their computer (close up to the web cam).  Tip:  Make it tough for them, and get them really huffing and puffing (with little effect on the flame) before you blow it out once and for all 🙂

  • Choose a Themed Virtual background – such as bunting or a photo of your favourite bar! In Zoom, go to ‘Choose virtual background’ (next to the video options in the bottom control bar) and you can upload an image of your choice and select it as your virtual background. (Note: This works best when your own background is neutral)


  • Get Physical with a Speed Hunt. This is another great way of bringing some movement and energy to online events. Prepare a list of commonplace items and mini challenges and have different household / office teams race to complete them.  g. ‘Find something stripey’, ‘Find something that makes music’, or ‘Take a selfie of all your team in a wardrobe’.  Either have everyone return to the web cam as they tick of each thing on the treasure hunt list, OR have them take a photograph at each step and WhatsApp it to you.
    (Another version of the game: Create mixed teams (across multiple households / offices) and use the Breakout rooms function – putting one mixed team per breakout room to complete the speed hunt.  Note – for this option you can’t ask everyone to take a selfie of themselves together in a wardrobe!)


  • Collective Cocktail Making in Various Kitchens. Need a drink? Rather than just take a break, make the drink preparation an online activity. It requires a little prep, deciding on your cocktail and sending out an ingredients list in advance with enough time for everyone to source things (e.g. mint, red berries, soda water, lime, cucumber…) To run it’s really easy.  Just invite everyone to move their devices to somewhere safe in the kitchen and line up webcams so everyone can see one another well, and then walk through the cocktail making steps, and once made – enjoy!  A refreshing and energizing break.

  • Screen-share an Online Spinning Wheel – such as the ‘wheel of names’. I love this and use it for all sorts of activities. For example, if playing a team-game online, use it to randomize the teams.  Put all names in the wheel, screen-share it and and spin it to see who goes with who (e.g. the 1st 4 are together, 2nd 4 are together, etc.) Use it to choose which games you’re going to play next (e.g. will it be Pictionary, charades or treasure hunt?) Use it to see who gets to go next (from all the names).  So many applications.  Get creative!  And keep people on their toes with the element of surprise.  (Note: the default setting in ‘wheel of names’ is that, once selected by the spinner, the name disappears, but you can change the settings if you want to keep all items in the list. You can also change the colours, sounds, spin time, etc.  It’s very versatile.)


  • Celebrity / Who’s in the Bag?  For this one, you need to know how to play the game IRL (in real life), then this online version description will make sense. You also need a dedicated games master.  It’s a lot of fun, but the games master doesn’t get to play.  The game works as normal, only the games master has the list of celebrity names and, as people can’t pick the cards or papers from a bag. The games master uses lightning speed fingers to type the names into WhatsApp and send them to the player who’s turn it is to make his/her team mates guess the names.  Every time their team guesses an answer, you send the next name.  As it can go really fast, I try and queue up the names so that I just have to press send.  You can also cut and paste them from a list (make sure you have three copies of the list at the start: one for each round – with the names in a different, random order in each list).  For scoring – count up how many names each player gets in 45 seconds (ask someone else to manage a timer!!) by looking at the number of names sent to them in the WhatsApp thread.  At the end of each turn, write ‘END TURN’ into the WhatsApp thread so you can keep track of how many names they got in each round. 

  • Take Cranium (the board game) Online – renamed ‘Corona-ium’ 🙂 For those who are becoming masters managing Zoom calls, you can put a number of the ideas above together and take the board game Cranium online.  Cranium combines games like Pictionary, charades, hum-that-tune and quiz questions, so see notes above on running those.  Take a photo of the Cranium Board and put this into a Google slide (or make one up of your own design). Make and name a coloured shape per team as the pieces to move around the board (using ‘Insert’ / ‘Shape’). Then designate someone to be the scorer (ideally not you).  Doing it in google slides in this way you can share the link with everyone (view only) so that at all times people can see the state of play.  From time to time you can screenshare it too. If you have the board game, you can take photos of loads of the cards and have these in your photo library ready to send out to people via WhatsApp or pop them into a google slide deck that you screenshare.  If you don’t have the board game (and I prefer this option with an international group), rather than picking cards, before playing ask everyone to send you (privately) 5 quiz questions, 5 famous people, 5 things, 5 songs, etc. Compile these and use them for the game, drawing on them randomly. Caveat: A player can’t give an answer they submitted so you need teams of at least three.Top Tip: As this game has lots of moving parts, I like to give different people the ‘lead’ on different topic types.  e.g. One person reads out the quiz questions.  Another does the Pictionary.  Another the Charades, etc.  This means you can participate and enjoy the game too, rather than just being the games master permanently.

We hope that these 20 examples give you some ideas for how you might adapt the above for your next online gathering, whether it is in a team meeting, a learning activity, or another fun gathering with others online!

When the days run together without a clear delineation between the work week and the weekend; when you need to work but have other things on your mind (feeding a family of four three meals a day with an increasingly weird set of back cupboard ingredients, supporting your kids to go to school and stop playing online poker, even if it “isn’t for money”; trying to come up with something interesting to say when you call your parents for the 100th time and you really don’t have anything interesting to say – thank goodness for vegetable gardens), not to mention feeling the intensifying gravity of a global pandemic – you need to set up some sturdy scaffolding to structure your days.

Even with your home office in place, as informal or impermanent (you hope) as it might be; even with real work to do; even with the intention and eagerness to do something different today! that takes you out of the Groundhog Day loop that you feel you are in when you wake up every morning – even with all these positive motivations, it can still be hard to get things done and feel truly productive in the currently abnormal situation.

Like you, I have a my lists of things to accomplish for work and home- both the tasks with deadlines, as well as that long list of “sometimes/maybe” things that perhaps this period of no travel might finally afford me the time to accomplish.  But somehow it feels harder to get going every day, especially now after 40+ days and counting of staying at home. Is my current productivity practice up to the task of fighting these new external and internal stressors for my limited attention? As a life-long student of productivity, I try a lot of different things aimed at personal efficiency and effectiveness. For me, it is always a good time to learn something new, and now more than ever. Where to start?

In the present fluidity of hours, days, and weeks, and with the level of uncertainty that is out there in terms of when things will change, I am feeling a greater need for structure even beyond my traditional GTD context lists.  I need this additional structure to help me make decisions about what I need to do and when I should do it (e.g. when I have the appropriate mental bandwidth).

There are a million ways to do this- this blog post is just about what I have put in place during this unique historic moment. It’s not a perfect system, but it’s working for me right now.

Creating Structure

Weekly: I structure my time using a couple of different tools. One is a weekly planning card that I fill in on Sundays for the upcoming week.  This is a useful printed notepad template by BeforeBreakfast which has a place to indicate 3 weekly objectives (things I want to have accomplished by the end of the week), as well as daily blocks where I can note specific daily tasks, affording me an overview to make sure I am blocking enough time throughout the week to accomplish them.  These daily blocks I divide with a line through the middle, above which I write my “Deep Work” (Cal Newport) and below the “Shallow Work”.  I separate these two kinds of work because I want to make sure that I “move the needle” every day, in the words of productivity podcaster David Sparks, if humanly possible. That is, to make some progress on the creative projects I have ongoing (writing, PhD research, developing a new piece of curriculum, etc.) in addition to doing other work that is more incremental and doesn’t necessarily bring something new into the world (meetings, admin, scheduling, email, etc.)

Daily: With my week planned at the 10,000 foot level, I use my daily calendar which is a week-to-view Lett’s quarto (I have used the same calendar for over 15 years now) and includes scheduling from 08:00 – 20:00, to block schedule (sometimes called hyper scheduling) my day. I might do this the night before or in the morning, whenever I feel I have the best overview of my day, to block time for discrete work (usually in 30 minutes to 1 hour blocks) around the hard landscaping of e-meetings and calls.

Within my day, I also block time to walk, cook with those weird ingredients, have lunch with my family, and do an online Pilates class. These are scheduled too. I also want to start to integrate more artistic activities that use a different part of my brain, and let rest the part that is being used at my desk. This week I plan to unmothball my trumpet which is sitting in its case under my desk and see what is left of my high school embouchure (yes, after 40+ days it has gotten to that point.)

Creating Accountability for Completion

When there is no office,  no travel, no long string of F2F meetings, etc. creating your own aspirational schedule is one step, but the best laid plans, as they say. In addition to having none of this office business, you also have no colleagues, no line manager, and no coffee buddies (at least in your home office.) No one may be checking in regularly to see how that document, or proposal or article is going. There are a number of different ways to create accountability if that’s something that helps you not fall into the black holes of procrastination like social media, watching YouTube videos of Stephen Colbert et al., or sparking joy by meticulously tidying up your desk, over and over again. My current favorite is FocusMate or FocusFriends or whatever you want to call it. I am not going to go into too much detail on this as I wrote a whole blog post on how to connect with others while making progress on your own stuff (When You’re Not in the Room Where It Happens: Getting Work Done at Home (Even Temporarily). I have gotten into a nice routine over these past weeks with a couple of friends who are also trying to do more than email during this period. With one of these friends, who works in a completely different field, we work together in parallel almost every day, chatting a few times a day to share what we are doing, accomplishing (or not), and what our perceived barriers are. When we can, we go into structured blocks of working one hour synchronously on Skype, with brief reporting on achievements on the hour. Other times when we have online meetings or other interruptions, we just write on Skype what we will get accomplished during the day, write updates during the day on how we are doing, and diligently read what the other person has written and provide comments and encouragement. Then we might call at the end of the day to debrief on how well we did on reaching our goals.

Another useful accountability mechanism is a monthly habit tracker that I review every night. I created this at the beginning of the Covid-19 stay-at-home period to keep myself focused on 10 things that I want to do every day. This is a simple A4 matrix that has the key words for the 10 things I want to do every day in columns across the top of the page, and the days of the month down the left hand side in rows. There is a line to write in the month at the top, so I can reprint a new sheet each month. At the bottom I have a little more description of the key words with my intentions, be they “Sleep” – sleep 8 hours a night, “Family” – do something with my immediate locked-in family every day; “Friends” – reach out to friends somewhere in the world every day;  “Deep Work” – work on one of my creative projects every day; or “Meditate” – take some time for this daily; etc.  Every night I review this list and make an “X” in the column if I did this. The daily reminder and the visual is useful to keep the habits alive, to confront myself on what’s really important, and challenge myself with the Jerry Seinfeld strategy of “not breaking the chain.”

Creating Habits and Reflection

Inspired by James Clear’s Atomic Habits, a habit tracker helps you set your intentions regarding the good habits you want to create, and then keep them front of mind so you remember to build them in at least a little bit every day. I used to lose my nascent good habits in periods of frequent travel, where my daily routine would be demolished by novelty, other people’s schedules, and intense fatigue. Now that their is no challenge whatsoever to my routine, I want to experiment with this method to entrench some good habits now that will support productivity and overall well being now and in the future.

Daily reflection is another habit I am working on through daily journaling. I write short entries at the end of the day and am using four fields as writing prompts: 1) Highlights of the day; 2) Achievements (however big or small); 3) Gratitude – this has been helpful when things seem to be wobbly around you; and 4) What I got out of the day – this latter sparks more overarching reflections and connections that I spot, such as how on days when I do a longer meditation at night I sleep better, or when I schedule the deep work in the morning it takes me less time to accomplish, etc.

For my journal, I am using a small notebook with removable pages, so that when it gets full I can take pages out and put in new ones.  I also have some “master list” pages at the front where I am tracking some additional items such as, “Achievements” (bigger things – to remind myself that I can finish things, even when life is messy and complicated); “Things I said ‘No’ to (and Why)’ (since this is an area I am working on and trying to actively manage), and “Productivity Tips” (shiny new things or useful hacks I have picked up and want to try).

A final input for daily and weekly reflection for me is time tracking. I have set up a time tracking Excel spreadsheet (although there are lots of apps that do it automatically, I like to do it manually for now), to help me see if my projections for block timing, etc. are realistic or not. Normally they are not – I tend to underestimate how much time it will take me to do something.  (For example, I thought this blog post would take me 1-2 hours, and now 4 hours and some interuptions later I am still agonizing over editing!) Not only do I track how much time I am spending, but when I am spending it during the day, by putting in start and stop times. That has helped me develop an understanding of when in the day I am most productive (Biological Prime Time) so that I can be more effective at scheduling, and know when breaks are needed or a significant change of tune (back to my trumpet).

Time tracking has its practical function, of course, if you are a project-based worker as I am. But it also builds an excellent database, along with the habit tracker, calendar and journal, to support reflection and provide evidence needed to make continuous adaptations to your system.

Too much structure? Maybe, but it actually doesn’t take that long in the aggregate, and in times of fluidity, uncertainty, and what seems like unlimited hours free to sit at my desk, I feel this is helping me focus my attention on the right things and not always on the momentousness of everything else going on right now, just outside my front door.

(Note: This blog post is long and detailed, and really only for facilitators or hosts who want to run bi-lingual meetings in Zoom. I’m capturing this learning mostly for myself so I can use it easily next time, and I’m happy to share with others exploring this useful functionality of Zoom. Feel free to ask questions in the comments, and I’ll do my best to answer.  Also, click on images to make them larger.)


My three, inter-connected virtual workshops this week were unique for a couple of reasons. First, I found it amusing that each workshop was held on two different dates – that was because the online participants were so spaced out in terms of time zones, that for one half we started on Tuesday but for the other half it was already Wednesday. Every workshop was held on two dates! (with the organizing team in the middle in Central European Time working from 21:30 – 00:00 or so every night.)

The other thing that made our three 2.5 hour workshops different was that we used interpretation online, and had two English-Russian interpreters join our meeting. This was new for everyone, including the interpreters and me, so I wanted to share this overwhelmingly positive experience (of course with a few challenges to overcome) and some thoughts about effectiveness from the perspective of the interpreters which I found insightful.

Our programme, spread over three days as it was, was a multi-sectoral discussion that needed to take place in 2 languages – English and Russian. This is a group of conservation scientists from different sectors located from the far east of Russia to the Bay area of the US, who have worked together face-to face in the past, always with translation. Now we needed to take their work into a virtual environment and chose Zoom as our platform particularly because of this new interpretation option. Our two interpreters joined us from their home offices in two different locations, and they translated in and out of both languages.

There were really only 5 steps to get interpretation working:

Step 1: Get the Zoom Business Plan

Zoom had recently offered an interpretation feature that we wanted to test. This option is only available to Zoom Business users. This is the plan above the Pro version that I already had. For this plan you need to pay for 10 hosts at the minimum, and it costs 199.99 USD per month. You can buy it by the month, which is what I did. Upgrading was incredibly easy to do on their website. You click the button and pay. You maintain your own account and all your details and just get the added features from the Zoom Business plan. Usefully, Zoom doesn’t force you to register the additional 8 hosts, just pay for them.  I only have two hosts registered (me and my colleague Lizzie), I will go back to Zoom Pro next month, and when I work with translators again, I will simply upgrade for the time needed.

Step 2: Setting  up your meeting for interpretation

With Zoom Business, now what I see as a host when I create a new Zoom meeting is a box to tick at the bottom of the meeting set-up screen that says “Enable interpretation”. Once you tick that box, you need to put in the email addresses of the interpreter(s) and the languages you will use. Currently Zoom offers options for 9 languages: English, Chinese, Japanese, German, French, Russian, Portuguese, Spanish and Korean. We needed Russian and English, so that was fine. I selected the languages that each interpreter would work in from a drop-down box. You can add many interpreters it seems using the “Add Interpreter” button – after clicking that 10 times I stopped.

Once you set up the meeting, the interpreters get an email message inviting them to join the Zoom meeting as interpreters. That’s really all that’s needed prior to your meeting – very simple!


Step 3: Once in your meeting: Start Interpretation

When you open the Zoom meeting as the host, you need to click on the Interpretation icon which shows up on your dashboard (bottom of the screen). Once that is open you need to “Start Interpretation”.  This makes an Interpretation icon show up on the screen of every participant. This is relatively easy to forget the first few times you use this function, because as the host you already see the Interpretation button on your screen and assume that everyone else does too. You then might confidently declare that there is interpretation enabled, and then all participants will respond loudly and in unison that they don’t have the interpretation button, they can’t find it and that this doesn’t work. Then you say “sorry” and start interpretation and magically the icons appear and everyone is happy.

This extra step to turn on interpretation probably makes sense so as not to start it before your interpreters are there. My two interpreters were always in the room early, so I could start that even before the meeting officially opened.


Step 4: Participants choose their language

Once participants see the Interpretation icon on their screen at the panel at the bottom, they click on the icon to see the language choices for your meeting. Note that by default, interpretation is “off” and they just hear whatever is going on in the main room. They need to choose their language to start hearing the interpreter when he/she is speaking their chosen language.


Step 5: Mute original audio

This last step is very important and was an initial source of consternation, taking us a few tests to understand what was going on and what to do about it. So, only after selecting the language of choice, the option to “Mute original audio” becomes active (before you select the language you can see it but you cannot click on it). Unless you wish to hear both languages simultaneously (the speaker and the interpreter) you will want to select this.

When Zoom describes this feature, they make it sound appealing to listen to the interpreters while also having the original language going on softly in the background, simulating a real physical workshop room where you would hear the interpreter in your headset, and still have the original speaker going on in the front of the room at a distance. However, this wasn’t our experience. Both languages seem to be almost the same volume, and with headsets, it was maddening to listen to both languages in both ears at the same time. So other than just dropping in to see that the translation was working, everyone used “Mute original audio” and were happier for it.

Here’s another thing we learned in our testing, the “mute original audio button” is currently only available in the most recent Zoom updates. People with older versions, or company versions that were updated (or not updated) centrally found that they did not have this button and were relegated to either “Interpretation off” (hearing only the language of whoever is speaking – for perfectly bilingual people this is no big deal) or hearing the frustratingly loud mash-up of the speaker and interpreter. This lack of “mute original audio” button was the case in about 25% of our participant tests prior to the workshops. As soon as people updated Zoom they all had the option to “mute original audio”, and their blood pressure went down again.

Eventually, the system worked 100% for everyone, even those who were working in very remote areas. As we had substantive technical presentations in both English and Russian, and only a small subset of bilingual participants, the meeting would not have been possible without interpretation. Zoom made it easy through keeping it all on one platform, rather than having a work around with interpreters needing to set up a separate call, using Skype or other. Another option is always consecutive translation, but that essentially doubles the time needed for meetings and would have slowed us down considerably.

How it felt to participate

I am trying not to be effusive, but we were truly amazed at how well the whole thing worked and how easy it was once you got used to it and set up. One of organizers said that it should be explored even for face-to-face meetings as everyone always has a laptop in front of them and headphones anyways these days. Even sitting in the room, they could log into a Zoom meeting, turn off their video, mute their microphone and pick their preferred language on the Zoom screen. The speakers at the front of the room would just need to have Zoom too and a headset (no video needed as they are live). If participants had a question, they would unmute themselves, speak and the speaker would hear it. There would be no additional interpretation devices to check out and collect, no booths needed, and your interpreters could be anywhere in the world and not in the room. Ah, I get carried away. It is an interesting idea to ponder. Just to note – the interpreters had a completely different opinion on this! (See “How it felt for interpreters” below)

Testing, testing, 1,2,3

As this was new to all participants, hosts, and even the interpreters, we ran 5 interpretation zoom tests in advance of our meetings, where we invited people to join us, walk through the few steps to turn it on and check they had the latest version of Zoom. This also helped us check audio, video, and connectivity issues, which was helpful overall.

I set up the Interpretation tests as separate Zoom meetings, enabled interpretation, invited the two interpreters, and then we hosted a subset of participants each time so that they group was small enough to help and trouble shoot (note that our first two tests were just internal with our friendly and patient organizers). These tests lasted from 15-30 minutes and upon declaring success, greatly helped us move technical issues out of the actual workshop meetings, making starts smoother and punctual.

Final reminder in the meeting

Even with the tests, I opened the first of our three workshops with a few PPT slides to remind people what to do for interpretation, using screen shots. I also included the meeting norms (keep on mute unless speaking, raise hands, etc.), followed by some simple testing of these important functions (“give me a thumbs up if you have this”). I always opened the Zoom environment 15-20 min before the official start of the meeting to trouble shoot with all those who signed in early. And on the last day, where we had a few new external people joining to give presentations, I presented the Day 1 “How to” slides again in the 5 minutes preceding our start time for these newcomers. We had informed them to join us early during the interpretation test meeting.

This all might seem like overkill, but it helped significantly, and made for an effective workshop. The first few times you use interpretation (or even Zoom itself), you can still easily forget where to find things and what to do, and then not know why things aren’t working, descending quickly into general gloom and the potential of existential crisis about whether or not you are going to get this virtual stuff, ever. On a more practical note, even before you get a whiff that people are stuck, you as the facilitator can also invite people who need help to write you in the chat using the “private” option and you can help them individually. After a few times, it is very straightforward.

Ultimately, for participants, once they got there, it was smooth and easy and a little magical to see the videos of their colleagues speaking, mouths moving, and the smooth voice of the interpreter seemingly coming out of it in your very own language. This facilitates discussion and communication among people significantly – brilliant!

How it felt for the interpreters

Talking to our interpreters about these meetings was eye opening for me. I have always been in awe of people who can listen to one language and simultaneously speak another one. I continue to be impressed – our interpreters were excellent, and were themselves learning how to do their work in Zoom.

A number of focused debriefing meetings with them after the tests, and after the workshops themselves, helped us tweak things – but interestingly, not so much from the technology aspect. That worked fine. But more from the procedural perspective. It was interesting to hear them compare their work in a booth at the back of a workshop room, to being plugged in, in front of their computer screens during a virtual meeting.

For them, interpreting for Zoom meetings is now a reality, so they are eager to get up to speed on this. However, their observation is that it is more intense and stressful than providing this service for in-person meetings. Meetings in the Zoom environment, they observed, caused additional cognitive stress. First, because when they are interpreting, they cannot communicate with the host, participants or the other interpreter (who is not in their booth but 1000 km away in their own office).  They cannot bang on the booth to get our attention, or visually signal to the other interpreter when they need something or are having a problem (e.g. if their system goes down, there is an issue with sound quality, or they lose connection – which can happen to anyone, necessitating the need to quickly log out and log back in). They cannot read the chat function when they are interpreting – the chat button lights up but they cannot easily see if it is a private message (e.g. about the sound, etc.) or just people chatting back and forth amongst one another.

Also, when someone is sharing their screen to present this obscures part of their dashboard so they cannot easily other things on their screen, like the time – so need to look at their watch or phone, etc. to know when it is time for the next interpreter to take over. That second interpreter is also not there with them physically to use visual communication to switch interpreters (they work in 30 min shifts).  All these might seem like small things, but when you are using all your full attention to listen to one language and speak in another simultaneously, it is cognitively more demanding to keep track of all these other things going on at the same time.

The second reason that this is stressful is because the Zoom technology does not impose procedural discipline upon participants, which means that the facilitators and chairs need to do that more. In face-to-face environments, when using interpretation systems, some systems do not allow two people to speak at once, and also people raise their real hands, and then push on a button when called, and then they speak. In Zoom however, everyone can unmute themselves and speak at the same time  (I’m sure we have all been on those family zoom calls when everyone is shouting at the same time). People can even speak over one another in two languages! In that case, what does an interpreter do?

To help, there needs to be an emphasis on procedural discipline, which might make the meeting feel more formal, but is really necessary when using interpretation. The Chair or facilitator needs to give voice to participants, and needs to insist on procedural compliance in terms of taking turns, and even trying to leave a bit of space between speakers and language changes, so that the interpreters can click on the other language button when they change languages. It is better for them, they said, if there is no direct contact between participants without the chair giving the floor to people. People also cannot mix the two languages which is very tempting for bilingual people – this is also a rule in F2F interpretation.

Notes for the Facilitator and Host

For the Facilitator of a Zoom meeting, you need to keep your eye on the interpreters’ names in the Participant Panel, and you can even check from time to time that all is going well by switching languages to hear the interpretation (or taking off for a minute “Mute original audio”). One tip for the Host is to rename each interpreter with a “__” (double underscore) before their first name, so that these names are always near the top of your participant screen, which is alphabetized by Zoom (after Host, Co-Hosts, those sharing screen and speaking). That way, you can easily see if for some reason they are not there/drop off the line, so you can stop and wait for them to come back in. If you don’t rename them in this way, their names are mixed in with all other participants and you might not notice if they aren’t there, with a speaker talking away but no interpretation.

This happened to us for a few seconds during one of our workshops, but we just asked the speaker to pause until the interpreter was back, and then to repeat a short segment. We went merrily on and it didn’t happen again.  It has to be noted, that bandwidth and internet fluctuations can happen to anyone these days, when everyone in the world is at home and trying to get online simultaneously – whether they are working or watching Netflix, or both at the same time. We know that these little things always happen in virtual meetings, and of course it is a little more dramatic momentarily when it is the interpreter who drops off, but you just pause for a moment and work through it.

This is surmountable, and our interpreters navigated all this novelty elegantly. We, the organizers, only really knew how much work it was for them afterwards.  I am sure that no one participating felt anything other than a great meeting, supported by equally great interpretation.  For interpreters everywhere who want or need to make this transition to virtual meetings, the Zoom system will become easier to use as they have more and more practice, but the procedural discipline aspect needs to be firmly on the “To Do” list for facilitators.

Some final thoughts

It was exhilarating to try something new and have it work so well! This international group would have had to wait months to meet again in person, and this virtual option allowed them to continue their collaboration in the meantime, from the comfort of their own homes from the far east to the far west.  It goes without saying that your interpreters are critical for the success of your bilingual Zoom meeting. As such, it is important to work closely with them, listen to their perspective and get their feedback through testing of the system in the preliminary stages of workshop development. And of course, remember to thank your interpreters at the end!

(BTW if you need recommendations for experienced Russian-English Zoom interpreters, I have some names to share!)

There has been a raft of flipped workshops recently where F2F events have been redesigned to be held virtually, and it is fascinating what a rich diversity of designs there are. Some of them have been reworked as big blocks of synchronous together time that aim to closely mimic the programme of the original F2F workshop with some minor modifications, such as adjusting the time to make it more comfortable for participants on different continents, and reducing the number of days for example. Others are dramatically reducing the “contact” time and pushing workshop tasks into the days before and after the online meeting, undertaken by participants individually. Yet another model is spreading the engagement out over weeks, with scheduled touch points that pick up different themes of the original event – and many, many more!

As we are all learning right now, I thought I’d share some details of a few of these models that I am working on right now, in case they might be useful for other designers and organizers who are in the process of flipping their workshops.

Model 1: The Block

I have one of these coming up which was originally a 3-day F2F workshop, scheduled to be held daily from 09:00 – 18:00, with one evening session. Now in its virtual incarnation, it is two days long, and will be held from 11:30-17:30 (Central European Time) to accommodate both European and North American participants (and no “night” session). To pare down the work, we needed to go back to the original objectives and select those that needed to be accomplished now, and those that could wait for a subsequent F2F, or be taken into a set of topical conference calls later on. We also added some pre-work, but most of the work would still be done together in the virtual sessions.

Even with these modifications, this virtual workshop block will be a heavy lift for participants. We have the traditional 90-minute session lengths, with lunch and afternoon coffee breaks scheduled to relieve people from their screens. During this free time, we will invite people to stay connected if they wish, to chat together informally while they eat and have coffee. To keep things interactive and lively, we have a diverse mix of activities, including a number of break outs, supported with google docs to capture outputs from breakouts and other small activities (polls, stretching, etc.) to keep things moving.

This format of this workshop is relatively close to our original F2F agenda, and I think in some cases the makeover of a F2F workshop to a virtual using this model can work well with a few caveats. This would include a rather small group (we are 20) of very dedicated people (this will be tiring so need to manage their attention) with a well- defined task (we are finishing a co-creation project to develop a set of guidelines). I think the fact that the majority of this mixed stakeholder group has worked together before will make the social dynamics side work. We invested significantly in building social capital in our first F2F workshop that we can draw on now for trust, commitment and creativity. For this workshop we are using zoom and will have two facilitators supporting the team in their work, one of which will operate the technical aspects (splitting people into breakouts, launching polls, etc.)

Model 2: The Blend

Not many of my flipped workshops are taking this compact block shape. For others we are opting for shorter synchronous meetings (where people are all together) and taking a lot of the planned work out of that full contact time. We are blending substantive pre- and post-meeting work that is asynchronously completed (e.g. undertaken by individual participants whenever they want), with the meeting times for synchronous engagement and discussion.

Here’s an example: For one previously scheduled two-day F2F workshop where we were gathering feedback to guide a consultation process, we asked the 40+ participants to review and comment on a google doc in advance of the meeting, and to answer 3 higher-level strategic questions about the document on a separate google sheet before we met online. As participants were located all over the world, we conducted our workshop through three 90-minute meetings held each day for two consecutive days – one call for participants in the Asia Pacific region, one for Europe/Africa/MENA, and one for North America, Latin America and the Caribbean. To support these virtual meetings, we made three identical copies of the document to comment upon and labeled each by region. The google sheet with the strategic questions had the instructions on the first sheet and then three tabs, labeled by region, each with an identical set of strategic questions. Note that we sent out the links to the google docs, but also sent the files as attachments in word and excel. Some people are not able to use google docs due to their location or institution, or not familiar with them, so they had the option.

The calls themselves were used to present an overview of the document as a reminder, and then an analysis of the comments and feedback received. We asked for more feedback and could ask specific probing questions on each region’s responses where we had them. With the documents split by region, we could easily see what the people from the region on the call said, so we could seek further clarification and detail on their comments efficiently as need be.

For the Day 2 meetings, we synthesized what we had heard on the Day 1 across the regions, and identified five topics that emerged across the calls to bring back to the groups. For example, we had a couple of points that needed further clarification, others where the different groups offered conflicting advice, etc. The second call allowed us to share what we had heard and to go further, bringing in some of the good ideas across the different calls.

It is true that not everyone attending this larger workshop did the pre-work, especially at this time when people are working from home and juggling many things. Many did, but said they would value more time to reflect on the comments others had made, or in order to do some internal consultation in their organizations. As such, we are leaving the documents open for another week to capture as much of their input as possible, let them build on other’s ideas, and reflect further. Also, if someone could not join the calls for some reason, or did not want to speak out on the call, they are able to contribute their ideas in this way. This was our plan, and was also requested by participants.

Our workshop goal was to get this senior group’s comments and ideas, so we needed to make this as easy as possible for participants. This workshop was the first step in a longer consultation process so it had to generate good quality input, in addition to being satisfying for the participants. This model blends asynchronous work before and after the call, with shorter synchronous virtual meetings. It was run by one facilitator on the Go-to-Meeting platform.

Model 3: The Journey

The third model that we’re working on flips a very large-scale 300+ community workshop into virtual space by spreading the content out over three weeks. Six interactive webinars will be held in total. Once a week on the same day, two webinars will be held on the same day, one in the late morning and one in early afternoon to accommodate as comfortably as possible the largest number of the global participant group.

As this was more of a conference-style gathering for a larger group, even with many interactive elements in the F2F format, there was a lot of content to work with. This gathering will be postponed until early 2021, so we are pulling out the good practice exchange, community updating and storytelling aspects into this webinar format and featuring the work of different community members. We will still have interactivity through the introduction of a back chat polling tool (polleverywhere for example), as well as a crowdsourcing exercise to draw ideas from the group. This latter task will be introduced in the first webinar and the results analyzed and presented in the last webinar two weeks later. For this we are exploring Zoom, and will have a facilitator and a host of moderators and technical resource persons.

So there you have it, what started out as three F2F workshops planned to be held over 2 and 3 days, have ended up as three dramatically different models of virtual workshops. The diversity of options makes it exciting to re-design in virtual space.

Design Questions

Your choice also depends on the design parameters you are working with. Once you know your objectives and desired outputs, you ask:

  1. How many people?
  2. Where are they located (time zones)?
  3. What kind of connectivity do they have? (Can they support video, calls, other?)
  4. How committed are they to your process and the goals?
  5. Do they know each other? Do they need to?
  6. What experience do they have with virtual work? Do you use some platform already?
  7. Will people do asynchronous work? E.g. Will they devote the time if we give them tasks to do before and after the contact time?

Then as a facilitator, you use your design skills and creativity to put together your virtual workshops, which, just like their F2F counterparts, come in a delightfully wide variety of shapes and sizes.


There is an excited flurry of activity right now among meeting, workshop and conference organizers -and their facilitators -as travel restrictions due to the coronavirus cause cancellations of face-to-face (F2F) meeting formats. Planning meeting agendas are being taken over with the exploration of different technologies, tools and platforms to help hold these events virtually.

But in many ways, virtual gatherings are not so different to their F2F counterparts.

It’s worth remembering, and I am talking to myself here too, that these meetings, workshops and conferences themselves are tools – a means to an end. We don’t organize workshops or conference just to have them – they are not boxes to tick in our annual workplans. We use these gatherings for other goals that are important to us. The most useful thing to bear in mind when looking at all these different models, tools and platforms to convert our F2F meetings into virtual formats is, “What was the end we had in mind?”

What did we want to change or be different as a result of our workshop? What did we want people to know, think or do differently after attending our conference? What did we want to have in our hands as outputs at the end of our meeting?

No doubt there was a task you wanted to complete – whether it was to collect useful input to a strategy development process, collectively write an article, review a set of draft guidelines, or exchange good practice to build community capacities, and so on. There were also probably some softer outcomes in mind, like helping build relationships in a community, reinforcing trust in a process, or inspiring buy-in and support in promoting the final co-created product.

Putting your desired outcomes first will help make choosing the right technology to support it much easier – form follows function (if you will pardon my invocation of an over-used design cliché.) If we take a step back and remember our desired outcomes and outputs, that will help make this conversion-to-virtual process easier, and potentially tap into some creativity in terms of how we get things done virtually.

A couple of other thoughts on virtual workshop design – length and complexity

We observe in our F2F conferences and workshops that even the most well-intentioned participants have finite attention spans. It may be less obvious when people are sitting in an auditorium as they can easily dream away while still looking fixedly forward at the person standing at the podium. They can of course also choose to keep talking to the person they just met at coffee break and leave their seat empty in the plenary room. (It is of course harder to disappear when there are only 15 or 35 people – although they may invoke the “sorry, I couldn’t reschedule this important call.”)

Online, there are a multitude of ways people’s attention can drift away or be drawn away – pulled by their computers, email, various devices. And there is no way to tell if they are even there at all, or just popped out to make a coffee, if they are on mute and no camera is being used.

So the same rules apply to virtual as F2F, keep things short and to the point. In F2F we rarely have sessions that are more than 90 minutes to two hours maximum before taking a break. Within those blocks we use a lot of techniques to keep messages focused, interventions short, pithy and discussions interactive. Virtual sessions should use the same rhythm, sticking to these familiar timeframes, and include well-prepared interventions.

Technology adds a layer of complexity for both participants and organizers. Even in F2F, preparing a presentation and standing up to speak is something that most people are happy to do. But add a PPT projector, slide changer, microphone and sound system, and things can fall apart if not practiced and tested. This is the same for virtual environments where seasoned speakers can be perplexed by talking, keeping an eye on the chat stream, and changing their slides at the same time – especially the first few times they do it. Speaker preparation is something that needs built into both formats.

Although we all have our phones in our hands at every moment of the day, even using polling apps in F2F workshops (like polleverywhere or mentimeter) with an increasingly tech-savvy audience, still creates complications for some. This is why we take time for set up and do some low risk test questions before we use these tools for real data gathering. With online interaction it’s the same, and we do need to add in that additional time for people to get used to the tool – take it slow, make it easy with clear instructions, and practice. It also helps to be humble and invite the audience to join in the experiment of trying new things and invite them to give feedback afterwards on what worked and what could be different next time.

The good part is that people are getting more comfortable with these technologies, at least as users. With this current situation, many more will also get more comfortable with the back end of these platforms and tools as administrators. Whether it is using a polling app on our phone F2F or using zoom in our offices or at home, we are now more quickly domesticating these technologies.

It’s actually a great opportunity right now, and a great responsibility. By doing a good job with your virtual meeting or conference, you are building the capacity and confidence of the whole community to work together in this way. Once people feel comfortable with the technical aspects,  and have a productive and enjoyable experience working together virtually, they will show up differently next time.

This is a valuable mass learning opportunity for our community to learn how to work effectively together virtually. It’s possible that, even without travel restrictions, we may never go back to the same meeting culture we had before. We will still gather, but may be even more ambitious with precious F2F meetings, with their substantial investments in carbon, budget and time. If we get our methods right, we may get the same valuable outputs in virtual formats as F2F, demonstrating that they are not so different after all.

(Photo credit: Bruno Cervera- Unsplash)

You’re not going into the office, you can’t go to that busy cafe, you’re not dropping into a co-working space. You are going to work from home for a while.

At first you think that this will be fun, after all you have worked effectively from home in the past for a day or two to finish that report or work on a proposal. This longer period will see you getting even more done, right? Maybe. What might happen when office workers go home?

Independent workers have set up systems to work effectively at home or in mobile environments. They have home work stations, office supplies and equipment, and that backpack that has every thing and every cable they need to work from anywhere.  But what if its not a permanent shift – just the reality for a while? It’s probably not worth spending time thinking about such things, you just need to get work done at home.

The first day is great, you plow through things; the second day, you get some more done. By the third day it’s getting quiet, just you and your laptop. You schedule calls and have online meetings. But between those you still need to produce something. You find yourself doing lots of email and planning – moving papers from one side of your kitchen table to the other. There are also other distractions trying to grab your attention at home, the laundry, training the dog, the drawer that needs sorting. It’s hard to focus, what do you do next? This isn’t going to work for 14 days.

For the last year, I’ve been working on a couple of larger writing projects. They have no particular deadline, and no pressure. They don’t call me or send me email. They do wake me up in the middle of the night occasionally. But I have to find deep wells of inner discipline and focus to work on them. I have discovered one practice that has helped me enormously to make progress and get things done, that I think might also be useful for workers accustomed to having high contact with others and frequent check-ins, and are not necessarily used to working on their own from home.

This practice was inspired by Focusmate which I discovered last year, and is an online community that literally works together. I thought it was a great idea, but didn’t want to work with strangers. So I set up my own set of Focusmate colleagues – friends of mine who are also working on writing projects and research in some cases, and others who just want an extra layer of accounabilty to get substantive things done. My Focus Friends are in Geneva, Paris, Rhode Island, and Budapest, and I am always glad to add others.

The process is very simple:

  1. Schedule: You schedule at least a 1-hour block with someone and put it in your calendars (I often schedule longer blocks such as 2-3 hours and we my schedule multiple sessions over a few weeks). Send a calendar invite if you like.
  2. Connect: Using Skype or WhatsApp or whatever you like, call each other at the scheduled time.
  3. Set Norms: Agree on your working mode – you will only need to do this once. You will be working together on different things and not talking. You want to limit distraction to the other person, but still have them “in the room.” You need to make a decision on how you will be connected during the hour. With some friends for the work time we leave on our camera AND audio, with others we turn off the camera and leave on audio, and others we turn off audio and leave on the camera. You can decide what you like best with each person.  The idea is to stay connected for this hour and work in companionable silence, as much as possible. You won’t be getting up and down, or taking phone calls, or cleaning your desk. Your goal is to do deep work for an hour on a project of some kind at your computer with someone else, somewhere else, doing the same in real time on a different project.
  4. Share: At the begining of the hour, use the first couple of minutes to tell each other EXACTLY what you will do and accomplish for that hour (use your camera for this if possible). Try to be specific and realistic -how many pages will you review or write, etc.
  5. Time: Set your timer for an hour (I use my iphone timer).
  6. Work: Get to work together – with no talking, just a clicking of keys and/or a thoughtful face (I usually connect with skype on my phone and have it to the side in my peripheral vision).
  7. Report: When the timer goes off, you both stop. Each of you tells the other briefly what they accomplished. It is interesting to note how well you estimated the time it takes to do things. This is great practice – each time you do this you will become more accurate in your estimations.
  8. Break (and Repeat): If you will do multiple 60 minute sessions together in one block, take a 5 min break in between each and then repeat from Step 4 above.

It is amazing what you get done when you add that accountabilty component and know that someone else is “with you” working at the same time, even if they are 3,000 km away. It gives you the comfort of being with others working, as you would feel in an office, which can be a motivator to really settle into a task and focus, and it carves out a dedicated space to do that more creative and original work. It also helps you push past the delicious urge to procrastinate that you might get when you know that no one is watching over you.

I have found this simple system to be incredibly helpful and thought it might be useful for others too. Even when you can’t be physically in your office for whatever reason, with focusmate, where ever you are, you’re in the room where it happens.


(Note from Gillian: This is a very long, detailed, and rather geeky post. I write this as I have been asked a few times recently for “how to” information on how to set up these kinds of group work templates for virtual workshops.)

As we get more comfortable with getting work done collectively through No-Fly Workshops, innovations begin to emerge as we challenge ourselves with facilitation questions like, “How can we run this interactive activity virtually?” Rather than lowering our ambitions about what we can accomplish with an entirely or partially virtual group, we can take these as facilitation design parameters (similar to having to work with theatre format, or not knowing how many people will show up to your parallel side event) and come up with a design that is fit for purpose.

Everyone is now familiar with Google Docs, although perhaps less so Google Sheets (the Excel equivalent). These are both incredibly useful in virtual workshop contexts. Below are two ways to use them to support group work. I expand at the end into one application of Google Sheets that is perhaps less well-known, but very valuable in helping to solve a couple of familiar workshop issues around identifying key messages from group work and (too) long report backs. I provide detailed instructions at the end of this post for how to set up an Aggregator Google Sheet that collects highlights from different small groups’ work recorded on individual sheets, and automatically pulls them together into one summary sheet.

I start with two scenarios for how to capture and guide a group’s work with Google Docs/Sheets – 1) Co-writing a product document of some kind; and 2) Capturing ideas/answers to questions through small group work.

Preparation for both these scenarios:

  1. Decide on “permissions” in advance – can everyone or only some people edit the document (with others in read only)? If the group is small, you might give everyone the right to edit. If your group is larger and you will have smaller sub-groups working on sections, then pre-assign the small sub-groups and decide who will be the recorder/rapporteur for that group and give them editing permission. If you pre-assign groups and recorder, make a table that indicates which group people are in, and who is the recorder, and share that table in advance.
  2. Set up a “Back Chat Channel”: This could be a WhatsApp group for all participants, and if the Facilitator sets this up, you will also have all members connected to you in case you need to contact them individually during the workshop.
  3. Always write the exercise instructions on the Google Doc or Sheet. When people finally get into their part of the document or groups, they might very well have forgotten what they were supposed to do!


Scenario 1: One virtual group needs to collectively write a document or write parts of a document (e.g. a proposal, a strategic plan, a book chapter, etc.)

OutputA collectively written document.
Online documentGoogle Doc
PreparationIf you have the headings for the different sections of the document (e.g. table of contents), paste that into a new Google Doc. If you do not, then your first exercise might be to have a brainstorming about the section headings (you can also do this BEFORE the workshop). Number the sections.
Activity (small group – 8-10 people)
  • Provide people with the link to the google doc.
  • Slower approach: If you want to discuss collectively and write the sections all together in real time, then have one person type and the others contributing ideas. This becomes a plenary activity. This is slow and can get messy. Plus even with a small group, people will struggle to jump in if you have any louder people, so this can be boring for some people. This can still work with a small group that  knows one another well and has good group dynamics.
  • Faster approach: Assign people to the numbered sections (this can be based on competencies or randomly assigned – e.g. putting your writers in alphabetical order to assign them.) People will write on the same document at the same time, but only initially on their assigned section.
  • Step 1: Give people a set amount of time to write. It is better to write in chunks and check in with people periodically for questions or comments. You can send an announcement in the chat to provide a 10 minute “warning” and the end.
  • Step 2: Once people are done with their sections. You can start a new activity asking people to read and comment on the other sections. Assign a time, and give them a 10 minute warning just before it is up.
  • Step 3: After the commenting period is over. Ask people to go back to their original section and review the comments, taking them into consideration and making a next draft of their section. Have them highlight any comments or questions for which they might need more information.
  • Step 4: After the writing, open a plenary discussion that allows section writers to clarify any comments or questions that they didn’t understand or would value more input. If it is useful, after this clarification round, you can give the writers some more time to finalise their sections.
  • Step 5: Open a final plenary discussion about the experience, what is missing, or what is to be done. You can create a new google doc that has Next Actions, Responsible person(s) and a Timeline or Deadline section. You might need to iterate your document further, or involve more people. This can potentially be done asynchronously after the workshop.
  • Note: While people are working, they can stay connected to the main workshop platform (Zoom, GoToMeeting, Skype, etc.) but mute themselves and take off their camera while they are writing their sections or comments on others, coming back in for the plenary check-ins and discussions.
Activity (large group – over 10 people)
  • Follow the above activity sequencing, but create small sub-groups (assigned in advance) and have them work together on another platform (Skype, MS Teams, or use the breakout room function in Zoom, etc.)  so they can talk while they write. They are still using the same shared Google Doc and link. The sub-groups can decide if one person writes and the others talk. Note you need to allocate more time for this kind of group work. It takes more time when a group is working, versus one person writing alone.
  • People can still stay on the same platform and mute themselves while they are doing their sub-group writing.


Scenario 2: Small groups need to brainstorm and provide responses to a question or set of questions.

OutputIdeas and answers to a question or questions (this might also provide input into a strategy etc.)
Online documentGoogle Doc for each group OR a Google Sheet with one tab per sub-group.

How to choose? If you have a report back, it is a little fiddly to click through to different Google Doc links, especially if you have some people who are only connected through audio (e.g. dialed in through their phones) who are clicking through themselves following along. It is easier to have one Google Sheet with multiple tabs, and then people can just click tabs to see the results of the different groups’ work. This latter also has the advantage of keeping all the information in one place for ease of sharing and use later.

PreparationYour choice of a Google Doc or a Google Sheet also depends on what you are doing. If you have, for example, four groups working on a complex set of questions in parallel and you don’t necessarily need to share their detailed results with the others, then you could make 4 separate Google Docs. This could be more appropriate for longer and more involved group discussions.

If you have four small groups that are brainstorming or answering one or two questions, then you might want to set up a Google Sheet that has 4 tabs (each labelled with a different group name), and ask people to work on the same Sheet but on their designated tab.

Designate the groups in advance. If you want to let people choose their group, then ask them to choose in advance through email or a polling tool like survey monkey, etc. Make a table to share to ensure that people know which group they are going into, what document they will work on (link), and how they will convene in their smaller groups. This can be through the breakout group function of your platform, or you can set up skype, MS Teams or other channel.

Activity
  • In “Plenary”, announce the activity and remind people of their groups by sharing the table that lists the group members. Explain what they will be doing once they get into their groups, ask for any questions then.
  • Give people a way to contact you if they have any problems (e.g. through WhatsApp).
  • Tell people when they need to come back to the Plenary.
  • As a facilitator you can watch the Google Docs or Google Sheets fill up, and if one of the groups is not making progress, you can check in with people in their small groups through WhatsApp or other backchannel. Note you may need to refresh your browser as there might be a delay in updating the shared doc.
  • Report backs? After the designated time period, when people come back to the “plenary”, you can ask for a representative from each group to share some highlights and share their screen, or you can share your screen, or you can ask people to click through the document themselves.
  • This part can be very long! You need to time it (e.g. give each group 5 minutes) or come up with another way to limit what people say, particularly if it is not essential for everyone to know every little detail about another groups’ work! For a neat way to help groups synthesize their discussions, you can create an aggregator Google Sheet (see below).

Helping groups identify key messages and be concise in their report back – Creating an Aggregator Google Sheet

When people have their group’s entire results in front of them, reporting back can be very long and overly detailed. It is hard in real time for many people to synthesize on the spot, and they want to honour the whole discussion. This is the same for both a F2F workshop and a virtual one. In addition, sometimes people don’t care very much about the nitty gritty of another groups’ work; they just want to hear the key points. However, report backs are expected, they can be useful for making bigger picture observations, and can acknowledge and appreciate a group’s work. So it is hard to avoid them. But you can make them better!

In a F2F workshop, I might give a group a template to work on with the key questions, and at the end of their discussion another smaller template asking them to distill out 3 key messages or highlights from their group’s work. Then I ask them to report back using the highlights template, rather than their longer, group work artefact.

You can do this in virtual meetings as well. A ninja tip (as my Luc Hoffmann Institute colleague who created one recently called it) is to develop a Google Sheet that has an aggregator function. By this, I mean, on each group’s tab there is one space where the group can discuss their question and record their answer in length, and a separate place where they write in their 3 highlights or key messages. Anything written in this second spot is automatically aggregated on a separate tab on the Google Sheet labelled “Summary” or “Highlights”.

When the group then gets to the report back part, you display the Summary tab’s sheet and that is all they and the other groups see. This Summary sheet gives you an overview of responses from all the groups, supporting a more focused and concise report back, as well as any subsequent observations for pattern spotting.

With this type of Sheet, as the organizer, you now get a write up of the longer discussion as recorded by the group on their designated tab, as well as their highlights on a separate one. Now you don’t have to wade through a lot of information to find key messages from the whole exercise.

Making this kind Google Sheet is very easy but takes some knowledge of Excel. For those who are whizz’s at Excel you might already know how to do this and be happy that it is similar in Google Sheets. If not, here is a description to follow below:


Setting up your Aggregator Google Sheet

First set up your Google Sheet with your “Group” tabs and a separate tab for the “Summary” (see below). Note that you need to have a one-word name for each sheet with no spaces. E.g. instead of “Group 1” you need to call it “Group1”.

Note: You can make the Sheets on the separate tabs as pretty or as plain as you like – this is a template, you can be creative! Below I changed font colour and font size for the title, put borders around my question and answer area, and highlighted the aggregated cell/line so it was easy to see. For each separate sheet, write in the group name again at the top, the question, as well as instructions for group work. (click on the image below to enlarge)


Next you will set up your aggregator page. Go to your Summary tab, here you need to enter a few simple formulas so that this sheet pulls the answers from the other sheets automatically (same as in Excel) (click on the image below to enlarge):


For this, you need to:

  1. Click on the cell in the SUMMARY sheet where you want the highlights to show up (e.g. the cell under Group 1).
  2. Type “=”
  3. Now go back to the sheet from where you want to draw the information and click on the cell where that information will be written (e.g. the “Highlights” cell)
  4. Press RETURN (it will automatically take you back to the SUMMARY sheet). Now your formula is there that links the key cells from the two sheets (SUMMARY and GROUP1)

Now when you go back to the SUMMARY sheet, you see the following formula in the cell under Group 1 as follows: =Group1!A2  (A2 is the cell you connected to on the Group 1 sheet)

  1. Repeat for the other group tabs until you have all the highlights connected with the SUMMARY sheet. Now in subsequent cells you have =Group2!A2   =Group3A2, etc.

You will see how easy this is once you try it. What you get in the end will be a helpful support to your virtual group work, making reporting back more efficient, pattern spotting easier, and giving you concrete outputs to work with in the next steps of your No-Fly Workshop. (And please feel free to add additional ideas on how to use them in virtual workshops in the comments section below.)


No-Fly Workshops are becoming increasingly popular as people become more sensitive to carbon emissions from air travel, respond to budget freezes or higher scrutiny of trips and travel, and try to profit from the time savings afforded by avoiding long flights or trips to meetings.

We know that face-to-face (F2F) meetings are good for social capital and relationship building, and can be important for achieving soft outcomes from group identity creation to shared ownership of a great collective result. But after relationships have been built, what are the options for teams or partnerships that have work to do, but also want to benefit from all these environmental, economic and personal productivity savings?

I recently had the great pleasure to work with a tri-continental team on a strategic consultation exercise during which: a) The whole team needed to share an understanding of future organizational objectives; b) Team members in different constellations needed to work together to generate key inputs; and c) These inputs needed to be shared with the whole group for further validation and value-adding discussion so that the process could go forward to the next step with everyone’s support.

This workshop would have taken a day or more to accomplish the stated goals. To execute in F2F format, it would also have produced over 20.5 tonnes of carbon from the air travel it would have needed to convene the team in one place, not to mention cost many thousands of USD in travel costs, and implied days of travel time for team members in other parts of the world – in this case, Europe and Latin America. We had bigger groups in two of the organization’s offices, and a few individuals joining from other locations.

In the end, the following virtual format was used:

  1. Four, 2-hour online workshops were held starting from 09:00 EST/14:00 GMT/15:00 CET and ending at 11:00 EST/16:00 GMT/17:00 CET. These were scheduled over an 8-day period, with gaps of a few days in between the first three calls (which helped with collecting feedback from those participating and tweaking the meeting process).
  2. Go-to-Meeting was the platform that we used for plenary discussions. MSTeams was used for small group work. The largest group always stayed in the Go-to-Meeting space, keeping that open for the duration of the workshop.
  3. A Google doc was designed to help small groups capture the outputs of the breakout discussions for each of the days (each day had a different theme), with one tab for each breakout group (labelled with the group name) created for each day. The questions to be answered through the group work on the different sheets were the same for each group in this case, although the groups could modify the questions and the framework for responding.
  4. A Word doc was sent to all participants in advance of each of the online workshops with the link to the Google doc for that session, a reminder of the Group topics, and the list of members for each group. Instructions as to whether the group would move to another room, or stay in the main room were included.

The first of the 2-hour sessions was somewhat of a pilot. We spent that session entirely in plenary using a Mindmeister mind map to capture the outputs of the plenary discussion. However, we quickly understood that we needed some further discussion on the overall framework and rationale for the exercise, so some time was devoted to a presentation during the next scheduled staff meeting. This happened to fall between Workshop 1 and 2, and had a more traditional online presentation format with a Q&A afterwards.  After that, as we were 14 people and wanted to have as much time as possible for individual contributions, we decided that small group work would be more effecient at least for part of each workshop. Therefore, for calls 2, 3 and 4, we used the following design:

  • Plenary opening (in the Go-to-Meeting space):  Welcome and reminder of the purpose of the 2-hour session, overview of the group composition and topic areas for this day, instructions for the group work, and the time to reconvene in the Go-to-Meeting space. (10 min)
  • Small group work: The largest group stayed in the main virtual meeting space. Some other people physically moved rooms if they were with one of the two larger groups in one of the offices.    Those people not in the larger group muted their microphones and turned off their cameras in Go-to-Meeting, and went onto the other platform for their small group calls (MSTeams in this case, but this could also be Skype or another). All the groups connected to the one google doc, and used their appropriate group tab to discuss and answer questions and capture notes. Each group designated a facilitator, as well as a rapporteur who would capture the discussion on the Google doc. In the bigger group, the external facilitator (in this case, me) stayed with that group and supported facilitation as needed and helped keep track of time. Some groups found that people had already included some ideas on their Google doc – this was because the Word document with the links had been sent in advance, and those who could have contributed to more than one thematic discussion encouraged to add some of their ideas in advance, with their initials.   (45-50 min)
  • Plenary exchange: After the parallel work, the groups reconvened in the Go-to-Meeting space to share the results of their discussions. For this plenary discussion, we used the “record” option for Go-to-Meeting, so that the discussion could be referred back to later. For the plenary exchange, we each clicked on the appropriate tab of the google doc to follow along as one team member shared their discussion. After each report, we took questions and comments, and added any additional thoughts to the template. As the plenary group was large, people also had the option to add comments and ideas to the google doc individually and noted their initials, so that we could get back to them if there were questions about what they added. This way it was not necessary for everyone to share in plenary – some could, and others could add their ideas in writing directly onto the Google doc.  (55 min)
  • Closing and Next steps: We had a little time at the end to take some closing comments from the host, and to talk about the objectives of the next call/the next steps in the process. We noted that the Google docs for each of the workshops were live and that people could also add ideas afterwards, again including their initials. (5 min)

This process got smoother and smoother, as people got used to the technology. We also tried a few different ways of recording the results of the small group discussions. Initially we let groups that went “off piste”  record the notes of the discussion outside the templates. But we eventually decided that it was better for people to use the templates, and answer the questions (bearing in mind that they could tweak the questions) for more task precision. We definitely saw the benefit of using this format a number of times over a few days – practice helped!

From the Facilitator’s perspective, I took some notes for myself that I wanted to share – I will want to use these the next time I facilitate a No-Fly workshop:

Before: Design
  • Design needs to be taken seriously by both the Facilitator and the hosting organization. It is tempting to think that this is like the conference calls of yore, when you just ask a question and (some) people talk. You will go miles further with a more complex design, a good discussion capture tool, and the technology and groupings decisions made in advance, written down and shared with all participating. Make an agenda just like you would with a F2F workshop, with timing to keep you on track.
  • Two hours is really the longest you can keep people’s attention online, and moving into groups keeps people engaged for that period. If you stayed in plenary the whole time you would need a break in the middle, and even with the break, two-hours in plenary would still be taxing, and guarantee a bit of attention drift for even the most committed participants.
  • All the discussion supports need to be made in advance, the Google doc, the instructions sheet (with links and groupings). This can be sent to people in advance so they can review them and have them handy.
  • Don’t make the templates too complex, and include the group work instructions at the top so that once people are separated from you in their small groups they won’t spend a lot of time trying to remember what it was they were supposed to be doing.
  • Build in extra time for some initial technical difficulties. As you will normally be using the platform that the team uses, someone from the team will likely be the adminstrator/convener of the session.  Know who your technical support person is – that is the person in the team who always knows how the technology works (in my experience, there is one in every team and probably one of the younger team members!)
During the Workshop
  • Remember that as the facilitator, your video camera will be on the whole time. People will be looking at you the whole time (in the breakouts you will stay with the big group, camera on, with your smiling face!) So think about that. Movements that you will make will be distracting, every turn of your head will be noticed, your facial expressions, your yawn, and everything else. If you are a fidgiter, you might want a stress ball nearby, as well as your water glass, your notes, your phone (on silent), your watch (also on silent), etc. all in your immediate reach so that your head is not bobbing in and out of the camera frame as discussions ensue.
  • As the facilitator in a virtual workshop, it becomes pretty obvious when you are doing something else. You can’t stand at the back of the room and take a break while people are watching the speaker. And to make matters worse (or more obvious), if you have glasses, the reflection in your glasses will show what is on your computer screen (this is the same for individual participants in front of their computers too). You are there to pay attention, support the group and deeply listen (if you are not trouble shooting or taking notes, or trying to find a participant, etc.)  – two hours is a long time!
  • Look behind you. I wrote a whole blog post about this: Look Behind You – it’s funny that I wrote this post 10 years ago, so the technology we were using is long gone, but the tips on how to manage your environment for an online workshop still apply.
  • Check your own  technology. I used a wired headset, as over a couple of hours (and as the facilitator I connected 30 minutes before the 2-hour call, so my online time was longer), my earpods can run out of battery if I’m not careful.  Also, if I have an option, I don’t rely on wifi for my connection, and have a wired cable, just to avoid any ups and downs in the wifi. You need to judge the reliability of your work environment.
  • Create your “cockpit”: I facilitated all of these workshops standing, using my standing desk. On this I have a large additional screen on which I displayed the Google doc and instructions. Beside this was my laptop with my webcam, as well as showing the webcams of all the other participants. I needed to be looking most of the time at my webcam, and still following the other documents, so they had to be in my line of sight. The workshop agenda I had in hardcopy and it was there that I took my facilitation notes by hand during the call. I had my phone on a stand-up charger just by my laptop so I could also see the skype chat (and WhatsApp). My “cockpit” had three screens of differing sizes and all my documents open or at hand.
  • Set up a communication means with the organizer. I used Skype to call and chat with my counterpart, but on reflection, during the workshop it would have been handy to have two WhatsApp groups available – one with the whole group to remind them about timing (e.g. when to come back from breakouts) and to see where people were (if someone didn’t come back, you could message them), and one WhatsApp with the main organizer so that you could ask bilateral questions, or check things as people were talking.
  • Remind people while they are speaking to speak slowly, and to pause from time to time. Similar to your role as facilitator in F2F environments, you will be helping other people jump in, so it is important that people not talk for too long. There seems to be even more of a barrier to entry for people to jump into a conversation virtually and it is harder for them to make eye contact or use the body language that they might employ in an in-person workshop to signal to the speaker that they want to get into the discussion. You will spend more time helping people contribute in this virtual environment.
  • All of the issues that would emerge in a F2F workshop will also emerge here and potentially affect people’s willingness to contribute. Whether it is trust, transparency, confidence, hierarchy – everything you as the facilitator may be keeping an eye on in an in-person workshop, you will need to keep an eye on in a virtual environment as well. Having methodologies that allow people to contribute without always speaking in plenary  – for example, using the google doc, allowing people to contribute asynchonously before and after, or even during the workshop,  in writing, etc. all these can help to manage some of these very human dimensions of collaborative work.
After: Feedback
  • It is incredibly useful after each of the workshops to have a debriefing call with the organizer to talk through what worked and what could be different next time. That helps continually modify the agenda.
  • It is also important to let all the participants know that they can send through observations on the process and suggestions, to you bilaterally, or to the organizers. Again this helps with adjusting the process.
  • I also used 10 minutes at the end of one of the early calls for people to write in their thoughts about “What worked” and “What could be different next time” on the side of the Google doc. In real time I wrote those two headings and asked people to take a moment to provide some quick feedback in real time. It just took a couple of minutes and everyone who had a reflection could contribute it without noting their name.

No-Fly Workshops have been around for a while, and they are certainly not going away. More and more people are considering this option for getting work done within distributed teams and networks, to cut carbon, costs and time. As technology advances, and our organizations invest in better platforms, so too do our motivations to learn how to use them more effeciently to get our collaborative work done.  Similar to sharing facilitation and design tips, as Facilitators, let’s try to share more and more of our “how to’s ” for these No-Fly workshops, as without all that flying around, we should have more time to do so!

I used some of the precious end-of-year calm to reflect on our work over the last 10 years, and look forward to the new decade. What had we done? Practically speaking, I created a spreadsheet of all the Bright Green Learning projects that we have undertaken between 2009  and 2019 – projects of all types, from designing Training-of-Trainers workshops for Disaster Risk Reduction trainers, through a strategic review of an organization-wide capacity development programme in a large sustainable development organization, Public Private Development Partnership learning products developed for a UN agency, to facilitation design and delivery for a broad range of co-creation workshops, and on and on. We had undertaken 351 projects in all!

It was a wonderful exercise to look back and remember those projects, the different types, outcomes and outputs, the organizations we had the pleasure to work with, and all that we learned.  In my spreadsheet, I also specifically indicated WHERE we learned it, that is, I had fields that captured the region and the country where we had travelled to do this work. My motivation for collecting this specific additional data was to ascertain how many flights we had taken, and, ultimately, approximately how much carbon we emitted by flying to undertake these projects over the 10 years.

Calculating Your Carbon Emissions

This final step was a big job, and it took me some time to pull all the data together. Here is how I did it, in case it inspires others in a similar direction:

Step 1: On my aggregated project spreadsheet, I identified all the projects that involved flights (thus I did not include projects where we took the train or other ground transport) – I focused this exercise on carbon emitted from air travel. We had together taken 123 flights in the last 10 years.

Step 2: I divided all the flights taken into the four ranges that they use on the transport tab of the UN Carbon Offset Platform, that is:

  • Very Long Range: Over 12,000 km or over 14 hours of travel
  • Long range: Between 6,000 km and 12,000 km or between 8-14 hours
  • Medium range: Between 3,000 km and 6,000 km, or between 6 and 8 hours
  • Short range: Under 3,000 km or under 6 hours of travel

In order to calculate the flight times/distances, I used an online flight time calculator to get the figures from our home base of Geneva, Switzerland.

What I found was that the majority of our flights were short range (UK, Sweden, Jordan, Armenia, etc.), but still, nearly a third were long range flights (Tanzania, Japan, Singapore, Mexico, etc). If a country/city was at the upper limit of a range, I moved it into the higher range.

Step 3: For each of the ranges, I allocated a rough average of tons of CO2. I did this generously, using the upper ranges for the sample flights that I plugged into two flight carbon footprint calculators.  Note that I didn’t use the calculators to determine an overall carbon footprint, I used the flight components to establish a CO2 emission figure for each of my four ranges. I used two to cross check the figures – Fly Green and Flight Carbon Footprint Calculator (by Carbon Footprint).  I used these sites to attribute a figure to each of my ranges. (Note that they both also offer offset services.)

I ended up with the following tons of carbon for round trip flights in each of these ranges:

  • Very Long Range: 4 Tons
  • Long Range: 2.5 Tons
  • Medium Range: 1.5 Tons
  • Short Range: 0.5 Tons

Step 4: I did the math, multiplying the number of flights by the tons of CO2 emitted per flight. I came up with 152.5 Tons in total. This is the figure that I wanted to offset retroactively for flights taken in the last 10 years. I also wanted to take the yearly average and project into the future for a few years.

Choosing an Offset

Of course, it is one thing to calculate the carbon that you want to offset from air travel, and quite another thing to decide HOW to do the offset. This is a source of huge debate in practically any related community you ask. I asked my trusted network of sustainability and systems practitioners what they would do…

Boom. The first immediate responses were reactions to the whole notion of offsetting, likening carbon offsetting to a modern version of religious indulgences – where you can pay for forgiveness. That we should not have the delusion that you can “undo” carbon emissions, and carbon taxes were mentioned.

There was a lot of skepticism about carbon offsetting programmes, and that some of these programmes ignore wider local social, economic/ownership and ecological contexts and can cause more harm than good.  Someone shared an article about the rise of “numerical environmentalism” and the perceived movement towards “calculative rationality displacing other ways of knowing and interacting with nature” (T. Smith, 2019).  The method of measurement was critiqued, the fast pace of life, the other excesses we should also be offsetting. Ultimately, we should not fly.

Acknowledging that this is an imperfect exercise, but that we don’t want to “do nothing” about this issue, Lizzie and I decided on a two-pronged approach going foward:

First, we will make a concerted effort to fly less and take at least the following three actions to support this:

  • Collaborating with Local Associates: We have been successful in some of our projects to structure them differently – we do the design work for a facilitated workshop or training course virtually and then pass on delivery to our network of international Associates. For example, last year I had the pleasure to collaborate on a workshop in Ghana with my facilitator/trainer friend based in Accra. Lizzie worked on an important stakeholder consultation in Dar Es Salaam which was then facilitated by one of our Associates in Uganda, who was much closer than we were to the event.
  • Increase Virtual Work: We can also continue to seek virtual opportunities. Over the last years, we have been conducting most of our design and preparatory work virtually, sometimes only meeting our counterpart in person on the day of the workshop or event. We have also been helping to design and run virtual consultations, such as the four, 2-hour team consultations I am working on now with a distributed tri-continental team. Another option is blended consultations. Last week I had a career first, when more of the participants were virtual (15) than in the room (10). If I am there in person, that doesn’t do as much to lower my carbon, but over the entire workshop, it contributes greatly to the footprint of the whole event. These are different kinds of workshop all together and demand some new tools, flexing skills, technical facility with some of the most popular platforms and often technical support.
  • Continue Capacity Development: We will continue to build and support facilitation and training capacity in organizations and individuals who work in our community. The more these important leadership skills are embedded, the less need there will be for external support. Yes, we will keep trying to put ourselves out of a job. Of course, there are some contexts in which you want external support, and these we will gladly undertake. And at the same time, we will also work with organizations who want to build these skills, offer support and coaching to those who want to implement them in their organizations, and work with local and in-house facilitators on design elements of their work.

Second, we will go ahead and make a lump sum historical offset of our 152.5 tons, and pay it forward for the next few years, based on current averages.  As controversial as that might be to some, we didn’t want to do nothing about our past air travel. One network colleague pointed out the risks of offsetting historical emissions for future gains. She thoughtfully cited two main reasons: 1) There is a lot of uncertainty in this business. Whereas, the emissions are real/have happened, the future offsets are hopeful. We hope the trees get planted/cookstoves are distributed, and if they are, we hope they’re used properly for the amount of time for which the offset is calculated. In other words, you might not be getting exactly what you calculated for the offset, to cover the real CO2 emitted. 2) The feedback effects of the extra CO2 in the atmosphere have a cumulative effect, contributing to climate tipping points etc. We can’t know what else those past emissions actually contributed to, between when we emitted them and now in 2020, when we are calculating our offset. Of course, I can round up, make conservative estimates and add more at the end, but this may not cover this; we just don’t know. But in light of this uncertainty, and with the other option of doing nothing, we still decided to go ahead with our plan, and also to “pay it forward” as she suggested (more on this later).

In seeking the way forward, and of course there are many options, we decided to select a carbon offset that meets, at the minimum, the Gold Standard criteria of doing no other (non-carbon harm), and which has some additional benefits.

We ultimately decided to support a programme that is providing fuel efficient biomass cookstoves to refugees in humanitarian camps. The cookstoves, called Berkeley-Darfur Stoves (BDS), are being distributed in refugee camps in Africa by the non-profit organization Potential Energy, based in Uganda, with over 50,000 BDS stoves already in place. We chose this because it fits our values, because of the extensive work that has gone into understanding the offset value, and the fact that one of the co-founders is a trusted network member of mine.

We needed to understand the offset value to calculate how many stoves we wanted to buy.  Certified by independent third-party tests carried out in Darfur, each BDS stove offsets 2 tons of emissions annually, with a total of 10 tons offset over the 5-year life of the stove. For more information, the lifecycle analysis of the Berkeley-Darfur Stove is described in a 2016 academic article in the journal Development Engineering, “Avoided emissions of a fuel-efficient biomass cookstove dwarf embodied emissions” (D.L. Wilson, et al., 2016).

Each cookstove costs 40 USD, which covers the cost of the stove, as well as monitoring and other costs for Potential Energy. Donations for the equivalent cost of the stoves are made through their website.

To contribute to covering the historical emissions, we bought 16 stoves. And, as our historical average carbon emissions from air travel is 15.5 tons/year, I am going to offset our travel at current levels for 3 years into the future, with the knowledge that we aim to reduce this annually.

16 stoves (2009 – 2019)

5 stoves (2020 – 2023)

_______________

21 BDS stoves

I will keep the calculations for our flights annually as described above, and if we are off our annual average for some reason, I will adjust accordingly.  But our goal is to reduce our yearly flying time overall.

This is complex, and no doubt will provoke debate, but the alternative of doing nothing didn’t sit well with us, and we feel we have found a good solution for now. We will keep tabs on the debate and be flexible about how we go about this. Ultimately, we are committed to cutting down on our carbon emissions from flying. I wanted to share our process in some detail to encourage others to think this through and take some practical action, whatever that may be for you.


The day before our recent 130 person, 3-day multi-stakeholder workshop, we were excited to learn that not one, but three VIPs would attend our opening session – two ambassadors and a minister! This was great news in terms of national visibility for the event, demonstrated buy-in on our topic, and support for follow-up on the outcomes. In addition to these benefits, such situations also give organizers and facilitators the opportunity to pull out their VIP checklists. What’s on yours?

Here’s what was on mine: Press, Protocol, People and Programming.

Press 

With VIPs come Press, cameras, lighting, cables, microphones and all the people holding them – which interestingly don’t have the same feature of transparency that they hope their news promotes. Is there a dedicated place for Press so they aren’t blocking everything?  Can you leave a front table free and reserved for “Press”? Or can you make plans for one of those many cameras to be projecting your VIP speaker on a screen so that the people in the audience can see the speaker and not just hear her?

In addition to potentially significantly restricting views, Press will also come and go at will. Think about their movements. Is there a side entrance they can use? A safe place for their gear? Can you brief them in advance as to where they should stand and set up?

With VIPs come Press, that’s a fact of life, and as a facilitator you can acknowledge them and ask your group to pause for a moment if need be to let them set up and do their work, so their movement isn’t disrupting you, the previous speaker(s) and activities, or absolutely everything.

Protocol

Involving VIPs comes with other implications – in particular protocol about speaking order, which is one way unknowing hosts and facilitators can accidentally put their foot in it. This can be different country-by-country and even sector-by-sector. If you have an international set of VIP speakers, you might run into this confusing mix of protocols. However, go with where you are – most will defer to the host country in case there is any discrepancy in norms between who goes first and who goes last, for example. In some countries, the most important ranking official goes first, and in other countries, this person always has the last word. Don’t make any assumptions here, get advice!

Not only speaking order, but official titles can also be sensitive. Whether it is the honorific, or the longest possible form of the Ministry or High Commission’s official name, you need to get this just right both in the programme and orally when introducing them. Name cards or “Table tents” for the speakers can be very helpful in this case. If you don’t have them and if you are not local, or have less than 200% confidence that you have exactly the right information, invite the local host to introduce them, to make sure that everything that needs to be said about them is said in their speaker introductions, following the right order. This is protocol, respect and also – oh, yes, remember the Press? – this is all being recorded for posterity.

Almost always, the VIPs will want to see the speaking list BEFORE they come, which is good, because correcting a speaking order or an official title has caused many a hurried agenda reprint in the past, and you don’t want this to hold up things or take up all your time (especially in hotels where printing big numbers can be a major roadblock).

VIPs’ packed schedules also can mean uncertain arrivals, with minute-by-minute SMS updates from aides about traffic and ETAs, necessitating one dedicated point of contact on your team standing by, phone in hand. Even before your VIP arrives, there is the need to communicate and check all these important elements with necessary briefings which also must fit into the VIP’s crowded timetable and thus might literally happen outside your workshop door while participants await your guest(s). And there can be LOTS of people waiting for them…

People

Legions of followers are another feature of welcoming VIPs, swelling your ranks for the opening session and providing big numbers for room size and catering (and the group photo if you take it quickly enough!) But these people normally disappear at the coffee break, leaving many half-empty tables and seats, and your room feeling a bit barren. You want to welcome them, and at the same time, keep your core participants together. Can you have a couple of rows of empty chairs at the side, back or front, to seat these guests and then remove them at the break? This is often not 5 or 10 chairs which you could easily stack in the corner by yourself during coffee, but can be more like 30 or 50, so alert the hotel conference staff in advance about this to get help. Remember to bring these chairs back in for your closing, particularly if there is a high-level element, as there often is when you start with one.

The organizers might also offer an opportunity in the registration process for people to indicate if they are coming only to the opening/closing, or staying the whole time, so that you can adjust your participant count numbers accordingly – not printing too many worksheets, or job aids, and adjusting catering for the rest of the workshop. Sometimes the numbers of this category of participant, coming to support and hear from the VIPs, is surprisingly large and can make a big difference to, and impact on, different aspects of your workshop.

Programming

Taken together, this means that your programme and facilitation design needs to be highly flexible, not too tight and rigid. You can still have your timing planned out and a logical sequence. But you need a firm Plan B, particularly for delays (from short to really long) or even last-minute changes or no shows.  Do you have some blank name plates and an appropriate black marker that you can use to quickly write in a new name? Do you have an activity that can be done with the group while they wait? For example, can you “officially” schedule table introductions for just after the high-level opening, and then move them up if your VIPs are VLPs (Very Late People). Can you have a discussion/ reflection question ready? One that can develop into a rich conversation or be cut off quickly and picked up later when the door swings opens and the security and aides walk in, to a hail of flash bulbs, preceding your much-anticipated speakers?

VIP participants can influence your workshop, meeting or conference in many useful and distinctive ways, don’t let them also be unexpected!

I recently had a conversation with a new collaborator where I needed to say that I communicate primarily by email and scheduled phone calls. The person at the other end said, “Well, I just pick up the phone, you might need to adapt to that.”

When I’m running workshops or giving a training course I‘m understandably not available to take a call, but I don’t do these activities all the time. That’s a special situation, but there have been a number of occasions when I was working in my office and I still didn’t pick up the phone. Why?

As a knowledge worker in the gig economy, my workday has its necessary project management components, email, appointment setting, briefing or catch up meetings, travel arrangements, etc. These are shallow tasks that don’t take a lot of concentration or focus. Some days are all that, but those I would say are not my best days and thankfully not the majority.

Mostly what people engage me to do, is what Professor Cal Newport calls “Deep Work,” which are new things that I need to create in focused and concentrated blocks of time. These things might include a design for a complex 4-day multi-stakeholder workshop that produces a set of validated guidelines or a collaborative project; or a new approach for a leadership training course that meets the learning needs of a demanding set of corporate sustainability leaders; or a thoughtful piece of writing that concisely draws out the key learning from 50 hours of expert interviews; or a chapter of a book.

These are things I cannot do in small slices of time around email and phone calls. They take longer blocks of concentrated, uninterrupted time. This is what people engage me to do, including this new collaborator.

Taking an unexpected phone call breaks a train of thought and propels you out of your Deep Work. It doesn’t do this perfectly or completely, however. As Professor Sophie Leroy’s research at the University of Minnesota shows, the Deep Work that you were so focused on leaves “attention residue” which will also affect your conversation with the phone caller. If I were to take that spontaneous phone call, some of my attention would still be on the Deep Work task that I was doing when I was interrupted, so the caller is not getting my full attention on the phone. Both projects now have suffered.

To avoid this, I will continue to protect my scheduled blocks of Deep Work which is so vital to my productivity and the quality of my outputs. This ability to do Deep Work also greatly contributes to the pleasure that I find in adding value to important initiatives, and ultimately shapes my reputation as a knowledge worker in a crowded global marketplace.

You can send me an email request to talk and I will schedule a call with you, and then be very happy to protect my time to deeply work with you.

Some of us are coming up to our first major break of the year, after a busy flurry of January, February and March. The nice long spring break, when email slows down a little and our work obligations are put on temporary hold with our out-of-office messages, creates a welcome breathing space which encourages us to reflect on what has happened so far and what we might want to strengthen or do differently in the coming months to make 2019 overall a productive year.

First of all, how are your New Year’s Resolutions going? It’s April! Whether you believe in New Year Resolutions or are someone who just thinks about the “clean slate” that a new year provides, you might ask yourself how its going. Are you successfully doing-it-yourself or do you need to get some help?

I have been enjoying reading Marshall Goldsmith’s book Triggers: Creating Behavior That Lasts – Becoming the Person You Want to Be which offers some easy-to-implement tools for behavior change including Daily Questions. These are questions that you create and ask yourself every day. To get started he has a set of interesting initial questions (e.g. Did I do my best to set clear goals?) and advocates using the “Did I do my best….” stem for each question rather than asking yourself how well you performed so that you are measuring effort rather than performance. Doing this daily helps keep your goals – the most important things you want to engrain as habits – front of mind, and helps you see trends. Although you can set up an accountability “buddy” for this process (and of course there’s always an app), you can effectively do this yourself.

Another way to go about this is to get some help. This might include engaging a coach – peer (e.g. in your workplace) or external. If getting a coach sounds good, its helpful before you start to think through your motivations for engaging outside support and your own commitment level to the doing the work that comes along with it (yes, this too involves work!)

Here are some considerations we can offer from our experience with coaching that might help think through what’s best:

    • Start with your own reflection about the coaching process: It is tempting to think mostly about what you want to change about your behavior – be a better team leader, manage your time or productivity more effectively etc. – but don’t forget to think about the coaching process itself. Ask yourself some questions about this such as: What individual challenges will I face in this coaching process? What should my coach know about me as a partner in the coaching process? How will I embed this coaching process into my current work (both the sessions and the practice)? Write this down somewhere.
    • Prepare to work outside the coaching sessions: For coaching to be most effective, you will need to do some work in between the coaching sessions and you will need to agree with your coach what you will do and honour your commitments to yourself. This work might include reflections on past behaviours, observations in situ, testing new tools or approaches, videoing a demonstration, etc. This takes us back to question 1 – are you already over committed? Will you have time to focus on this?
    • You will be getting some feedback, is that ok? As a part of the coaching, there will be some diagnostic elements, this might come from you, your coach or others (for example 360 degree feedback). As you try things, you will also get feedback. The questions asked to you can be highly appreciative and based on what is working and what you could be doing differently, and still, this might challenge in unexpected ways your current paradigm of yourself in your workplace. Your coach will work to create a safe environment, and still, think about this – will it be ok? Prepare to share some of your thinking about how you respond to feedback with your coach and what you might want/need to make sure this is effective.
    • Things will be changing, so write things down: In coaching processes, many things are changing simultaneously. You will be trying new approaches, as a result your external environment might change, and therefore what you need to do next in your coaching might change. This can be a very dynamic process, and probably not linear. Even with a good outline for your coaching process, the process needs to be responsive to your needs and in the end might look very different to what you or even your coach expected. This also depends on the period of time over which you have your coaching – if it is a longer period then it is more likely that this change will occur. How and where will you record your thinking, new ideas, and plans? Your coach might give you a manual or journal, or you might set up one of your own. It is helpful to try to keep things in one place so that you can look back at the changes, and see the trends. A blank book can work, but you might also consider making yourself some templates that you can use in all situations. These could ask questions like: What exercise did we do this week? What did I get from this/what were the key points? What will I do for my homework? When will I do this? Your coach might keep a similar record and use that to engage with you. It’s worth writing things down as these processes often produce subtle changes that are hard to pick out and remember in the sometimes deafening thrum of our daily work.

Whether you do-it-yourself or engage a coach, both have the potential to be incredibly instrumental for helping you make the changes you want to see in the future. Both do take effort on your part and at the same time aim to ultimately make things better, more effective, and more enjoyable. As you take your first steps up this ladder of change, looking out at the rest of your year, keep the vision firmly in mind of this next version of you!


No matter what your financial or calendar year looks like, there’s always time for planning!  Woo hoo! What are we going to do next year?

You certainly have some options – you could do it strategically or unstrategically.

What exactly is unstrategic planning? Here’s how you might go about doing that…

  1. No big picture thinking needed: Don’t bother to think about the bigger context of your programme, project or process. Imagine that you are operating in your own little bubble, safe and sound, and that you have complete control over everything.
  2. The future starts today: The past is messy! Thankfully, you don’t need to think about anything that came before. Try really hard not to be bogged down by learning from the past, what worked or what you might do differently in the future. Imagine your process is a white board and that everything starts from today!
  3. Do-it-Yourself: It is hard to coordinate everyone’s schedules, so just do the planning yourself, or with anyone available. No need to bring in the people that your plan might affect or consider what they would like or think about it. Just consider what you want to do. You can always check in with them later while the plan is being implemented. They will understand!
  4. Time is precious: Anyways, people are super busy, so make sure it is nice and short – something you can do in a couple of hours max. People can’t devote too much time to this as they need to go back to whatever they were doing that was not related to last year’s unstrategic plan.
  5. Capacities can expand: You don’t need to consider the capacities of the people that will implement the plan, or whether they have time to implement the new ideas. They are great people and they will find the time!
  6. Talking and planning: In your planning session, don’t bother to write things down, you’ll all remember what was discussed! And no need to have a time plan, or milestones (things will happen when they happen). If you do want to write a little report, sit on it for a few weeks, then people won’t remember what was discussed leaving you a little wiggle room for tweaks…no one is going to read it anyways!
  7. If we plan it, funds will come: You don’t need to gather information in advance about budget, or need to know how much is available. Actually you don’t even need to talk about budget. If you want something enough, funds will show up.
  8. Risks, shmisks: No need to talk about risks or Plan B, C or D. These plans are basically thought exercises anyways, right?

These are some of things that can make your planning unstrategic. Of course if you want your planning to be strategic, do the opposite!

  • Do think about the bigger system in which your project or programme is embedded.
  • Try to learn from what has happened before – what worked and what didn’t and use that to inform your next plan.
  • Make sure all the right people are in the room and make sure anyone not in the room has been consulted if you planning will implicate them.
  • Strategic planning takes time, you can’t rush it. A day or even two days might be the appropriate time to get through all the steps thoughtfully, comfortably, with creativity and enough discussion for agreement.
  • Consider the capacities of the team members implementing this, how does it fit into their current work, will it be a part of their work plans? Reflected in their performance assessments?
  • Make sure you document the process and make it available immediately (a google doc perhaps?)
  • Make sure to include time plans, realistic budgets and roles and responsibilities so when you are not in the room together everyone knows what to do.
  • Have a conversation about risks – what might be the risks to implementing the plan and how might you mitigate those?

What more would you add here?

Unstrategic planning is relatively easy. Thankfully this is an alternate universe to ours. We all understand how important it is to make sure our planning is strategic and that it sets us up on the best possible trajectory for the highly anticipated new year ahead.

So Happy Strategic Planning and hoping your year is full of exciting, well-planned initiatives and activities!!

I just finished From Ideas to Action: Bring ideas to life through Ideation and Prototyping – my first of two courses with IDEO U for the IDEO Foundations in Design Thinking Certificate.

The final project for this online course, run over 5 weeks with hundreds of participants from all over the world, was to create a pitch for a product or process that you had worked on through the Design Thinking steps of ideation, rapid prototyping, and iteration – and to reflect on your learning.

We use elements of Design Thinking (DT) in our Bright Green Learning work regularly, from different visual brainstorming techniques (lots of cards and post-its), to prototyping ideas through approaches such as the  LEGO Serious Play method (see my blog post What’s in a Brick? Using LEGO® for Serious Stuff“) and drawing/storyboarding, so I was eager to follow the IDEO Design Thinking courses to get additional ideas and tools, and a vision of their whole DT process.

I found the course to be excellent, video- and assignment-based, with ample feedback from other participants (built into the course requirements). I did get some useful new tools and a better understanding of the elements of each step. And some of the most profound insights came by observing and reflecting on myself in my role as a facilitator in these human-centred processes.

One big aha was to step out of my own way!

What I noticed? For the most innovative ideas to be generated, I needed to pay attention to some very subtle constraints that I might be putting on the process myself!  This is not the grumbly participant who doesn’t want to draw, the person on their phone all the time, or the person who already has the best idea and is completely certain of that. No, these constraints take the form of unecessary parameters that I build into the process that are based on my own mental model of how things should roll out to get results. These very subtle decisions that I am making as a facilitator and process leader might be inhibiting those participating, limiting the number of ideas and the innovation that emerges. Whew, that’s tough to accept!

Here are 4 obervations I had about self-imposed constraints in the Ideation process (generating initial ideas):

Unecessary Limit 1: The “right” ideas

In “brainstorming” sessions in the past I have not actively encouraged wild ideas from participants, but only realistic ideas, or at least I didn’t proactively encourage people to think of things that were really out there. In my testing of different ideation techniques, including some that I already use, I saw that wild ideas can spark others to have ideas that are a stretch, and that usefully fill the gap between boring and too far out. Now I will give people permission and encourage them to try to throw out some crazy ideas. There is always a prioritisation step next that will see the idea “everyone wears panda onsies” move down on the list (maybe, or who knows, maybe not!)

Unecessary Limit 2: Stopping short of great

I saw in my ideation testing that there are cycles to ideas generation. The first cycle squeezes out all the easy ideas, a veritable flurry of things that are already on the tops of people’s minds. The second cycle gets the crazy ideas. And then if you can pause long enough, even when people seem a little bored (when I as the facilitator would notice this, get nervous, and say, “OK, done, let’s move on”), with some prompting, you can get some really great, further honed and synthesized ideas. It was my observation that in each cycle you get less ideas in number, but the quality/innovation increases.

Unecessary Limit 3: Who’s invited

The third observation was around who you ideate with. For my product (unlike my normal professional work), I worked with a mixed demographic – that is, older and younger people (even very young people) from 8 to 55 years old. Of course your group depends on your ultimate product/process users, but how can you expand this past the usual suspects? I should not have been amazed at how creative the responses of the younger people were. They were not usually the final answers, but they certainly informed them and they expanded the continuum of possibility and fun factor considerably. (If you can’t have younger people in the room, then perhaps using the “Putting yourself in other people’s shoes” ideation method could help people tap into their inner teenager!)

Unecessary Limit 4: One thing at a time

Finally, the last observation is a very small thing, but could potentially have considerable impact on what is produced during an ideation session. Normally I would ask people to stop writing and listen while others are presenting their ideas, making a clear distinction between these two steps of generating and sharing. I might have enforced this with a look or a mention (very teacherly of me!) In these tests, I did not say that; in fact, I said that if someone’s idea gave them a new idea, they should quickly note it down before it was forgotten.  I noticed that people listened differently to report-backs of their peers’ ideas, and that these ideas in turn sparked further new ideas in the listeners. Allowing people to continue to write and think during the report backs, in addition to listening, produced some additional great ideas to work with.

My take away: Make sure you, as the facilitator, are not creating rules that subtly inhibit your ideation process! Ah, even after so many years of practice, the learning never stops…

One of the hardest things about using LEGO® SERIOUS PLAY® method (LSP) is just getting people to try it!

Imagine walking into the workshop room and sitting down at  your spot to see, with your water glass, pen and paper, a small mixed bag of 48 LEGO® bricks – a LEGO® Exploration Kit. What’s running through your mind?

You might fall into two categories of people, the first one who says “Cool! Let’s play! No PPT – finally, not your ordinary workshop!” or the other one who says, “What? This is serious business, and time is scarce. Skip this silly stuff and let’s get to work!”

But before you even get into the room, there is a whole discussion that needs to happen with the workshop host in advance, where the Facilitator might get one or the other of those reactions after proposing LSP. During this conversation the Facilitator will need to explain the benefits, and give a little of its background…

Whose idea was it?

In the late 90’s, confronted by the tidal wave of video games that were taking kids away from their bricks, it was LEGO® itself who founded the LSP process, with a couple of IMD business school professors, to help the company think creatively and re-imagine itself.

The method worked, beautifully. Today LSP has a growing community of certified LEGO® SERIOUS PLAY® method facilitators connected together in an Association of Master Trainers, of which I am proud to be one!

Who’s using LSP and why?

I would say that LSP is becoming fairly well known in the private sector, many of the facilitators I met at the recent LSP community meeting in Billund, Denmark – the home of LEGO – worked with businesses, but not all. It seems to be just beginning in the NGO and inter-governmental/United Nations world, where I find myself working most. I’ve run LSP processes now with a number of first-time user groups, here are three illustrative examples of the organizations and what they wanted to achieve:

  • a large international conservation NGO’s resctructured leadership team was undertaking a visioning process, and wanted to understand the features of a successful team in the future structure;
  • a global reproductive health supplies team wanted to identify organizational priorities and explore efficiency and effectiveness in delivery;
  • a small sustainability Think Tank wanted to focus on building excellent internal and external communications, and identify capacity and skills needed to do this.

The applications of LSP are vast, from strategic planning, design thinking, product development and marketing, rapid prototyping ideas, work process re-engineering, prioritization, as well as softer goals such as identifying what makes a good team member, how to build trust, and how to resolve conflict.

How can you do THAT with LEGO®? Thinking with your hands

The basic LSP process involves four steps:

  1. Asking a question
  2. Building a model (with the bricks)
  3. Sharing and explaining your model
  4. Reflecting on meaning

This four-step process happens over and over in an LSP session, with various other rules and parameters sometimes added. The process provides the builder the opportunity to think about her/his answer to the question (and the questions can be incredibly complex or blissfully simple), and then to use their hands and the bricks to build a metaphor that illustrates their answer (not a literal answer, but a metaphorical answer). Often people build as they think, they re-build, they explore their answer as they think and layer meaning onto the bricks. This process, of turning thoughts that might have started out rather vague, into 3D objects, helps people become more concrete about their thinking.

This nuanced work would be hard with a pile of only the traditional rectangular and square bricks, so the LSP brick sets are full of metaphorical pieces in addition to these – flags, mini figures, animals, flowers, propellers, etc. – to release the creativity of the builder. You still have to get familiar again with how things snap together, and even working with metaphor, so a skills building component is always included in an LSP session.

A number of Core LEGO® SERIOUS PLAY® application techniques have been developed by the Association of Master Trainers. These are illustrative of some of the most commonly used and thus most documented applications, and build on one another:

  1. Building individual models and stories
  2. Building shared models and stories
  3. Creating a landscape
  4. Making connections
  5. Building a system
  6. Playing emergence and decisions
  7. Extracting simple guiding principles

These generic techniques can be applied widely to different team and organizational goals, and are customised through the framing and question that is asked (What are our blind spots? What will our organization look like in 5 years? What does a perfect co-worker look like?), and normally involves some sequencing, where models are built and deconstructed (also a good lesson in letting multiple ideas come and go) with a strategic set of relevant, thoughtfully framed questions.

What changes in the individual? 

There is some nice research underway exploring the value of LSP in working settings, and the changes that can occur in the individuals and teams participating. Some that we heard about and discussed at the LSP Community Meeting included:

  • helping people enter a more reflective and thoughtful state, rather than getting off-the-cuff answers that might be the first ideas that pop into your head, thus the easiest ones, and perhaps not the most creative ones;
  • helping people appreciate other perspectives – building the different models individually and sharing them helps people see what other people see (literally);
  • helping people explore sensitive issues – building a model and using the model as a metaphor, even holding it or pointing to it as one speaks, helps to externalise the issue from the builder, making it easier to explain and less risky. The thinking has already been done, so people are not trying to think and talk at the same time;
  • helping people develop more creative confidence – to feel more confident being creative in the workplace, especially in a rapidly changing environment where innovation is needed, both at the organizational level, as well as in terms of products and services.


It definitely takes courage to try something new, but I can report that all the groups that I’ve worked with using LSP have loved it, for the uniqueness of the process, the fun and engagement it provides, and ultimately for the deeper insights and creative results it produces.


You travel a lot, I travel a lot.  International work is exciting and takes many people to the four corners of the earth. Maybe we go to similar places? Faraway places, or those close by; hot places and cold places; highly populated urban areas and sparsely peopled rural areas. North, south, east, west. You’re a planner, I’m a planner. Let’s work some scenarios.

You are travelling far from home, on another continent. Let’s say you are approximately 5, 702 kilometers from home. You find yourself in a situation where you are relieved unceremoniously of everything you have, except perhaps a small overlooked cabin-sized suitcase in the back of the taxi with some clothes and toiletries. But you no longer have your well-packed work backpack, your handbag, and your tube of flipcharts (just as an example.) You will spend several days to several weeks without some things, and the rest of your life without others.

This post is all about what to do before you get robbed. What can you do to help your future self in that situation, if it would ever happen to you, to make it a little less painful, traumatic, and confusing?

So, let’s make a checklist!

Since you will probably not read all the way to end of this mega-checklist, and hopefully you will never need to, I will put my closing thoughts here, and repeat them again at the end:

My overall advice in such a situation is: be nice, stay calm, say thank you. In the absence of the physical things that accompany us in our daily life, and in an unfamiliar environment, you will need all the new friends you can get.

Documentation and Identity

Scenario: You will have lost your passport, driver’s license, work permit, and so on and so forth. You are now only who you say you are.

  • Have the number of the local embassy that can help you.
  • Travel with extra passport photos in a separate place (or a concealed money belt).
  • Travel with copies of your identity cards in your suitcase.
  • Put copies of all these documents into Evernote or other cloud storage.
  • Update this when you get new ones (rather than procrastinating this).
  • Memorize your log-in to your cloud storage.
  • If you have 2 passports, leave one at home in an accessible place.

Money and Finances

Scenario: You will have no money, cards etc. Not. one. cent.

  • Have the telephone number to 24-hour assistance to cancel your credit cards.
  • Have the number to cancel your bank ATM card.
  • Have someone at home that can Western Union you money (in a perfect Catch22, you will need a passport/ID to get your money, but you can’t get your new passport without money – therefore you need friends who have their own id and money).
  • Use a money belt – split things into different places. Make sure it is not very obvious, or else that will go too.
  • Take out anything in your wallet that is non-essential for your trip or irreplaceable, old photos of kids, cinema card, etc.

Work Computer

Scenario: Your computer and ipad will be gone.

  • Don’t put any files on your desk top.
  • Have all files in dropbox or equivalent cloud storage.
  • An online data backup system, like Crashplan, can restore files to the latest update.
  • Update everything the night before you leave.
  • Have your computer serial number available (in your suitcase and at home).
  • Have a login and memorise it.
  • Use a cloud email like Gmail that you can access from any computer.

Communication

Scenario: You won’t have a phone or email; your Apple watch, remarkably, will just tell the time.

  • Back up your phone the night before.
  • Have an automatic upload for photos to the cloud when you get on wifi and do that before you leave.
  • Keep your Apple watch charger in your suitcase. (Having said that, it is actually amazing how long the battery lasts when it is only telling the time.)
  • On your phone have a log-in, use apps like find iphone, google maps with location sharing, find friend which might help you located your phone. Have a way to wipe your phone from a distance, and someone who knows how to do this, as well as check these apps to see if your phone is still findable.
  • Make sure you have at least 1 or 2 telephone numbers memorised – you laugh, but how many telephone numbers do you know by heart? (and your childhood home doesn’t count)
  • Make sure the people at home will answer their phones at night (as things always happen at night)- find out if they have some kind of night time filter where you have to ring three or some magic number of  times before the call gets through.

Health

Scenario: You might be hurt, taking medication (malaria, or other) and in a Yellow Fever zone.

  • Have copies of your health insurance card and Yellow Fever card (yellow international vaccination certificate) at home and in Evernote.
  • Have a copy of your health policy in your suitcase.
  • Split any medication into 2 places – malaria medication for example as it might not be easy to get a replacement prescription where you are.
  • Have a phone number of your Doctor in case you need to change medications mid-stream and need to ask about side effects. They will ask you exactly what you were taking, so…
  • Have prescriptions scanned and a copy in your case and in the cloud.

Insurance

Scenario: You will need to replace lots of things.

  • Make sure you have travel insurance to cover any loss, and enough of it to cover what you have with you.
  • Keep receipts of things you have with you in an accessible file.
  • Don’t take valuable irreplaceable jewelry, watches, etc. (remember that value is in the eye of the beholder, such as flipcharts).

Work Documentation, Paper Calendar, Paper GTD (Getting Things Done) File

Scenario: You are cursing your analogue tendencies; missing your retro paper calendar, and the lifetime to do list in your paper GTD file that has 10 years worth of “someday/maybe” items that you probably weren’t going to do anways, but now really can’t.

  • Photocopy/scan any documents before leaving that are not already digital (notes, etc.)
  • Update your online calendar with your paper one the night before you leave.
  • Keep a birthday book at home (one that has all the birthdays in it, unless you want to tell the whole story when you uncharacteristically forget an important birthday).
  • Scan your GTD file the day before you leave and put it into Evernote.
  • Don’t keep unique items in your GTD file (precious photos, etc.)
  • Scan any receipts as soon as you get them and upload them to the cloud.
  • Scan paper time sheets or keep digital ones.
  • Put pens and paper in all places (it is maddening not to have a pen).
  • Have some reading in all places (also maddening not to have anything to do or read).
  • Have an itemised list of what you are travelling with – a hard copy with you and at home, and a digital one on the cloud. You can also take a photo of everything you pack.

Travel

Scenario: You are somewhere where you don’t live, you need to get home, and you have no tickets or official identification needed to cross a national border.

  • Have your locator number in your luggage, or in a belt.
  • Have a print out of your ticket in another place.
  • Have someone at home who has access to your emails and can send these things to you (or to the new friend with the phone and computer).
  • Local contacts? They can help you get in touch with the police, give you some money, provide you with a sympathetic driver, lend you a computer to email, a phone to text on, and pen and paper. Maybe they can get you a magazine or newspaper, or a deck of cards, don’t be picky.
  • Make a packet of this travel information, and include your packing list – keep 2 sets with you in different places, 1 set on your desk at home, and 1 set in Evernote.

What the police will want…

Scenario: You will spend many hours inside a police station, watching policemen do their job which was pretty quiet until you came along.

  • An itemised list of items stolen and their approximate value.
  • Sim card number.
  • Registration number of your phone, including the make of the phone.
  • Serial number of your computer, and make of computer (and any other details you know).
  • Passport number (a copy if possible).
  • Photos for the police report (if you don’t have them you will have to go get them taken, so you will need money to get these, and a friend to give you money).
  • Proof of entry into the country (e-ticket).

What the embassy will want…

Scenario: You are at the embassy which is an hour from where you were staying, you were kindly provided a driver, and will need to produce the following:

  • 4 or so passport photos of the correct size. Make sure you know the size or you will do this twice, even for emergency passports, you cannot submit photos that are not exactly the right size. (Note: to get these you need money, and for money you need that friend).
  • Copy of your lost passport and number.
  • More money (30 Euros for example) to get an emergency passport.
  • Application (remember you have no pen – they can usually give you this).


The above list makes a good starter checklist – what would you add? You can make it with those little check boxes by each item and keep blank copies in your travel file, or geek out and laminate it and use an erasable whiteboard marker to fill it in each time. (I have not yet done this but the idea appeals to me.)

I hope you never get robbed. But if you do, these precautions will make the long days that follow a little easier. You will notice small things that you have not noticed for years. Your pace will slow down. You will read anything lying around and appropriate a pen and scraps of paper from the hotel to write things down while they are fresh in your mind. You might sit for hours trying to recreate your GTD file on little slips of paper, or play 100 games of solitaire on a spare deck of cards, or finally learn how to use Google hangouts so you can talk to loved ones 5,702 kilometers back home. This not a sad story, it is a learning story, an exercise in reframing that can be helpful when preparing to travel and setting policies on when and how to travel with work.

Oh, and let me also repeat: Be nice, stay calm, say thank you – as you noticed from the checklist above, you will need all the new friends you can get.

As trainers and facilitators, we need not necessarily be confined to working in our native languages. We have probably all had experiences working with translators (who translate the written word) for materials and interpreters (who translate the spoken word) in meetings using both simultaneous and sequential interpretation. But normally these opportunities are confined to more formal presentations and settings, where people are sitting down with headsets bolted to tables or connected to a little fiddly box, and often to shorter timeframes.

What if you wanted to play a game, run a quiz, or get people on their feet for an interactive exercise, in Russian, Arabic or Japanese? (these are languages that at least I do not even notionally speak)

With our Japanese partner, Change Agent Inc., and a fantastic, local bilingual Co-Facilitator, I had the great pleasure recently to lead three days of Bright Green Learning Academy workshops in Tokyo with an impressive group of 30 Japanese Facilitators and Trainers. Our training courses are highly interactive and experiential, and it was a training about facilitation and working across cultures.  It was fascinating to plan how to run the workshops very effectively in a language that the lead trainer (me) didn’t speak at all. It worked remarkably well due to a number of actions taken in advance and during the workshops. Bear in mind that to do this well, it takes a lot of extra work, but if your goal is real learning exchange, then it’s worth it.

Preparation, Preparation, Preparation

To make this work, preparation is absolutely key. You cannot simply show up, speak your language, and let the interpreters do all the work, using your English slides, flipcharts, and materials. Everything needs to be translated in advance, including:

  1. Participant Materials – This is obvious – everything the participants get needs to be translated into their language.
  2. Facilitation Materials – If your co-facilitator speaks your language, you might not need to translate all the facilitation materials. But you will want to go through your Facilitation Agenda in great detail with your co-Facilitator to make sure he/she completely understands the content and process, as they will then be able to answer questions without asking you.
  3. Job Aids – All the handouts, group work sheets, quizzes, etc. will all need to be translated. It is helpful if you number your English versions, and then have the same numbers and layout (as much as possible) for the translated versions, so that you can hand them out while giving instructions, and are certain that they are the same documents.
  4. Flipcharts: Instructional and Templates – In advance (like months in advance), I sent through photographs of all the flipcharts, both those that had group work instructions, and those that small groups use to fill in to guide their group work and record their answers. See below for an example. I thankfully had photos of all of our flipcharts from other English delivery of the courses, so could send those along for translation and creation in Japan.  When I got to Japan all the flipcharts had been made beautifully, and were recognizable as they were exactly the same as the English versions in look. When I had to refer to them, such as the schedule, either we put a few words of English on the Japanese version (as below), or I put an English version of the flipchart below the Japanese to orient myself. When I introduced it, though, I used the Japanese and just kept an eye on the English to make sure I was in the right spot!

Note that it takes longer than you think to translate all these materials well, and format them nicely (and in some cases print them). All these materials need to be sent weeks and months in advance if possible. It is also important to have a professional translators, which Change Agent had, so that the translations were done particularly well, something always appreciated by participants.

Delivery with Interpretation

With all your materials translated, and with a mirror English set in your hands, you are ready to start working with the interpreters. On the day prior to the workshop, it is useful to set up a meeting with the interpretation team so that they have a chance to ask you questions.  The excellent Japanese interpreters I worked with had been provided with both the English and Japanese translation of the materials and had carefully gone through it highlighting concepts, acronyms, phrases that they needed some further information about. This meeting took us about an hour, and also included their tips for me on how to work successfully with them.

In our case, as we were a relatively small group, in a small room, I was the only person with a headset. When I spoke, the interpreters would consecutively translate into Japanese. So I needed to speak slowly and chunk up my inputs so that they could follow. When a Japanese participant spoke, or my co-facilitator, the interpreters would simultaneously translate into my ear. So for the participants, when they were interacting with each other and with me this was seamless, and almost immediately I could understand what they were saying. In order to do this, the interpreters would move around the room to be close to the speaker and use a small whisper mic into which they would simultaneously interpret into English what was being said. They used a clipboard to cover their mouths when they spoke into their small hand held microphone (about the size of an iPhone) and could do it so quietly that no one noticed or heard them speaking, except me through my ear piece! This meant that when I spoke, it doubled the time needed, but when participants were speaking, there was no additional time needed in the agenda. That was an incentive for me to keep my inputs concise, and pacing felt more natural.

With a highly interactive agenda, including lots of movement and format changes (we were delivering facilitation training so walking the talk) this worked well, as participants did not need to speak into microphones, nor wear headsets. I also did not need a microphone, as long as the interpreters could hear me clearly. They did use a microphone themselves when they were consecutively translating my words, so that they could be heard easily by all the participants in the room.

A couple of tips from the notes that I made during our workshop:

  • Wear something with pockets as you still need to put the little control box for the headset somewhere (that lets you turn up the volume, and turn it on and off to save battery – check the battery!)
  • Meet up with interpreters in advance, not only to allow them to ask questions, but also so they can get used to your voice and speech patterns.
  • Keep eye contact with the interpreters during your session. They will give you signals when you need to slow down or explain things further, or if they need a little more time to translate what you said.
  • Check in with them regarding their hours, break times, and things they may or may not do. (Not in this case, but once I had interpreters tell me a little late that they would not translate videos, thus making our small group video report back exercise rather challenging.)
  • Also see if there is anything that drives them crazy – when I work  in French and English, two languages that I speak, I have had interpreters ask that I only speak one language and not mix them mid-sentence, which can be tempting to do. In some cases, there are two interpreters, one who translates into one language and one who translates into another. So when they see me take the microphone or stand up, that would be a visual signal and they would know what language I would be using and the related interpreter would be ready. This doesn’t work if you keep switching languages! This is not always the case, but a conversation with your interpreters in advance will uncover any of these things.

All in all, it is amazing to be able to work effectively in many different languages, even if you don’t speak them. Taking particular care of the preparation and delivery with translation and interpreters can help you make sure that you achieve your goals, your participants achieve their goals, and that your words and materials are not irretrievably lost in translation!

Great events get attention, achieve results, and create momentum towards your goals. We all want great meetings, workshops and conferences. Having a list of VIPs who are attending your event helps demonstrate the importance of the topic and the work you are doing. As a result, organizers can focus a lot of energy into woo-ing the head of this or that. At some level that makes sense, as these people have positions of influence, they command large budgets and staff. They also attend other high-level meetings where, when they speak, their interventions are recorded into the official minutes of the meeting, and potentially help influence others who command large budgets and staff to act and support your effort from their lofty level of the hierarchy as well. Great!

However, the expectation and current paradigm is that the VIP participant always gets the prime real estate, that is, they will open the Conference and speak, potentially at some undetermined length, in plenary. This can sometimes pose a problem as you squeeze in more and more VIPs who want to attend.  There are only so many hours in the workshop day, and if you fill all the hours with official speakers making pre-prepared speeches from podiums on stages, you will run out of working time, quickly start to lose your eager audience and potentially jeopardize the impact of your event. You definitely don’t want to risk losing the buzz and energy and results that were promised when the VIP originally agreed to attend, and that they would talk about later.

Maybe I am being a little melodramatic here. Yet, it bears taking some time in the design stage to think about what you can offer your VIP participants that is an alternative to several hours of speeches at the onset of your exciting meeting. What are some other options?

  • If no plenary is a deal-breaker what about the Closing Plenary? Sharing what’s next and why this was an important meeting? Especially if that person might be from a country that is hosting another event further along the process.
  • There is always an Opening Reception, what about giving a short (but pithy) speech as the first toast? (Co-) Hosting is an honour you can bestow.
  • There might be a Welcome Dinner or Closing Dinner, another opportunity to make a speech. Call them Gala Dinners, have a head table with reserved seating, and arrange to have your best table moderator or facilitator there to make their experience fascinating and focused on messaging about the event. The speeches can also be spread out during the meal: starters, main dish, dessert. They should be short (toast-length) and not in a long line of speakers.
  • Set up a green screen or other video area and invite your VIP to make a short video statement about your event, what she/he expects and what they will do afterwards to promote your goal. Put the videos online, and show them during the event, make a closing video compilation that features your VIP speakers sharing their excitement for your work.
  • Can there be a High-level Panel? Put your most competent moderator on the job to interview them and draw out their learning and experience in your field – and as an added bonus, they don’t even have to prepare their speech in advance! (but make sure this is a real panel discussion and not just a string of individual speeches followed by 10 minutes of Q&A with the audience – not a “Panel Discussion”) If they are a character, they can also be the Moderator chosen to host the panel.
  • Can VIPs sign an MOU with your Programme, with another partner, with each other in a Marketplace area, or at a special featured point in the programme? You can bring out the conference paparazzi, capture some great images for the website, feature and applaud their initiative.
  • Are you offering any Awards? Can they present the Awards and prizes? Along with the media and photo opp, they can share some of their thoughts about the conference, competition and the winner and about their country/programme/initiative.
  • You can also feature some separate events for them and the other VIPs – a High-Level Reception (with a few speeches), a High-Level Lunch with their peers to share their own challenges and opportunities they are finding in relation to the work you are featuring at the conference. This is a perfect opportunity for them to share their learning, identify opportunities to support your work and share that thinking with their high-level peers, etc.

Don’t let these golden opportunities slip past, they are excellent opportunities to get glittering testimonials, quotable quotes, wise tips from your champions on how others can become champions too, etc. In fact it is easier to get these more valuable nuggets of wisdom from your VIPs in any of the above alternative contexts than in a Plenary opening speech, which is bound to be written in advance (potentially by someone else), read from a script, and riddled with protocol and acknowledgements and thank you’s. Something about them got them to their VIP status, and if they are with you at your event, they are there to apply their magic to help you achieve your goals. Consider giving them some other options than that 10 minutes, in a long list of speeches at the very formal and often rather dry onset of your event.


Bringing together a large global community of people for learning is a considerable investment in time and money. Planning can start 6-8 months or more in advance, and for large communities entail hundreds of flights and hotel rooms, vast conference facilities, a team of interpreters, an army of VIP handlers and rafts of protocol.

Meeting hosts can get easily bogged down in the mechanics, which are also important for learning. Comfortable, happy, secure, well-fed people can concentrate on learning in an environment foreign to their own everyday workplaces.  This should never be underestimated. But this blog post focuses on the programmatic part of community learning meetings.

It is very tempting, also, for the meeting managers to focus on what THEY want to learn. After all, they manage the overall programme and their reward system involves having good knowledge about the various country projects and activities and people that are under their purview. Perhaps communication between country projects and HQ is not always forthcoming, as people are busy doing the projects and reporting takes extra time and effort, plus how do you organize all that data dribbling in in various formats over the year?  The meeting manager wants to download everything that has happened in the last year in every project because they want to tell these stories, and also write the donors’ reports, and the proposal for the next project installment, etc. etc.  Information is king!

But information is not learning, and it also doesn’t make sense to fly everyone in for three days to a location far far away to give PPT speeches one after another to a plenary room full of bored participants in three languages.

Of course, if necessary, there are things you can do to help make a long list of speeches more palatable to people. See my past blog posts 18 Presentations in a row? What can you do?  and Preparing a Pecha Kucha: One pragmatic approach  for some tips. But it is better to try to expand your mental model of learning from what you, the organizer and programme manager wants to learn, to include what participants want to learn.

Do you know?

It can be as easy as asking – two different groups that we have been working with have recently hosted large global and regional community learning meetings, and their processes started with a survey to participants asking them what content areas they would like to learn more about, both from external content experts and from each other. These kinds of surveys produce a long list, but also indicate group priorities that can be woven into plenary sessions, for the topics with the most support, and themes for parallel breakout sessions for others. Considering the placement of learning themes in the programme is important – reserve plenary sessions for topics that the majority of people are interested in as people don’t have a choice for plenaries (except whether or not to go) and often no voice because Q&A in a plenary of 250 people is never going to be long enough to hear from more than 2-3 people waving their hands wildly in the air. So unless you build in table-level discussions, people cannot ask questions or customise their learning very much in plenaries. It is all supply side thinking that goes into designing these types of whole group sessions – what do we want people to hear and who do we want them to hear it from?

Learning from Case Studies?

Having lots of other opportunities for learning takes the pressure off of plenaries, and can satisfy the multiplicity of learning needs. Thematic parallel sessions can feature case studies from country projects and allow participants to choose where they go to learn. But even learning from case studies is not always obvious unless they are prepared with drawing out reusable learning in mind. There is a temptation in case studies to make them highly context specific. Often the case study presenter spends a lot of time on context, the more the learning appears context dependent the harder it is for listeners/learners to extrapolate the reusable learning elements. Of course it depends on your goal for learning again. The programme manager’s goal is to understand what is happening in Country X, what is working and what needs to be strengthened, etc. For other country project participants, they are not necessarily there to learn about Country X particularly, because they come from Country Y. They want ideas, innovations, things to try, things to avoid, useful processes and approaches they can adapt to their own context, based on evidence that they have worked in other places. They are not usually there to learn something point by point to replicate it exactly. This also means in your design, you need to have ample time before or after a case study is presented for people to ask questions and consider adaptation and application to their context. You can of course leave this up to them to pursue speakers at the coffee breaks, but you are missing an opportunity to foster immediate learning if your parallel session or breakout doesn’t feature some reflection and processing time.

Learning in Open Space Sessions

Another way to integrate learning opportunities into your programme is to introduce Open Space Technology (OST) sessions, which work even for very large groups.  In an OST session, anyone can propose a table discussion theme, and submit it in advance. These are scheduled by assigning a table number and a time slot for each proposed topic. During a series of rounds, those not hosting discussions at a designated table can attend other discussions of their choice. Putting something like “Community Open Space” on an agenda with no substantive pre-cooked themes might seem risky to programme organizers. But in all the times I have organized these, for groups from 25 to 250 people, they have come together beautifully, with a smorgasbord of offerings and been highly appreciated. When OST sessions are featured towards the end of a learning meeting, they allow people to fill gaps in their learning needs, test new ideas they gained from the meeting with other potential collaborators, and also give the programme organizers a chance to add in things that they missed, provide more time for discussion on a hot topic, or satisfy new learning needs that emerged during the event.  For his to work, you need to give people advance notice about this opportunity on your first day, but don’t be surprised if OST topics only come in the morning of your session.  The mechanics of Open Space and some tips can be found here Opening Space for Conversation (and Eating Croissants) and generally you only need your plenary room (with table seating, not theatre format), table numbers (so people know where to go at the designated time), cards for collecting host ideas, and then your schedule on PPT for table allocations per topic (see below). Again, programme managers can participate, both as hosts and participants, so your learning is also assured!

Community Marketplaces and More

If you really just need data from every country as the overall Programme Manager, poster sessions can be useful ways to encourage this sharing, as country project officers need to fill in your e-template with key information and get the files to you for printing (or bring them printed) in advance. However, poster sessions can be variable in terms of their attendance and utility for other participants.  If the posters are placed strategically (by the coffee table), you get browsers who might scan them. But you can get more attention if you create some buzz around the posters, perhaps adding tables for the display of documentation and 3D objects that attract passers-by.  Having a dedicated place for the posters is good, and even better is having a dedicated session that gets people into the space and programmes that time. Call it a “Community Marketplace”, give it 2 hours during your agenda at the end of one day, serve drinks in the space at the end of the time slot, and have microphones available to announce in-session events. What events? I recently worked at a large community meeting that had such a Marketplace and during the two hours there was an MOU signing between two Ministries in one country (so a few super short speeches, a handshake, applause and lots of camera equipment), and the announcement of winners of a Photo Competition (again microphones, photo opps, prizes and lots of clapping).

The Marketplace went one step further and scheduled times when regions were standing at their posters to answer questions. At the onset of each 30 minute regional “session” (in quotes as in the marketplace it is a bazaar environment with lots of talking and milling around, you can’t get too stressed about the chaordic nature of this kind of event), the microphone was given to a regional representative who said a few words about the relevant work in the region, what is most interesting, and announced the countries who would be standing at their posters for the next 30 minutes. Then people could go and find them if they wanted. This worked fairly well, and for the most part people went around to talk to some of the countries featured during their time slot. As there were multiple reps from each country this morphed into an open ongoing exchange, and still the calling to attention each 30 minutes of a voice from a new region provided some scaffolding to help structure and give some buzz to the Community Marketplace session.

Of course, learning also happens in coffee breaks and lunch, and extending these by 30 minutes can help conversations deepen and give time for reflection. Instead of 15 minute coffee breaks, can they be 30 minutes (for larger groups this is the only realistic option anyways), and can lunches be 90 minutes rather than one hour? This also gives the Programme Manager time to find the people she/he wants to talk to for more information on their activities before they fly home.

Ultimately, it’s not an either or – either the Programme Manager learns or the participants do.  In fact, with the participants also in mind, the learning from Community Meetings can be even richer. You just need to not worry too much about controlling every aspect of the agenda by having everything in plenary and all front-loaded. For your courage, you will be richly rewarded with enthusiastic feedback and the most important result – real community learning that makes the next stage of the process even better!


It’s January again and I find myself compulsively clearing my desk and going through my cupboards and drawers. Reaching the bottom of piles of papers, looking in the backs of deep shelves and under things, I unroll tubes of flip chart papers, and sort through piles of “filing” that hasn’t yet been done. I archive five years of my GTD files of past projects, and test a huge collection of markers, retiring those that don’t work. I ask myself seriously how many of those conference bags I will use again in the future? And on and on.

I start with my office, then this urge spreads to other parts of my house – storage cupboards, camping equipment, clothes, Christmas decorations… it takes days, and weeks to look through, sort and triage everything. I do it carefully and thoughtfully. Marie Kondo would be proud. David Allen would smile. Eventually I collapse into my own thoughts – who needs all this stuff? Why do I keep so much stuff?

This annual clear out isn’t just rearranging and putting back into place systems that are there to corral the paper and loose items of life that find their way into our offices and living spaces. As I move through these places, I have my three-box system for things to keep, things to rehome and things to recycle/throw away. I am a frequent flyer at our local recycling centre, and practically have my own parking space at the Salvation Army. It pains me to put things into the throw away box. This continuous item-by-item decision-making is perhaps why it takes so long. This and the memories that all the items bring back when you are reaching the deep recesses of storage space and are trying to decide if you will keep something in your three ring circus of life for another year or send it out into the circular economy.

I imagine that for some people this process of clearing is easy and quick. I envy my friends and those de-cluttering experts in YouTube videos who can just look at something and immediately toss it, with no attachment. I can attribute deep ecological feelings to my agony at getting rid of things (this widget is after all still useful!) and to why I spend an inordinate amount of time thinking who could use it and where it could go next on its journey of ownership and use. (But paradoxically, these feelings aren’t always able to keep me from acquiring things in the first place.)

Ultimately it feels good to move things on. It clears up space on shelves and in cupboards, in filing cabinets and materials drawers that are now easier on the eye and mind, and provide the opening for new things. This new idea or project or hobby is now not just another thing to squeeze into an already crowded space. As the new year starts, this feels necessary yet it takes so much time, herculean effort and in some cases courage. In a thoughtful moment, I ask myself, do certain lifestyles and life situations make it more likely to keep things around? Do expats keep more that reminds them of home and family in far away places? Do parents keep more of their growing children’s things as they anticipate them leaving home? Do knowledge workers keep more of the physical as their work is often virtual? Do independent workers keep more evidence of their past work as their future work is not always certain?

Is being all of these things a recipe to keep way too much? Let me grab a cup of tea and sit down for a moment, but not too long, I have some new ideas for this year and I need the space…

Learning and Knowledge Development Facility recipes for success

As winter arrives in the Northern Hemisphere and 2017 comes to a close, it is a time to reflect on our work and give thanks for all the opportunities and lessons of the past year. It’s also traditionally a time for cooking!

We seized on this idea recently with UNIDO’s Learning and Knowledge Development Facility (LKDF), where Gillian has worked as a Learning Expert for several years. LKDF wanted a fresh and engaging way to capture the lessons and successes of its innovative Public-Private Development Partnerships (PPDPs) and share them with the public, partners, and donors during a meeting.

From a forklift operator training project in Iraq, to a project in South Africa that uses virtual reality to safely teach students how to use log-cutting equipment, young people are learning the technical skills they need to find jobs and become part of a skilled workforce in their countries.  How could the learning be interestingly captured and shared from eight projects around the world?

“Recipes for Success”

With holiday cooking on our minds, we captured the lessons and good practices of the projects with specially designed recipe cards called “Recipes for Success”.

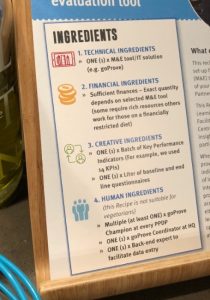
We began by sending a template and a sample recipe to project managers ahead of the meeting, asking them to provide information about their projects. We worked with one game manager in advance to create a fun sample recipe we could share, which gave people an idea of what we were looking for – we wanted “ingredients”, directions, preparation, and “cooking times” for their projects.

An editing job spiced up the answers and clever formatting converted them into recipe cards. Tips and variations were included, such as “This recipe is for counterbalanced trucks below 5 tonne only” and “This recipe is designed for a maximum of three learners to one instructor so it is makes a small portion with a lot of impact (driving experience).” Although not your typical easily reproducible recipes, they gave the flavor of the project, provoked interest for more information and provided a funny and memorable takeaway for participants.

You’ve Heard of Speed Dating, and Speed Meeting… How about Speed Eating?

On the evening of our meeting, partners gathered for a not-so-typical meal to learn more about each project.

In a room with 10 small, numbered tables, Recipe Holders (project managers) had 6 minutes to share their project “recipe” with a group of 5 donors, colleagues and industry partners. Each Recipe Holder had a stack of recipes to hand out and a 3-D object from their project, from a beautiful hand made shoe (from the leather panel training project in Zambia) to a set of branches (from the virtual reality forestry training project in South Africa).

After six minutes a bell rang, and each group moved in chronological order to the next numbered table, where they met the next Recipe Holder. On each table was also a set of real appetizers, so as the participants talked to the project managers and collected the recipes, they were also able to have a bite to eat. (That’s dinner sorted!)

Inspired by the global love for eating and cooking, especially at this time of the year, we found a fun and more engaging way to share learning and good practices. If you think back at your year, what did you learn? What would be your Recipe for Success?

More food for thought

Bite-Sized Learning

Sharing information is hard. We have so much we want to share that we tend to push it out in large quantities and in the same old ways. How can we cut through the tidal wave of information, find the best nuggets, and make information stick?

One way is to make it bite-sized! Fortune cookies can be a good way to make information stick. Besides being tasty, they can provide a little, physical reminder to join a LinkedIn group, recall a key lesson from a team-building exercise, or follow up on a commitment.

There are other ways to make it short: learn how quiz-based micro-learning can deliver a wealth of information in manageable “nuggets”.

We just completed our Bright Green Learning Academy training course on “Using Interactive, Experiential Learning Games in Meetings to Communicate Messages (and have fun!)”  and part of our course includes selecting, adapting or making a new game and running it for the group – going through the stages of game administration:

  • Preparation (parameters, people, space, materials, set up, practice and testing)
  • Framing (why are we playing this game?)
  • Briefing (instructions, objectives, “rules”, safety)
  • Play (observation of dynamics, “rules” enforcement, role of participant observer, etc.)
  • Debriefing (what’s the point? Good questions to connect game experience to reality and action, discussion to co-create meaning. )
  • Deconstructing (break down)

It was wonderful to see the participants take on new games, work them up and then deliver them for the first time in the course. We know there is the Power of 10 when it comes to creating and mastering games (e.g. you need to play a game 10 times before it is bullet-proof, tweaking all the way), so there was a good opportunity during the games demonstration to generate tips for game administrators. Here are a few that I came up with:

  1. Watch safety considerations, particularly in games where people are moving around (safety includes both watching chairs and cables and other obstacles in the room if you are inside, curb and pedestrians if outside, but also the physical abilities of participants. For the latter, create roles for people who might prefer to be participant observers – what should they watch out for to report back in the debriefing?)
  2. Write down the “Rules” or instructions if they are at all complicated. If there are only 2 rules or no rules, then don’t bother (you can repeat them as needed), but if there are a number of rules or parameters to your game, put them on a flip chart and keep that in the room. If you are using this game for the first time, or times, this will also keep you tight and to the point in your briefing.
  3. Master the space when giving instructions and briefing – this is more of a feeling of confidence that game administrators need to give (remember participants have never played this game and in some cases might have some anxiety about what will happen and what to do). This includes using an instructive tone (think manager talking to construction crew),  accuracy and word choice, clarity of speech. Go for crisp and clear instructions so that there is no doubt about how to start, which can inhibit the early stages of the game. If instructions about how to play are a little woolly it can allow for widely different interpretations of the instructions.  It is important to remember that, in some games, just ONE word out-of-place can affect the whole outcome of the game.
  4. Practice until you get your instructions to the point where you don’t get blank looks and that ONE word doesn’t creep in.
  5. Watch your framing. If you are playing in discovery mode (that is, where people don’t know what to do to “win” the game, but are playing it for the first time), you might not want to give too much framing except to say that the game will help us experience something important that we are or will be discussing. If you are playing in confirmation mode (where people do know the right behaviour and are practicing that), then you can be more explicit with the framing.
  6. Don’t let participants analyse too much the game at the onset – there is a temptation for the game administrator to ask for questions after the briefing. In some cases this will open the floodgates of questions, analysis of this and that, exploration of options, check this and that, and before you know it the timing is up and you haven’t played. If there is a technical question that is fine, but encourage participants to start and try more or less right away after your good, clear and concise briefing, as most of the time this is where the learning will happen. It’s better if they experience the dynamics of the game, rather than discussing it forever first.
  7. Let the participants contribute to the debriefing. As eager as you may be to share the “punch line” for the game, use a good questioning sequence to let participants identify what happened, why, how it manifests in real life, and what to do about it.  You can perhaps repeat and reinforce the key points at the end, but don’t lead with that.

Games provide a wonderful moment for participants and teams to break out of the usual context of workshops or training, to use their brains, bodies and senses in different ways, and can be powerful learning experiences when they are administered in an equally powerful way!

(our next Games workshop in the Bright Green Learning Academy schedule is in autumn 2017, join us to learn more about using learning games meaningfully in your workshops and meetings!)


  • Breakout room 5 (the one on the other side of the building) is out of flip chart paper!
  • Where’s my Key Note Speaker?
  • Anyone seen the group work template for Table 3 (after 2 hours of hard work), it’s not in the stack?
  • The online location for saving the country screencasts has changed to…
  • Impromptu Facilitation Team meeting after the last session today!

The bigger the event, the bigger the venue, the bigger the facilitation team, the more coordination and communication is at the core of success. And the more running around (literally) you have to do as the Facilitator and the Facilitation Team to keep things together and progressing smoothly. That obligatory non-stop flurry of movement was the case, that is, until we all discovered this great workshop application for WhatsApp (or your other favorite smartphone group communication app).

At a recent large event, we had 11 Country Teams, with 11 Country Facilitators,  a number of technical content experts, and a Secretariat support team. I wrote a Facilitator’s Manual that included context, instructions, facilitation agenda, and session-by-session instructions/timing and tips for the Facilitators.We diligently held our essential briefing meeting on the day prior to our 3-day event to go through it.   We had several end-of-day debriefing sessions scheduled in advance. As the Facilitation Team Lead, I had done all I could to ensure that the Facilitation Team ran smoothly during this large event. But we all know, that stuff happens, things change, and there are externalities (Is the Deputy Minister coming?) that keep you perpetually on your feet.

A Few Simple Steps for Set Up

You might already have used WhatsApp at a workshop or large event, so you know how simple it is to set up. For this event we had two WhatsApp groups – one for just the Secretariat to talk amongst each other. The other was a larger group including the Secretariat, Facilitation Team, and the Technical Experts. This was a regional event with people from many countries and, we barely noticed, that everyone in our group had a smart phone, everyone already had the free WhatsApp app installed (quick to do for those who don’t), and the venue -a large hotel in a tropical country over 10,000 km from my office in Switzerland- had great wifi everywhere on the premises.

We put up a flip chart during our Facilitation Briefing Meeting asking for cell phone numbers  (you can also ask for numbers by email in advance). Then we set up a new WhatsApp Group with an obvious name (many people have multiple groups going on simultaneously – so give it an obvious name like “Facilitators/Tech Experts”). Voila – ready to go!

Communication Plus…

The expected use for a messaging app is obvious, to send messages before (“We start in 15 minutes, can you come to the room”) or during ( “Going forward, please make sure to use the podium for your presentations to ensure our colleagues seated at the back can see you better”) the event. And we had lots of this kind of chatter, with ideas contributed by everyone, that was helpful to make the event run smoothly.

So our first uses of WhatsApp were the ones you would expect:

  • 1. Instructions: Give instructions, information and remind people of things (as above).
  • 2. Questions: Provide a way for Facilitators and Experts to ask questions both in the plenary room (“How much longer do we have on this exercise?”), and when they are away with their groups (“Can someone bring me more flip chart paper in Room 5? Quickly!”) Tip:  You need to designate roles for first responders to these kinds of pleas. You don’t want people shouting in the virtual wind, or still having to send a runner back to the Secretariat office for supplies.

But the step change came in some different uses of WhatsApp…

  • 3. Capture and Archive Outputs on the Cloud

We always use some capture tool for group work. This can be a flip chart template, an A3 template, a Job Aid of some kind, a handout. Something that has the guiding questions, instructions and a place for the group to capture the results of its discussion. These artifacts are frequently collected for further analysis and use by the organizers, posted  on the walls so everyone can view them in a structured “Gallery Walk” or viewed individually later, or serve other uses. Sometimes the group needs to keep them (like their Action Plan) but the organizers would like them too. So we simply asked all the Facilitators to take a photo of their group’s completed template after each session and put them on WhatsApp. With phone cameras so high quality today, these photos were perfect for archiving on our thread.

Multiple benefits: The group could keep the physical artifact of its group work with them (or lose it, no problem – the Facilitator has a back up image that they can easily find on WhatsApp); there’s no need to run around the room or rooms and collect them; there’s no need to carry piles of paper back to the office after the event (or to your room at the end of the day); and the host organization and all the facilitators can see what other groups are producing without exhausting plenary report backs.  I also took photos of all the plenary work which was posted on pinboards and flip charts, and anything else that was created and might be useful in session or later on and posted that on WhatsApp. No need to worry about writing being too small for the Facilitators to see in the back. That’s in session, afterwards as the thread is on the cloud, when you get home anyone can refer back to, and use, anything produced.

Tip: You can ask Facilitators to label their photos clearly when they put them on WhatsApp, e.g.  “Country X Group Work Session 3” and some people will do this. But it’s not essential if you  ALWAYS put this information on the template itself. For example, in the header of the page or the top of the flip chart, include the session number and session title and a field to write in the country or group number. This makes for easy recall and archiving.

  • 4. Collecting Images of the Event

In large events, I almost always propose a slideshow in the closing session that features photos of the event – fun photos, working photos, the group photo, team photos, etc. to remind people of their journey and highlights of the event. Sometimes organizers say, “We don’t have the human resources to give someone the role of photographer.” So in the past we have compromised and asked participants to send their photos taken during the workshop to us, to an email address given on the screen in the opening session, or to post them on twitter. Both of these can yield a few photos, but people get busy and forget, leaving you with precious few on the last day. But using WhatsApp and asking the Facilitators to take photos and post them directly on the same thread produced TONS of images to use, and it collected them all in one place (no extra step of having to send them by email to someone and cutting and pasting them out of multiple individual email exchanges or searching a Twitter thread). So the only role to designate was someone to grab the best photos taken by everyone from the shared WhatsApp thread and put them into a PPT slideshow on the final day. People are always happy to snap photos on their phones, and your Facilitators are everywhere. We had a wonderful “competition” to take the closest photos of speakers’ quizzical expressions and highlights of our event in session and outside. Added bonus: This also makes illustrating the Final Report and website easier, all the photos you need are there in one place and on the cloud, so anyone can use them after the event.

  •  5. Matching Expertise and Need in Real Time

In our event, we had our 11 countries working on action planning in parallel, and a number of technical experts on hand to help. We set up Open Space sessions, and thematic sessions, but sometimes a team needed an input right now – please send expert X over to Table 3 or Breakout Room 6 pronto! We used WhatsApp to help the technical experts be efficient – instead of walking from room to room or table to table to see if anyone had questions, or having a table or room rep run to find the Expert, the Facilitators could just post on WhatsApp their need and the expert could come directly to them, saving lots of unnecessary to-ing and fro-ing.

Easier Sharing, No Bursting Suitcases, and the Report Writes Itself!

When you capture everything on WhatsApp  – the outputs of the workshop, the images and high points, the questions people have, the needs articulation for expertise – it puts all this information in the hands of everyone on the WhatsApp list automatically (no need to wait for the report for a reminder), it does this digitally (no need to stuff papers into your suitcase and no worry about losing essential outputs during the event or on your way home), and it organizes it chronologically so the report writing is much easier.

Using WhatsApp at a large event could  herald a step change in facilitation.

It’s a step change for Facilitators in another way too – if you counted on all that running around the plenary room and hotel to make your 10,000 steps a day, you will now need to go to the hotel gym treadmill to meet your step goal. The nice thing is that you will have time to do that now because the communication, coordination, capture and collection side of the event is running itself!


(Just a note: If you are interested in learning more about designing and facilitating large group workshops and conferences, the Bright Green Learning Academy has a dedicated course on this: Working with Large Groups: Designing Interactive Large-Scale Workshops/Conferences/Congresses. See our course schedule here. And we’ve written a great deal about large-scale events on this blog!)

  • Would you like your Keynote Speakers to do more than stand at a podium with their notes and read their prepared speeches? (perhaps even prepared by someone else?)
  • Would you prefer your speaker to share personal experience and examples – to speak from the heart?
  • Do you want high energy at the opening of your Workshop or Conference, with a kick off that is dynamic, and thought provoking?

If you said yes to these questions, and almost everyone does, then thinking carefully about the format of your conference or workshops’s high profile sessions can lead you into thinking about non-traditional inputs such as Pecha Kuchas, Ignites, and TED-like Talks.

I frequently recommend these formats to groups I work with, and people generally like the idea of this, but don’t always have the experience with the preparation stage. They often ask, “How much time will this take to prepare?” Watching a smooth, tight, powerful TED-Talk makes it look easy. However, compared to a traditional presentation that has a bullet-by-bullet PPT presentation to guide it or a paper to read –  a podium to stand behind, and a luxurious 30 minute time slot, these talks take more time commitment, for what’s ultimately a shorter input.

As Henry David Thoreau said in 1857: Not that the story need be long, but it will take a long while to make it short.

Ideally, you want your high profile speakers to take this time and create a great quality input in such prime real-estate in your conference programme as an opening session, or another key moment. You might want to video this input so that you can re-use it – put it on your website, include it as a part of the materials that come out of the event, or show it again on the screen in related events. So making the time investment in getting a polished Talk can be worth it.

We have written quite a bit on this blog about Pecha Kuchas and Ignites, so let me focus on the steps and timing we use to coach speakers towards using the TED-like format for their talks, and draw on our experience planning and hosting of numerous TEDx Events. There are lots of good blog posts about how to do TED-Talks, and TED’s Chris Anderson wrote a whole book on that this year if you want to go deeper into their process: The Official TED Guide to Public Speaking.

This is just a short indicative idea of the steps and the timing we use for the speaker and for the coach to support her/him in developing a TED-like Talk:

What’s the Idea?

  1. For this first step, you, the event organizer, probably have the idea and have chosen a speaker who you want to deliver it. Try to put the idea down in a sentence. Try a number of attempts. (30 min)
  2. Talk to the speaker and get their commitment to using this approach and explain that it will take them more time than writing their speech on the plane and handing you a USB stick before they walk on stage. (see arguments above). (10 – 30 min)
  3. Schedule an initial call with host, speaker and coach to discuss how to approach and frame their “idea worth spreading”. Establish a timeframe for working on it, and agree on the length of the talk. (Note the 18 minute limit, and the fact that the talk should only be as long as needed to make the point, so less time is also fine). The coach will give some ideas on the call about how to approach the idea.  (30 mins to 1 hour call)
  4. The speaker should watch a number of TED Talks for storytelling tips  – they can watch for example pick some from the playlist of The Most Popular TED Talks of All Time. (1 hour+)

Write it down

  1. The speaker will write an initial draft as they would speak it. If they don’t feel ready to write it out verbatim, they can put down bullet points first for feedback, then write down the whole thing as they would speak it afterwards. (1-3 hours)
  2. If the speaker has initial thoughts on images these can be put into the draft script. (30 min)
  3. Send the draft script to the coach (and the host if they want to be involved in the process). The coach reads through the draft and makes comments on structure, storytelling approach, etc. and sends it back. (1-2 hours, depending on how much work it needs)

Prepare to revise

  1. Hold a second call to talk through edits etc. This might not be needed if there is not much to change, but traditionally this first draft needs some restructuring and editing, often to add the personal component, the “colour”, some drama, perhaps to flip the structure from a chronological story to one that plays with the timeframe to set up the big message better, etc. (30- 45 min)
  2. The speaker rewrites/edits the talk (1-3 hours)
  3. The coach reviews the script again for any further edits, and can start to suggest pauses for effect, hand gestures, body placement, props, images if possible at this stage. (Note this back and forth on the scripts can go on as needed and time permits) (1 hour)

Practice the Talk

  1. Third call: During this one the speaker reads the talk, this can be done with skype and video, so the coach can see the speaker, or it can be done only orally if video is not available.  The coach listens for pacing, pausing, vocal variety, etc. and makes some notes in the script while the speaker is speaking. There is a discussion about any body or hand gestures, etc. (Note, this step might also need iterations, or not) ( 1 hour)
  2. The Speaker works alone to memorize and practice their talk (2+ hours)
  3. Fourth call: Practice again the talk – the coach follows along with the script which includes notes on pauses, etc. and makes any further suggestions. At this stage the Speaker might want more people on the call to simulate the audience and get further feedback on the talk. This should be just tweaking, and any tricks if there are things that are harder to remember or pronounce, or nerves, etc.  (1 hour)
  4. Onsite: There should be a practice onsite the morning of the talk so that the speaker can get on and off the stage, knows where to stand and gets the feel for the room. (Will you have the big red circle carpet to help the person find their place on the stage? Can you borrow one from the local TEDx organizers?) Note this test run might be a bit of a disaster, as it feels very contrived to talk to an empty room, but generally the speaker does very well once there is a live audience with energy in the room!) (30 min)

This is the process, more or less, we have used with speakers and organizers who want to feature a TED-like talk at their workshop or conference. This kind of talk really feels different and is so refreshing for the audience – when they see the speaker come on, no notes, no podium, talking straight at them, telling a vibrant personal or person-based story that has a creative structure and a message with a punch. These are the talks that, in spite of being one in many, are often unforgettable (plus you have the video to help make this extra true!)


Working with complexity and uncertainty seems to be a feature of everyday life in our organisations and projects. There are undoubtedly great, daunting challenges presented by working within systems that seem to be constantly changing and have many moving parts. Thankfully, there are also useful tools that can help us think through what is going on and strategise about how to best move forware – some of the most valuable are tools from systems thinking.

We have all seen, in our personal and professional lives, examples of vicious cycles where the effect of one action causes a knock-on effect that somehow loops back with a negative effect on the first, making things worse. For example, the Human Resources department is too busy to offer staff training, but the lack of capacity development opportunities makes staff members look for other work to grow. This means the HR department spends all its time hiring, and has even less time to develop a staff training programme. You might describe such things as ‘spiraling’ out of control.

You have also likely seen examples of virtuous cycles where the inverse is true and interaction of a number of interconnected variables makes things better and better, according to what you would like to see happening. For example, you develop a leadership style that encourages people to manage their own projects independently and take credit for their own successes. This empowers team members to act and gives you time for further creative learning around positive leadership (rather than spending your time micromanaging team members) and time to help those who might need additional support to work more independently.

And then there are those times where, despite your best efforts to change a recurring pattern, something in the system is resisting this change. We’ve all wondered at times, “Why does this keep happening?” This question is the sure sign of a system at work!

In the language of systems thinking, it’s all about feedback loops. We need to get better at spotting them and using this understanding to inform our actions.  Using diagramming tools, such as Behaviour-over-Time graphs and Causal Loop Diagrams (this is more fun than it might sound) can be highly valuable in helping us think through what is going on and enable us to better understand the cause and effect relationships at play. When we have a clearer picture of our system, we then have a much better chance of finding a ‘leverage point’ and a strategy to change things.

A systems thinking approach can be effective in many situations, from high-level strategic planning, theory of change and organisational development work, to improving the productivity of a team of five. These tools can help you step back and see the bigger picture, making systems more visible, the inter-connections more obvious, and the opportunities for change more apparent. And they work beautifully with groups, to communicate these dynamics, check our assumptions and agree together on pathways forward.

Our Bright Green Learning Academy systems thinking course – “Communicating Complex Challenges Using Tools from Systems Thinking” – explores how to use these tools and approaches in our work, the questions we need to ask when planning or reviewing a project, and how to ‘unblock’ a situation to make progress or generate the change needed.

“The systems thinking course helped me understand the vicious cycle I was experiencing in my business. With this new understanding, I was able to break the vicious cycle and now I have made good progress in the direction I wanted.”
Olympia Mitsopoulou Kolyris, Managing Partner, ATOM WAVE

Why not join us for our upcoming systems thinking course taking place 2 June 2017 in Nyon, Switzerland?
More information and registration.

Read more

The Climate Change Playbook – 22 Systems Thinking Games for More Effective Communication about Climate Change

What possibilities Staff Meetings have!


Staff Meetings, when the whole of a staff group are convened in one place (physical or virtual), are an important investment that a team makes on a regular basis. And they can be a significant investment – if you monetize the time that is used to convene this group, you can have a significant sum of money on the table – 70 staff members for an hour, at an average of 50 USD an hour, is 3500 USD per staff meeting! (BTW, that’s $182,000 a year for a weekly staff meeting…and 3,640 person hours of time…quite a contribution!)

These all-staff meetings are incredibly unique and valuable moments, and have a important set of purposes in a team setting. They can be used to:

  • Share information (among team members, among layers of the organizational hierarchy)
  • Collect information (get insights, opinions and ideas from the staff)
  • Encourage collaboration (from greater insights about what others are doing)
  • Build relationships (develop interpersonal connections among people)
  • Energise (get energy around an initiative or collaborative task)

With these good purposes, and the considerable investment that is made in achieving them – why then does feedback after a staff meeting sometimes include the following: “Not sure what the purpose was”, “Not relevant to me”, “Too long”, “Boring format”?

We have a couple of thoughts on this as facilitators and process designers! Let’s look a little deeper at these Staff Meeting purposes and how to achieve them:

Share Information

The traditional format for sharing information in a Staff Meeting is for someone to stand up and talk to an agenda point. Followed by another and another. They might have a limited time, and might be using a PPT slide to help, and some people can get away with this from sheer charisma and/or scintillating topic. However, after a few people doing this, and especially switching topics rapidly, it is both hard to follow, and chances are some of these speeches will not be entirely relevant to 100% of the team. Once you get a few with less than exciting delivery or content, people will gravitate to their phones or their minds will wander gently back to what they were doing before they joined the Staff Meeting. Busy people trying to optimise their time.

What are some other ways to share information?

  • Can you ask people to make a short 3-minute Screencast of their input using a free online tool like Screencast-o-matic, or the many other options. This is fast, and easy, and can seemlessly incoporate a wide range of media in the 3-minutes (webcam, web page, video, still photos, etc.). It also creates an artefact that people can refer back to later, and help those who couldn’t come stay up-to-date. (Warning, if your staff meeting format is only information push in the form of one presentation after another with no or limited interaction, you could serve this purpose by just sending around an email with the links to all the screencast updates. Consider adding some interaction to your staff meeting to make it more logical to be there in person.)
  • Can you cluster presentations in a logical way so that there is a clear flow to them, this will help people follow the thread. Share your logic with the group and show it on the agenda which is in the room on a flipchart, so people can follow along and see how far they are in the sequence (two presentations to go, nearly there!)
  • Can presenters be given a template to prepare their input in the form of a “teaser”. In addition to a strict time limit (3-5 minutes – use a bell or the timer on your smart phone and be strict and equitable), the teasers could include: key facts, why this is important to us all, how staff members can help the presenter or vica versa, and where to get/give more information. Have this template list on a flip chart in the room to remind the speaker. Make a job aid – like a credit card sized card – and give it to everyone at a staff meeting, so they always know how to prepare if they are giving an input at a future Staff Meeting.
  • If you have a longer update to share, can you provide it in the form of a Quiz? Draw out the key message and craft a 5 or 10 question fun multiple choice/true-false quiz (making quizzes fun is an art!) Have people take the quiz as a Table, and take time as you go through the answers to share the information you want to provide (always giving the group the opportunity to answer first). Give shareable prizes to the table that gets the most answers and be prepared for a multi-way tie. I would even say have enough of the prizes – wrapped small chocolates, etc – that everyone gets them or the winning table can share them with all.   (See this blog post for some ideas on how to use quizzes as learning opportunities: Want to Learn More? Take a Quiz )

Collect Information

  • Staff meetings are really mini-workshops. Why not use the multitude of workshop techniques to crowdsource ideas from your group? Perhaps start with a How to Have a Great Staff Meeting brainstorming exercise. Here’s one example of how to do this – we used storytelling to generate a discussion that provided us with ample ideas for how to improve staff meetings in one organization, see this blog post for a description: Using Storytelling to Generate Ideas: We just went to a great staff meeting – what happened?
  • If the information you want to collect is a little sensitive, why not use an online polling tool such as polleverywhere.com to ask the group questions, allow for anonymous responses and visualise on a screen in real time the collective answers from the group – from which type of end of year party we want, to which of these options for office rearrangement is preferable, you can ask these questions using this online polling software. All you need is for everyone to bring their phone with them – people will be very curious if the invitation to the Staff Meeting includes a line that says, Please bring your cell phone…

Encourage Collaboration

  • Using Open Space Technology as a technique in a staff meeting  can help satisfy the first two purposes above, as well as encourage collaboration. In its purest application, it allows the group to create the agenda on the spot, and allows people to choose what they are most interested in hearing more about and contributing to. Small parallel conversations are scheduled (you can also do this in advance if people are responsive), and marked tables (A,B,C) help people know where to go for which conversation – whether they want to hear more about the new Sustainability Policy, or about what that successful project in East Africa is learning. It also means that you can’t go to everything. Through 1-minute teasers before the start of the Open Space session, staff members can get a sense of what each table host will talk about and what they need from the group. This helps people choose where to spend their time, and enables them to follow-up with the person later if they couldn’t attend that conversation (or even if they did).
  • Of course, asking any speakers to explicitly note what kind of help or input they would like from their colleagues (see template information above) also opens doors to collaboration. Speakers in Staff Meetings tend to just share facts, encourage them to ask questions.

Build Relationships and Energise

  • The interactive techniques mentioned above can take you far into this social capital building territory for your staff meeting. Quizzes, prizes, small group focused discussions, creative screencasts, and more. What about having a featured person each Staff Meeting whose name is pulled from a hat and gets to answer the Proust Questionnaire on the spot? (See: Workshop Games Everywhere: Even from Proust and Vanity Fair) Even the cost of coffee and croissants seems minimal when you consider how much you are already investing in bringing team members together in the staff meeting!

These collective moments are incredibly valuable in the life of a team. They go far in setting the tone and sharing the values of the management and the team members. As we have seen, they cost a lot and can do a great deal. They are, as the bottom line, worth taking the time to prepare them beautifully and thoughtfully. This care demonstrates their value, and communicates the respect for the time and attention of the team members who are there and contributing to your collective work.

A final thought, staff meetings as a regular occurrence can also be programmed over time. Instead of seeing them as one-offs all the time, can you think of them as 10 one-hour mini-workshops over a 5-month period? Can you iteratively programme in something that the team is working on or contributing to over the whole period (this can complement the weekly updates or other work done in the Staff Meeting). This can be effective for change management or strategic planning goals, and as long as the team has visibility over the longer-term purpose and how the individual staff meetings fit together, they will be happy to contribute.

Wouldn’t you like your team to walk out of the room after an hour together saying, “I just went to a great staff meeting“?


(Just a note: One type of training course in the Bright Green Learning Academy focuses on design different kinds of meetings and workshops – there is a specific half-day course on designing Effective Staff Meetings, as well as Team Retreats, Strategic Planning, Multi-Stakeholder Dialogues, and Partnership Scoping workshops. Our course schedule is on our website, and we will be posting our new course calendar for Fall 2017 in the next few days!)

Every time I facilitate I make a Materials and Equipment List. This is for me to think through exactly what we need on hand, and also to share with a partner or host when you are sourcing these items locally.  This is a two column list that can be an aggregated list of everything needed for the whole event, or can be broken down by session. For procurement, the aggregated list is easier to use and share.

The Equipment List is  normally made up of things that you need to request/order from the venue. These things normally have a price and the venue team will put them in the room as they are, for the most part, too big to carry around (not always, as there are mobile projectors, and people may use their own laptops, etc. )

The most traditional items are fairly evident and can include:

  • LCD Projector
  • Computer
  • Screen
  • Connector (between computer and Projector if using a Mac)
  • Flipcharts (with ample paper)
  • Pinboards (with pins – especially useful if you can’t post things on the walls)

The Materials List includes all the things that need to be brought in or sourced to run the various activities that you will facilitate in the workshop or meeting. Items on this list can be more problematic to describe when you are sending the list off for onsite sourcing. You might go back and forth describing this and that with a very conscientious counterpart who wants to get exactly the right materials (which is really excellent!)

To aid this, I thought I would make a pictorial summary of some of the things that most frequently show up on my Materials List. These include:

  • Facilitation Cards: These are made of thick paper in different shapes and  colours (for brainstorming and multiple uses). There are plain-backed cards, cards with sticky on the back (self-stick), and today there are static cards that will stick on walls and windows. Here are the most common shapes and sizes (click on the photos to see detail):

  • Tape: Needed especially if you are using the non-self stick Facilitation cards, or to put up flipcharts, etc. There are two kinds that we use – masking tape (the opaque one) and cellephone tape (the clear one):

  • Post-it Notes: This has replaced Facilitation Cards in some exercises, and can be used for many other things in a workshop. There is a wide variety of shapes, sizes and colours:

  • Sticky Dots: These are used for prioritisation, giving feedback etc. Note that dark colours are better than lighter colours and size matters:

  • Markers: Again they come in a range of widths, the selection of which depends on your activity and what you are writing on (a flipchart or an A5 card):

  • Other materials: These are often frequently needed (by me!)

With this list, you can make sure that you have everything you need to execute the workshop activities you have planned, and if sourced onsite, your luggage won’t be as heavy as it might otherwise be.

This of course doesn’t mean that you don’t need to bring anything – see an earlier blog post called, ” ‘ Conference Organizers Providing Everything’: Packing List for Team Facilitation. Just in case…

Michelle Cartín, Project Manager – events and congresses. Former Deputy Forum Manager, IUCN World Conservation CongressMichelle Cartín, Project Manager – events and congresses. Former Deputy Forum Manager, IUCN World Conservation Congress

One of my most interesting and challenging roles was Pavilions Project Manager for the 2016 IUCN Congress, which attracted around 8,000 participants. The thematic pavilions, centred on themes from youth to marine conservation, are where delegates can explore the work of IUCN and partners through informal presentations and networking events.

Nine pavilions, each with its own planning team (of up to 21 people) and very diverse goals was a lot to coordinate over nine months. The teams involved internal and external members; they were multicultural and cross-functional. Some meetings were face-to-face, others virtual, others mixed. Learning how to foster collaboration and buy-in, and get everyone on the same page was essential!

Right after the Congress, I decided to build on my experience and looked for a way to improve these group processes in the future. A key lesson I learned from the Academy is not to be afraid of debate amongst your team and how to make it constructive while staying on schedule. There are so many different views of what will work best – you need to create space for people to voice their opinions and to brainstorm. If you don’t build time for discussion into your agenda, it can backfire later. There are many tools and methods. Poll Everywhere is useful for mixed teams – ensuring everyone’s opinion is tabled when you don’t have time for open discussion, also useful when you need anonymity. Six Thinking Hats can get great results, analysing a situation from different perspectives.

People often think of facilitation as being for external events but it is essential to facilitate well internally, within your teams. Fostering ownership of group work is vital if you want to be a good manager. It involves intuition, reading situations, knowing when things are not going well and being able to adapt accordingly.

You’re asked to help design an interactive and engaging conference of 200, 400, 1,500, or 10,000 people. Do you leap at the challenge or quake believing this is beyond your capacity?

Rest assured: You can do much more than you might expect, whether in side events, workshops or on the ‘main stage’ in plenary. People often come to conferences to build relationships within their professional community. Designing interactive sharing and learning into your conferences helps in building these relationships whilst also engaging with the conference subject matter and it is possible – even for very large groups.

With conferences often costing millions to stage, taking years to plan and involving large teams of organisers and facilitators (take the World Water Forum as an example – drawing more than 30,000 people!), meeting the learning, sharing and networking needs of participants is a must.

Many large conferences can seem formulaic, anonymous and unambitious. This is a missed opportunity when these events have an attentive audience of thousands of experts. Imagine what you can do with that amount of knowledge and enthusiasm – it’s an incredible resource to harness!

There are many tools and techniques that allow participants to provide genuine input and learn and share something useful, rather than listen to a long series of plenary presentations. Let them brainstorm, learn directly from their peers and be creative. The first step is to identify the results or impact you want from your event, and work back to select the best tools.

Flexibility is key. In large-scale events, people often choose what to attend from a variety of sessions in parallel (or they may choose to just have a coffee with a new contact), so you never know how many people will turn up to your sessions. You need to design each session of your event so you can scale up, or down, as needed.

There will always be speakers. But keynotes, plenary presentations and traditional panel formats can be made more interactive and stimulating by tools such as open space technology, ‘open mike’ time, TED-like talks on stage, as well as interactive audience-polling and Q&A tools.

In our last newsletter Brian McKenna described the Reproductive Healthy Supplies Coalition conference with 250 participants, which Bright Green Learning helped to design. Together we designed a programme that combined a formal agenda with creative tools that engaged participants with some great results, and closed with a moving summary by a performance poet!

We’re happy to be launching a new module on designing interactive workshops at large conferences on 6 March. We’ll be looking at what works well with really large groups, what to do when too many people want to speak at plenary, how to solve problems on site and adapt to the unpredictable. Why not join us!

Read more…

Rural spring landscape with dirt road

You just finished your exciting learning workshop, the walls are plastered with carefully completed templates, there is a stack of A3 sheets from group work, a pile of cards that captured individual reflections to salient questions, e-templates were filled in. Learning was captured, key messages identified, ideas prioritized. Lots of learning and exchange filled the hours of the workshop, the artefacts demonstrate this and they are in your hands…

The question now is, what can you do with it? Read more

Brian McKenna, Deputy Director, Reproductive Health Supplies Coalition (RHSC)Brian McKenna, Deputy Director, Reproductive Health Supplies Coalition (RHSC)

In October, the RHSC held its 17th General Membership Meeting in Seattle for 330 participants from 43 countries. Evaluations from last year’s meeting told us participants wanted a more interactive event with more technical sessions and opportunities for discussion. We needed to be innovative – to get people to think differently.

So this year…

Participants were given workbooks that included questions to guide discussions at each session. This proved effective in getting people talking about the topic at hand.

We introduced variety to the agenda: A ‘learning café’ in which participants were able to choose from 20 different moderated discussions, focused on reducing stock-outs.  Participants were divided into groups around picnic blankets during lunch one day to discuss in a more informal setting how we could better work with and for youth.

A graphic artist recorded the discussions in words and images, and to conclude the meeting, we hired a ‘performance poet’ to capture the essence of the event in poetry. This injected some passion into what is essentially a technical meeting.

As one of the key attractions of these annual events is the opportunity to network, specially designated spaces were set up just for ad hoc conversations and meetings.

Overall we managed to combine a formal agenda with some creative tools that helped engage participants. It wasn’t perfect of course, but this year’s evaluations tell us that these innovations were well worth the effort.

For the meeting’s videos, presentations and photographs, please visit the web page.

www.rhsupplies.org

As event hosts and organisers do you focus all your energy on designing the official programme? If so, you’re missing out. Workshops large or small offer plenty of opportunity to network ‘around the edges’ of formal sessions – during coffee breaks, meal times or waiting for sessions to start. Think how many people pass each other in hallways on their way to the next event or stand silent in food queues – so many missed opportunities!

Workshop ‘downtimes’ are ideal moments to network and learn something through activities such as info-rich treasure hunts, quizzes or demos. There are so many clever ways to encourage interaction from the simplest of tools to sophisticated team-building exercises.

Why not try these for starters?

Do you speak X?
Encourage people to get to know each other by advertising the languages they speak using badges. This works well for very large groups; you can produce hundreds of badges with key languages printed on them and a few blank ones for lesser-known languages or dialects. It’s a great way to kick-start conversations. Find out more.

Talk to me…
Use large name tags that have participants’ photo, title and home location, and a line ‘talk to me about’ with three words of their choice. A fun way to break the ice and get some interesting conversations flowing.

Fortune cookies with a twist
Place brightly wrapped fortune cookies on the tables during breaks. Instead of a fortune, write a starter question to get conversations going with the new people you have joined.

Picnic time
Avoid the awkwardness of finding someone to sit next to at mealtimes by offering a picnic. For a group of say 30 people, provide five picnic baskets and tell people to divide up and find a comfortable spot to eat, preferably outdoors. Ideal in the summer but it also works indoors!

Let us know if you’ve tried other ideas, we’d love to hear about them.

Read more…

Think again what’s going on around the talks – sensory delights offered by the experts at TED global

You are speaking, facilitating, moderating, or MCing at a BIG event.

You are in front of dozens, hundreds, a thousand people, and you are introducing people with big names and long titles.

The lights are bright, the video camera rolling, surrounded by a buzzing room full of eager participants. Can you remember all those names, important titles, their honours and awards, and in the right sequence up there on stage?

You need some notes! But you don’t want to hold those crinkly printed white papers, or a handful of index cards that might accidentally flutter down to the floor like snowflakes, mixing themselves gleefully all around your feet.

Here’s an easy DIY craft for the holidays (she said only partly kidding, because when you really need them you might not have the time or patience to make them, or the right materials, so think ahead!)

You need just a few simple supplies:

Materials:

  • Rectangular facilitation cards in the color of your choice – maybe a different colour every day, one that matches your clothes, or the branding of the event?
  • White paper to cut to size.
  • Scissors
  • Glue stick
  • Hole punch
  • Pen
  • Ring (that opens, I bought a pack of these in an office store)
Make your cards: 
  1. Cut the papers to size so they fit into the middle of the card and don’t leave too much extra space, but a nice frame (remember people will see this in your hands).
  2. With the glue stick, stick the white paper on the card on one side (leave the back blank OR put your logo or the event logo on the back.) I think a plain colour back looks less fussy.
  3. Punch a hole in the upper left hand corner – try to put the hole in the same place for every card so they aren’t uneven in your hands.
  4. Put the ring through. Click!
  5. Number the cards (still helpful so you know where you are.)
  6. Write your notes on one side of each of the cards.
  7. Feel happy that your notes look good, they won’t get out of order, and you will remember everything to make things run smoothly and give you peace of mind!

Happy Holidays and Happy Facilitating from Bright Green Learning!!

You have received an invitation to fly to another continent to deliver a one-hour training presentation within the context of a longer, carefully designed workshop, on an important subject that you know a great deal about.

You are a Parachuted Presenter, dropping in to share some wisdom that can be helpful, hopefully, to the group as they go forward with their project, programme or task.

Here is the Parachuted Presenter’s Promise – Please sign on the dotted line:

I will…

  • Be available in the weeks and days before hand to skype or connect with the organizers about my session.
  • Ask questions and inform myself about the wider agenda so that I can connect my content most effectively to what is going on and the specific objectives of the programme.
  • Send in my materials and equipment needs and any PPT or other presentation materials well in advance (and double check that they have been received). (Corollary: I will not send them in the morning of my session to someone who is in the session and won’t see them until the moment I go on.)
  • Come into the session before mine to listen in, get to know the participants a little, see how I can best connect my content to the overall discussion, and get a feel for the tone of the workshop.
  • Take a moment to talk to the main session facilitator to see, from her perspective and understanding of the overall flow, how I can best connect my content to what is going on around it.
  • Check in with the main facilitator prior to my session to see if timing has changed at all, whether it has shifted to another time, or changed in terms of length as I know that my intervention is connected to everything else that is going on in the workshop. I will be flexible.
  • Tell the main session facilitator how to introduce me and frame my intervention (if I have not been able to do that in advance.)
  • Come in early to see if the room is set up in the way I would like it, and check that my presentation materials have been loaded and tested.
  • Bring my own specialised materials if I need them.
  • Keep track of time during my session, and stay within my allocated time. I know that I am not the only presenter and that time is a common pool resource that we have to manage together, even if I have flown in from 3791 miles away.
Signed ______________________________ (Parachuted Presenter)
As the main session facilitator, I thank you very much for your understanding. I am doing a million other things and I really appreciate that you have checked your assumptions about what is and isn’t and that you take full responsibility for the success of your session, so that we all can be happy about contributing to a great meeting.
(…and when I am a Parachuted Presenter, I will do the same!)